ServiceNow Integration
Connect a ServiceNow instance so Escape can create incidents from issues, attach request evidence, and keep each incident's state in sync with its Escape issue.
Workflow Required for Incident Creation
A workflow must include a ServiceNow export action before Escape can create incidents. After you connect the integration, create a workflow with that export action.
Configuration
Create the Escape Role
Escape reads and updates incidents with the permissions of a ServiceNow user. That user needs the permissions of a role named escape_integration. Create it in ServiceNow and add these roles to it:
| Role | Why Escape needs it |
|---|---|
itil |
Read, create, and update incidents |
personalize_choices |
List incident choices (states, categories, subcategories, close codes) for the action form and status sync |
sn_sec_core.read_dictionary |
List incident fields, including custom u_* fields, for field mappings |
Without personalize_choices and sn_sec_core.read_dictionary, the Category, Subcategory, and field dropdowns of the action form fail with HTTP 403.
Use ACLs Instead of Roles
personalize_choices also lets the user create, edit, and delete choice list entries. If you'd rather grant read-only access, or your instance doesn't have one of these roles, replace personalize_choices or sn_sec_core.read_dictionary with read ACLs. Keep itil in every case: Escape needs it to create and update incidents.
-
Elevate to
security_admin. -
Go to System Security > Access Control (ACL) > New.
-
Set type
record, operationread, and required roleescape_integration. -
Create the ACLs that replace the missing role:
Instead of Create personalize_choicesOne read ACL on sys_choice, field*sn_sec_core.read_dictionaryTwo read ACLs on sys_dictionary: one with field-- None --, one with field*
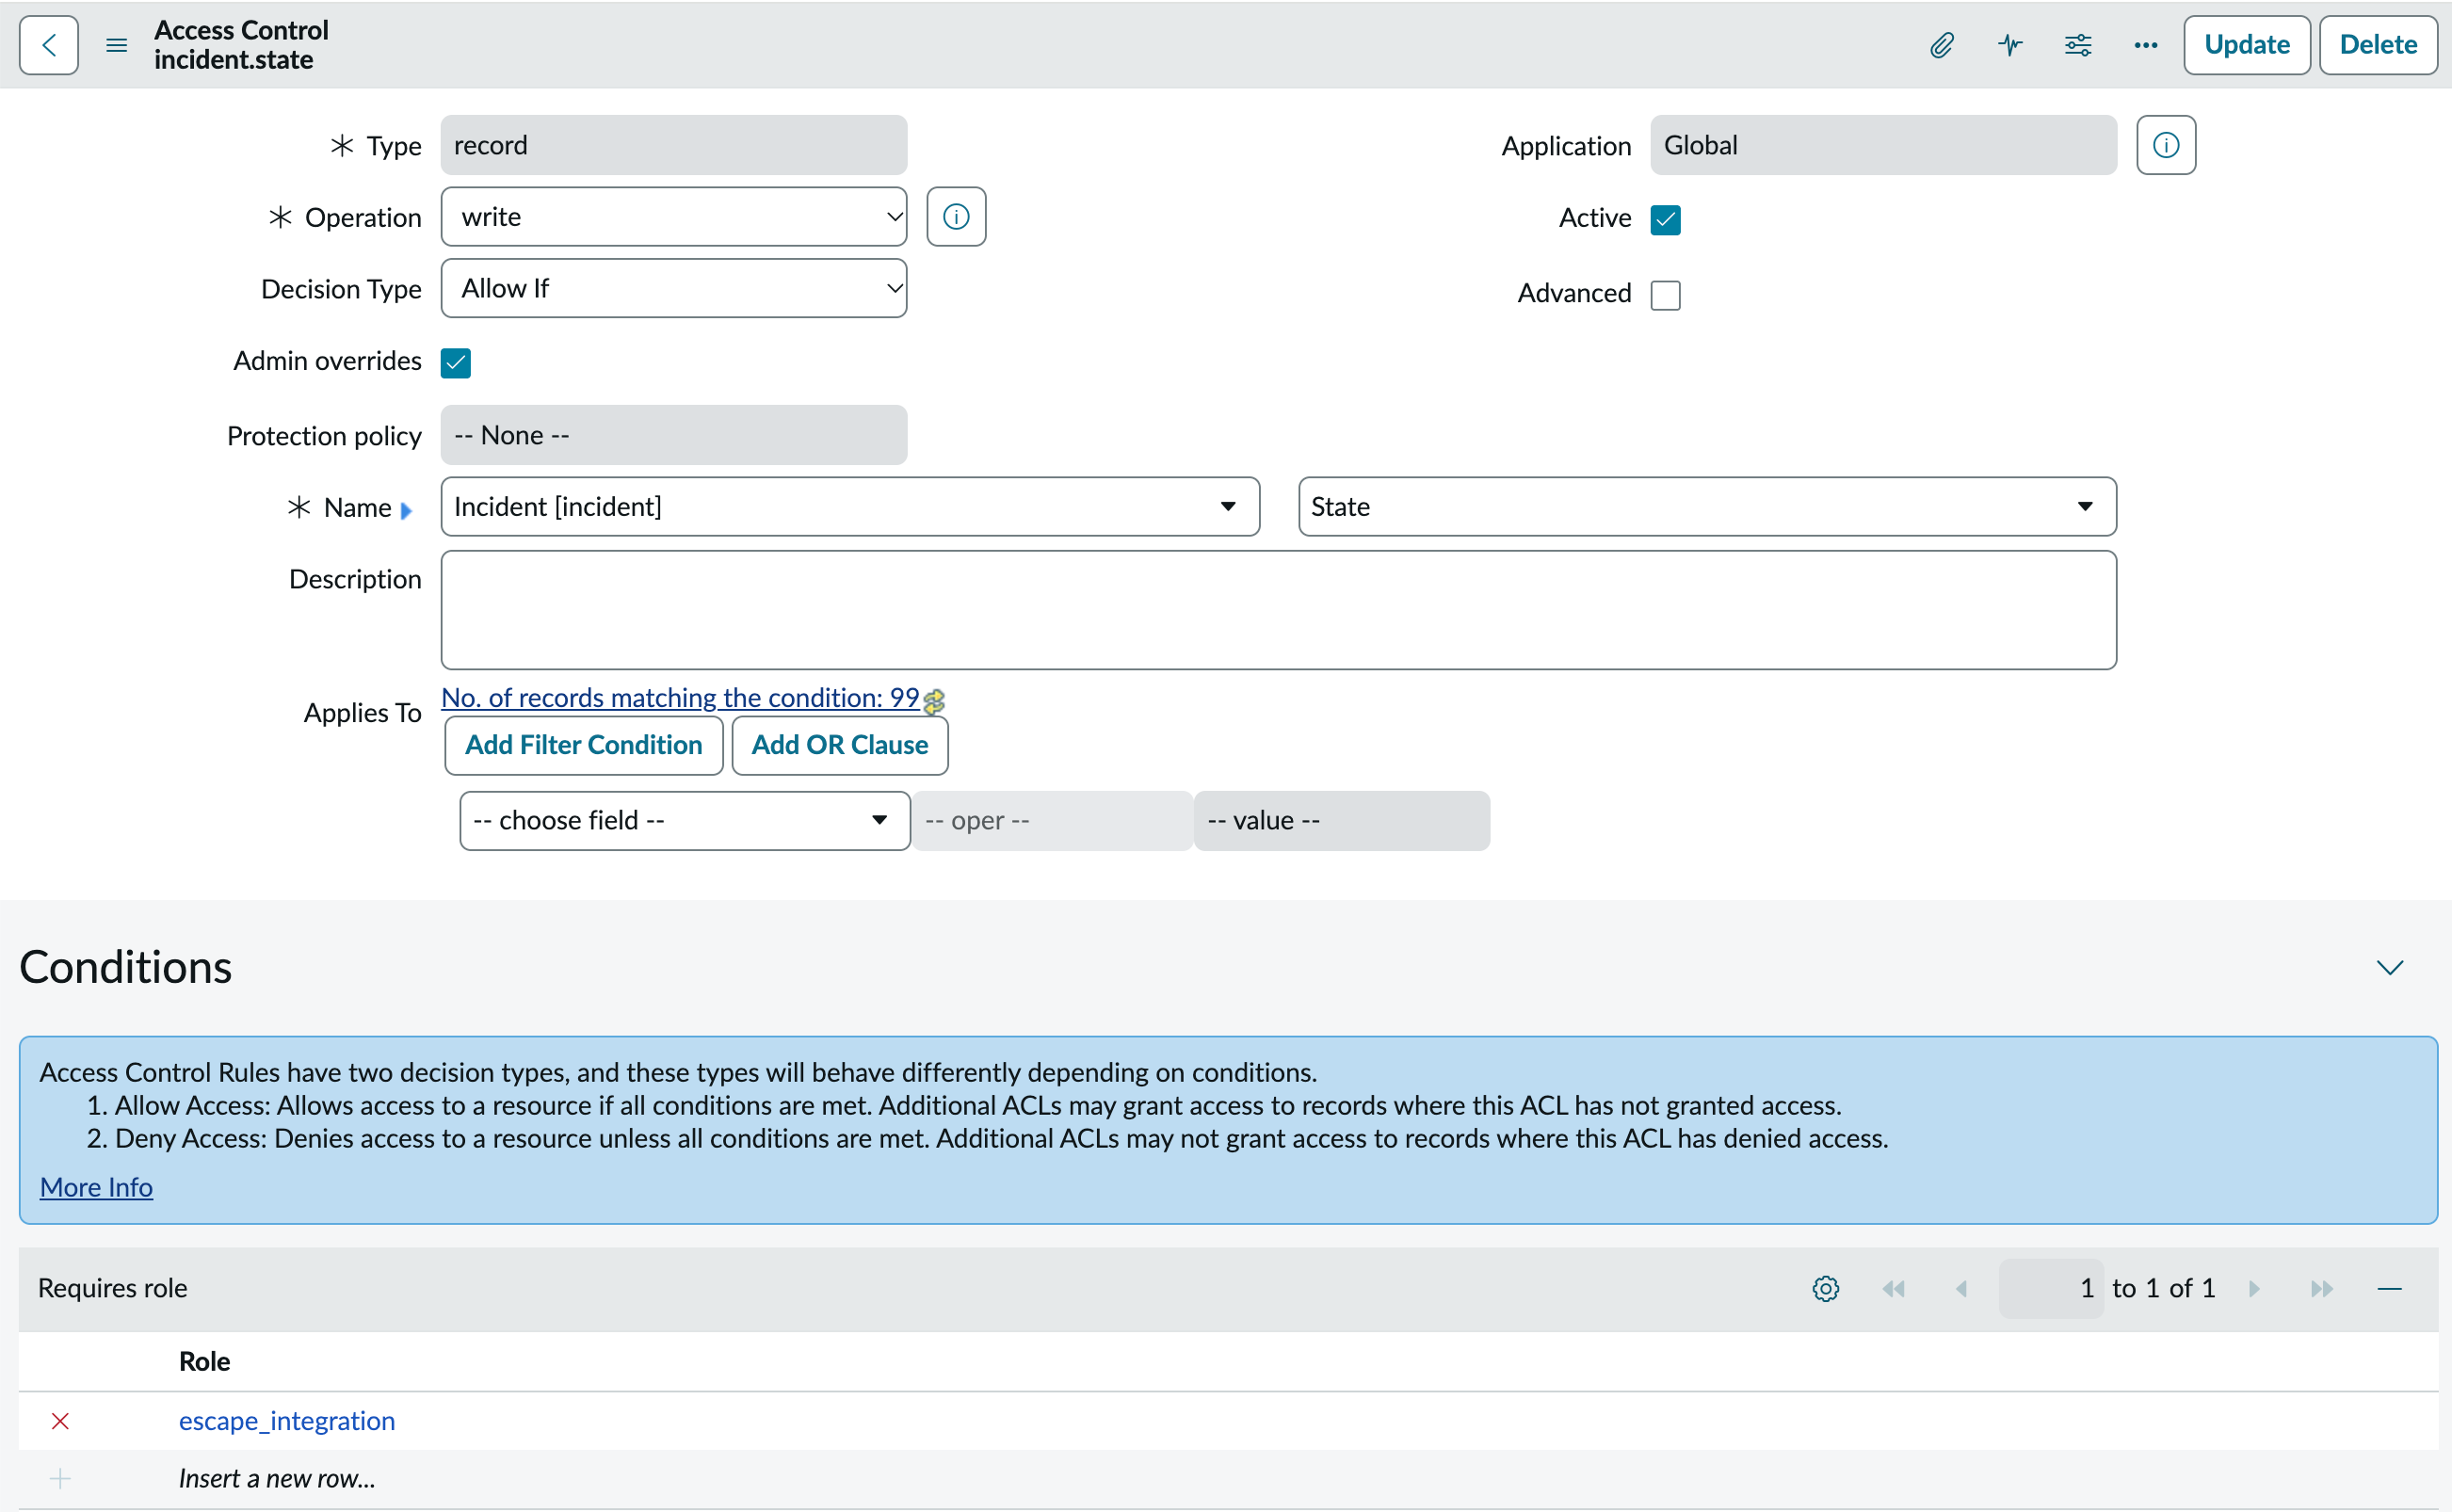
Allow Reopening Closed and Canceled Incidents (Optional)
Escape reopens an incident when its issue opens again, for example when a scan finds a resolved issue again or someone reopens it in Escape. That's often after the incident is closed: by default, ServiceNow closes Resolved incidents automatically after 7 days, and False positive or Ignored issues cancel their incident.
ServiceNow's built-in ACLs don't let itil users change a Closed or Canceled incident. Without the two ACLs below, the reopen fails with HTTP 403: the issue is open in Escape while its incident stays closed. Skip this step if you don't need incidents to reopen.
- Elevate to
security_admin. - Go to System Security > Access Control (ACL) > New.
- Create a first ACL: type
record, operationwrite, tableincident, field-- None --, required roleescape_integration. - Create a second ACL: type
record, operationwrite, tableincident, fieldState, required roleescape_integration.
You need both. With the first one alone, ServiceNow accepts the update but keeps the old state.
Choose an Authentication Method
Pick one of these methods:
| Method | What you set up in ServiceNow | Escape acts as |
|---|---|---|
| Basic auth | A user with a password | That user |
| API key | A user and a REST API key | The user the key belongs to |
| OAuth | An OAuth application | The user who authorizes it |
In every case, that user needs the escape_integration role.
API Key, OAuth, and REST API Access Policies
ServiceNow uses REST API Access Policies to decide which authentication methods can call an API. A policy only accepts the methods it lists.
For API key and OAuth, you add your method to the policies of the Table API and the Attachment API. Once those policies exist, they also apply to Basic auth: if you use Basic auth, or another tool does, keep its profile listed too. Any method missing from the list fails with HTTP 401.
Basic Auth
- Create a user for Escape, for example
escape.integration, and check Internal Integration User. - Grant it the
escape_integrationrole. - Set a password.
API Key
The steps below follow ServiceNow's Inbound REST API keys guide. They need the API Key and HMAC Authentication plugin and the admin role.
-
Create a user with the
escape_integrationrole, as in steps 1 and 2 of Basic Auth. -
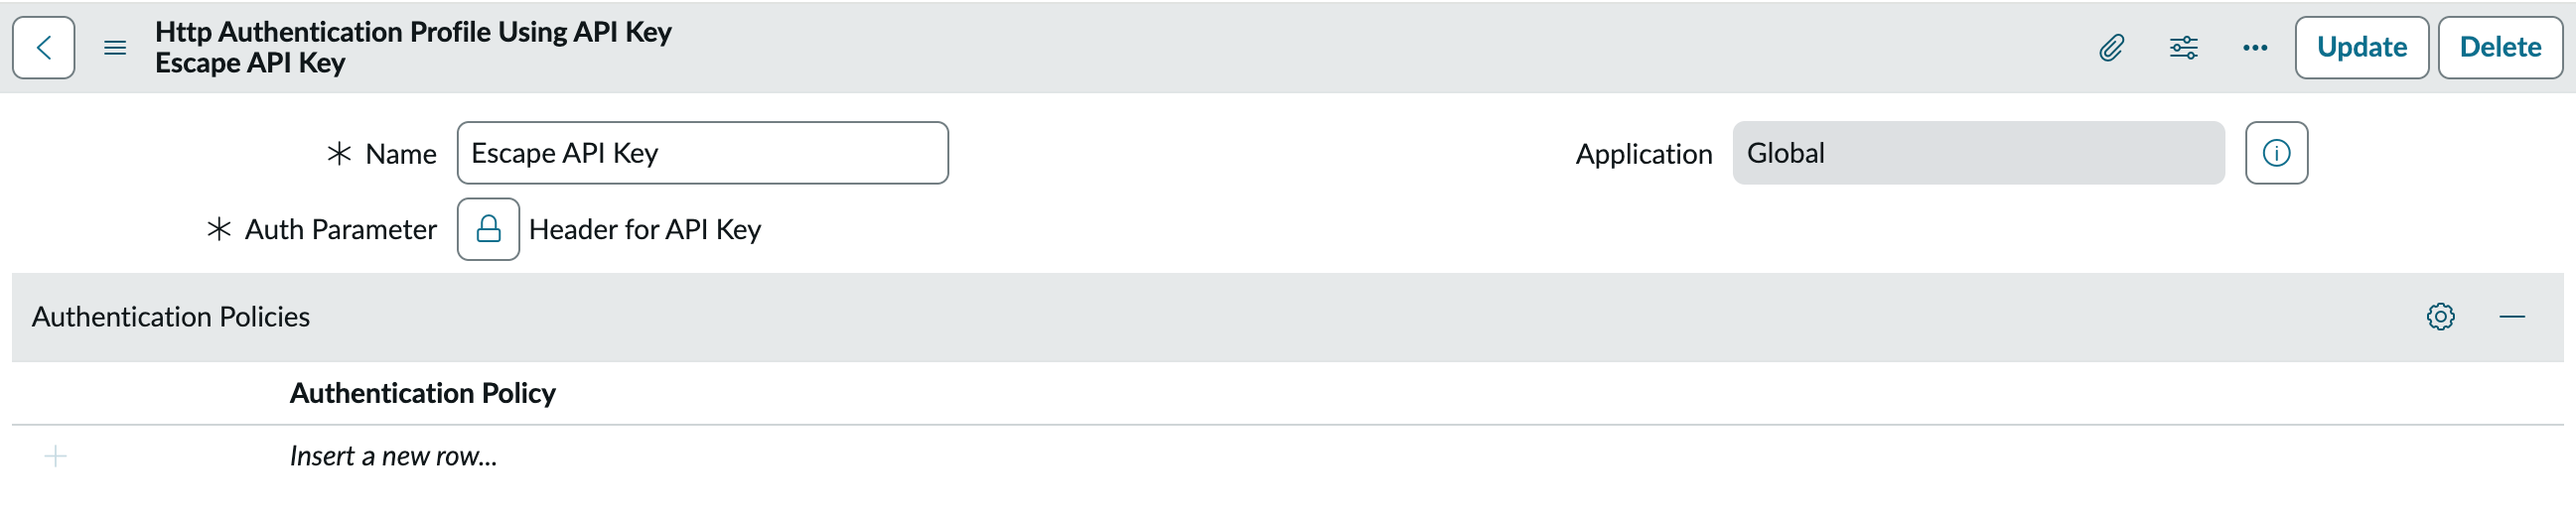
Create an authentication profile for API keys:
- Go to All > System Web Services > API Access Policies > Inbound Authentication Profile, and click New.
- Click Create API Key authentication profiles.
- Set a Name, and set Auth Parameter to Header for API Key (the
x-sn-apikeyheader). - Click Submit.
-
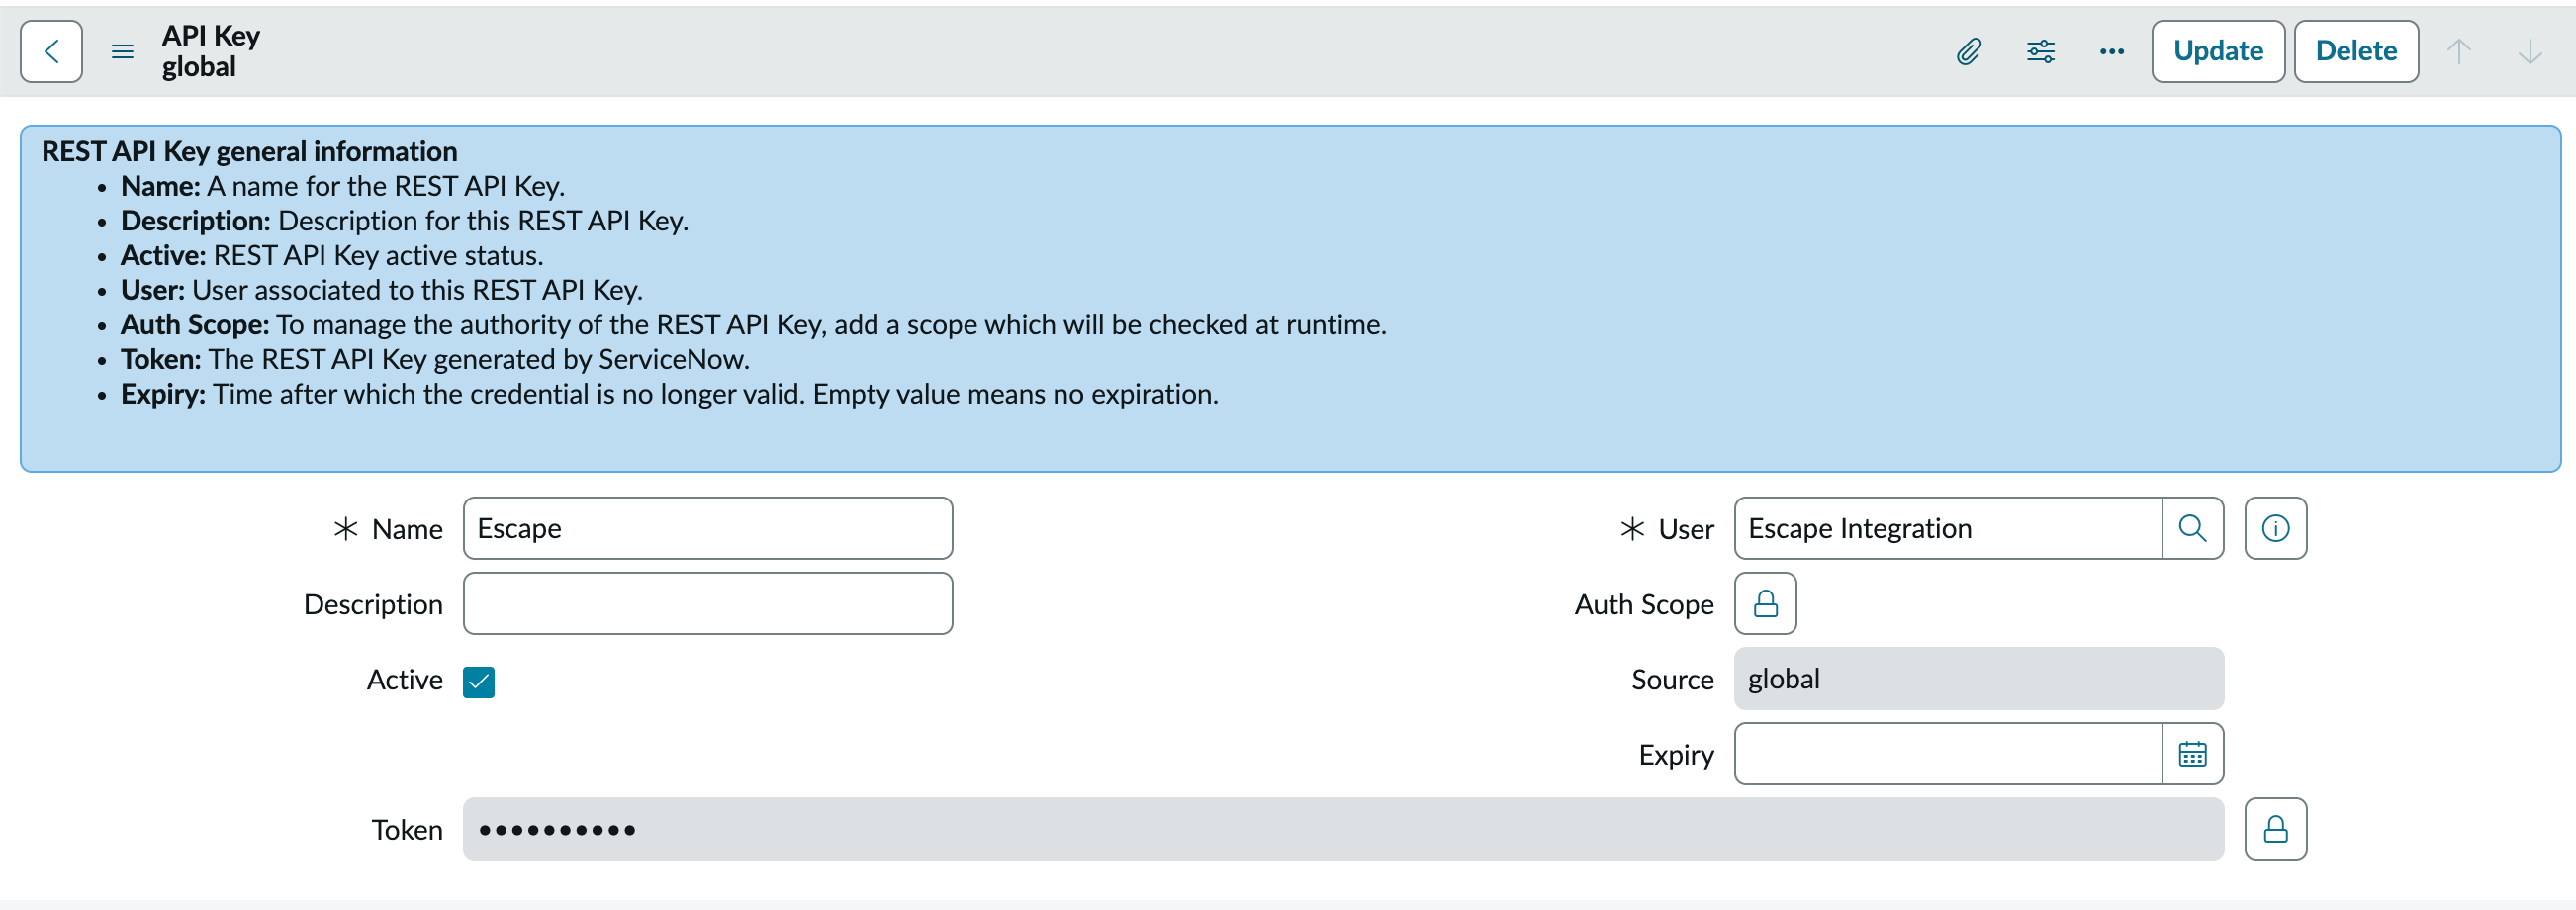
Create the API key:
- Go to All > System Web Services > API Access Policies > REST API Key, and click New.
- Set a Name, and set User to the user from step 1.
- Save the record. ServiceNow generates the key in the Token field.
- Click the lock icon next to Token, and copy the key.
-
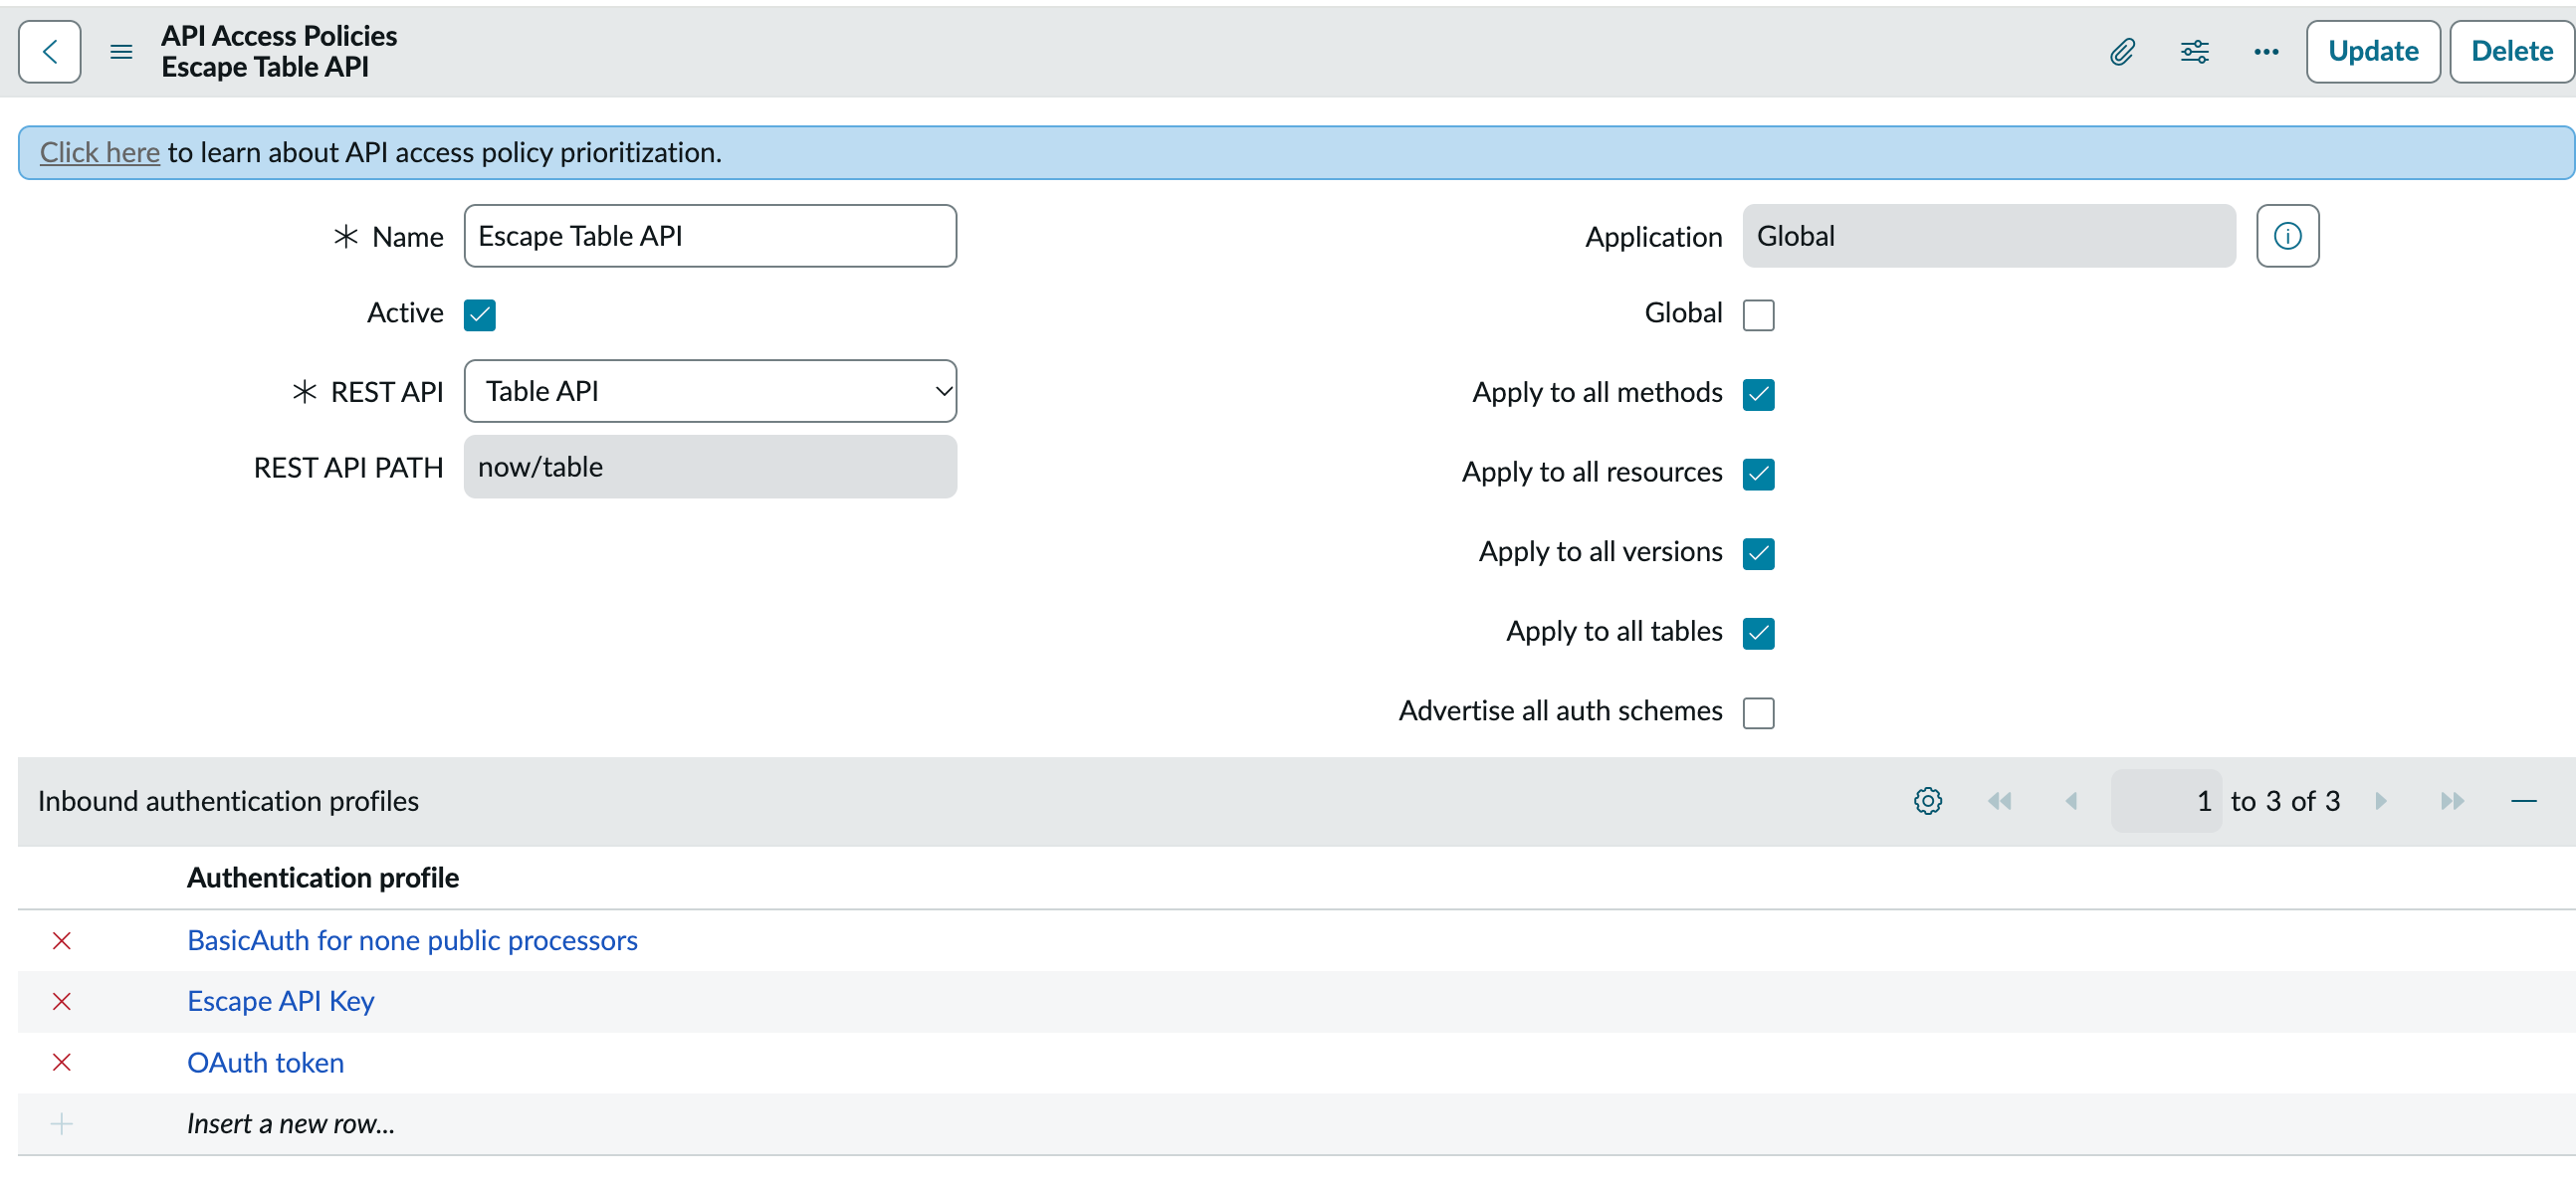
Allow the profile on the Table API:
- Go to All > System Web Services > API Access Policies > REST API Access Policies.
- Open the policy of the Table API, or click New and set REST API to Table API if there's none.
- In the Inbound authentication profiles list at the bottom of the form, click Insert a new row... and pick the profile from step 2. Keep the profiles already listed. For a new policy, also add the profiles your other tools use, for example BasicAuth for none public processors for Basic auth, or they get HTTP 401.
- Click Update, or Submit for a new policy.
-
Repeat step 4 for the Attachment API.
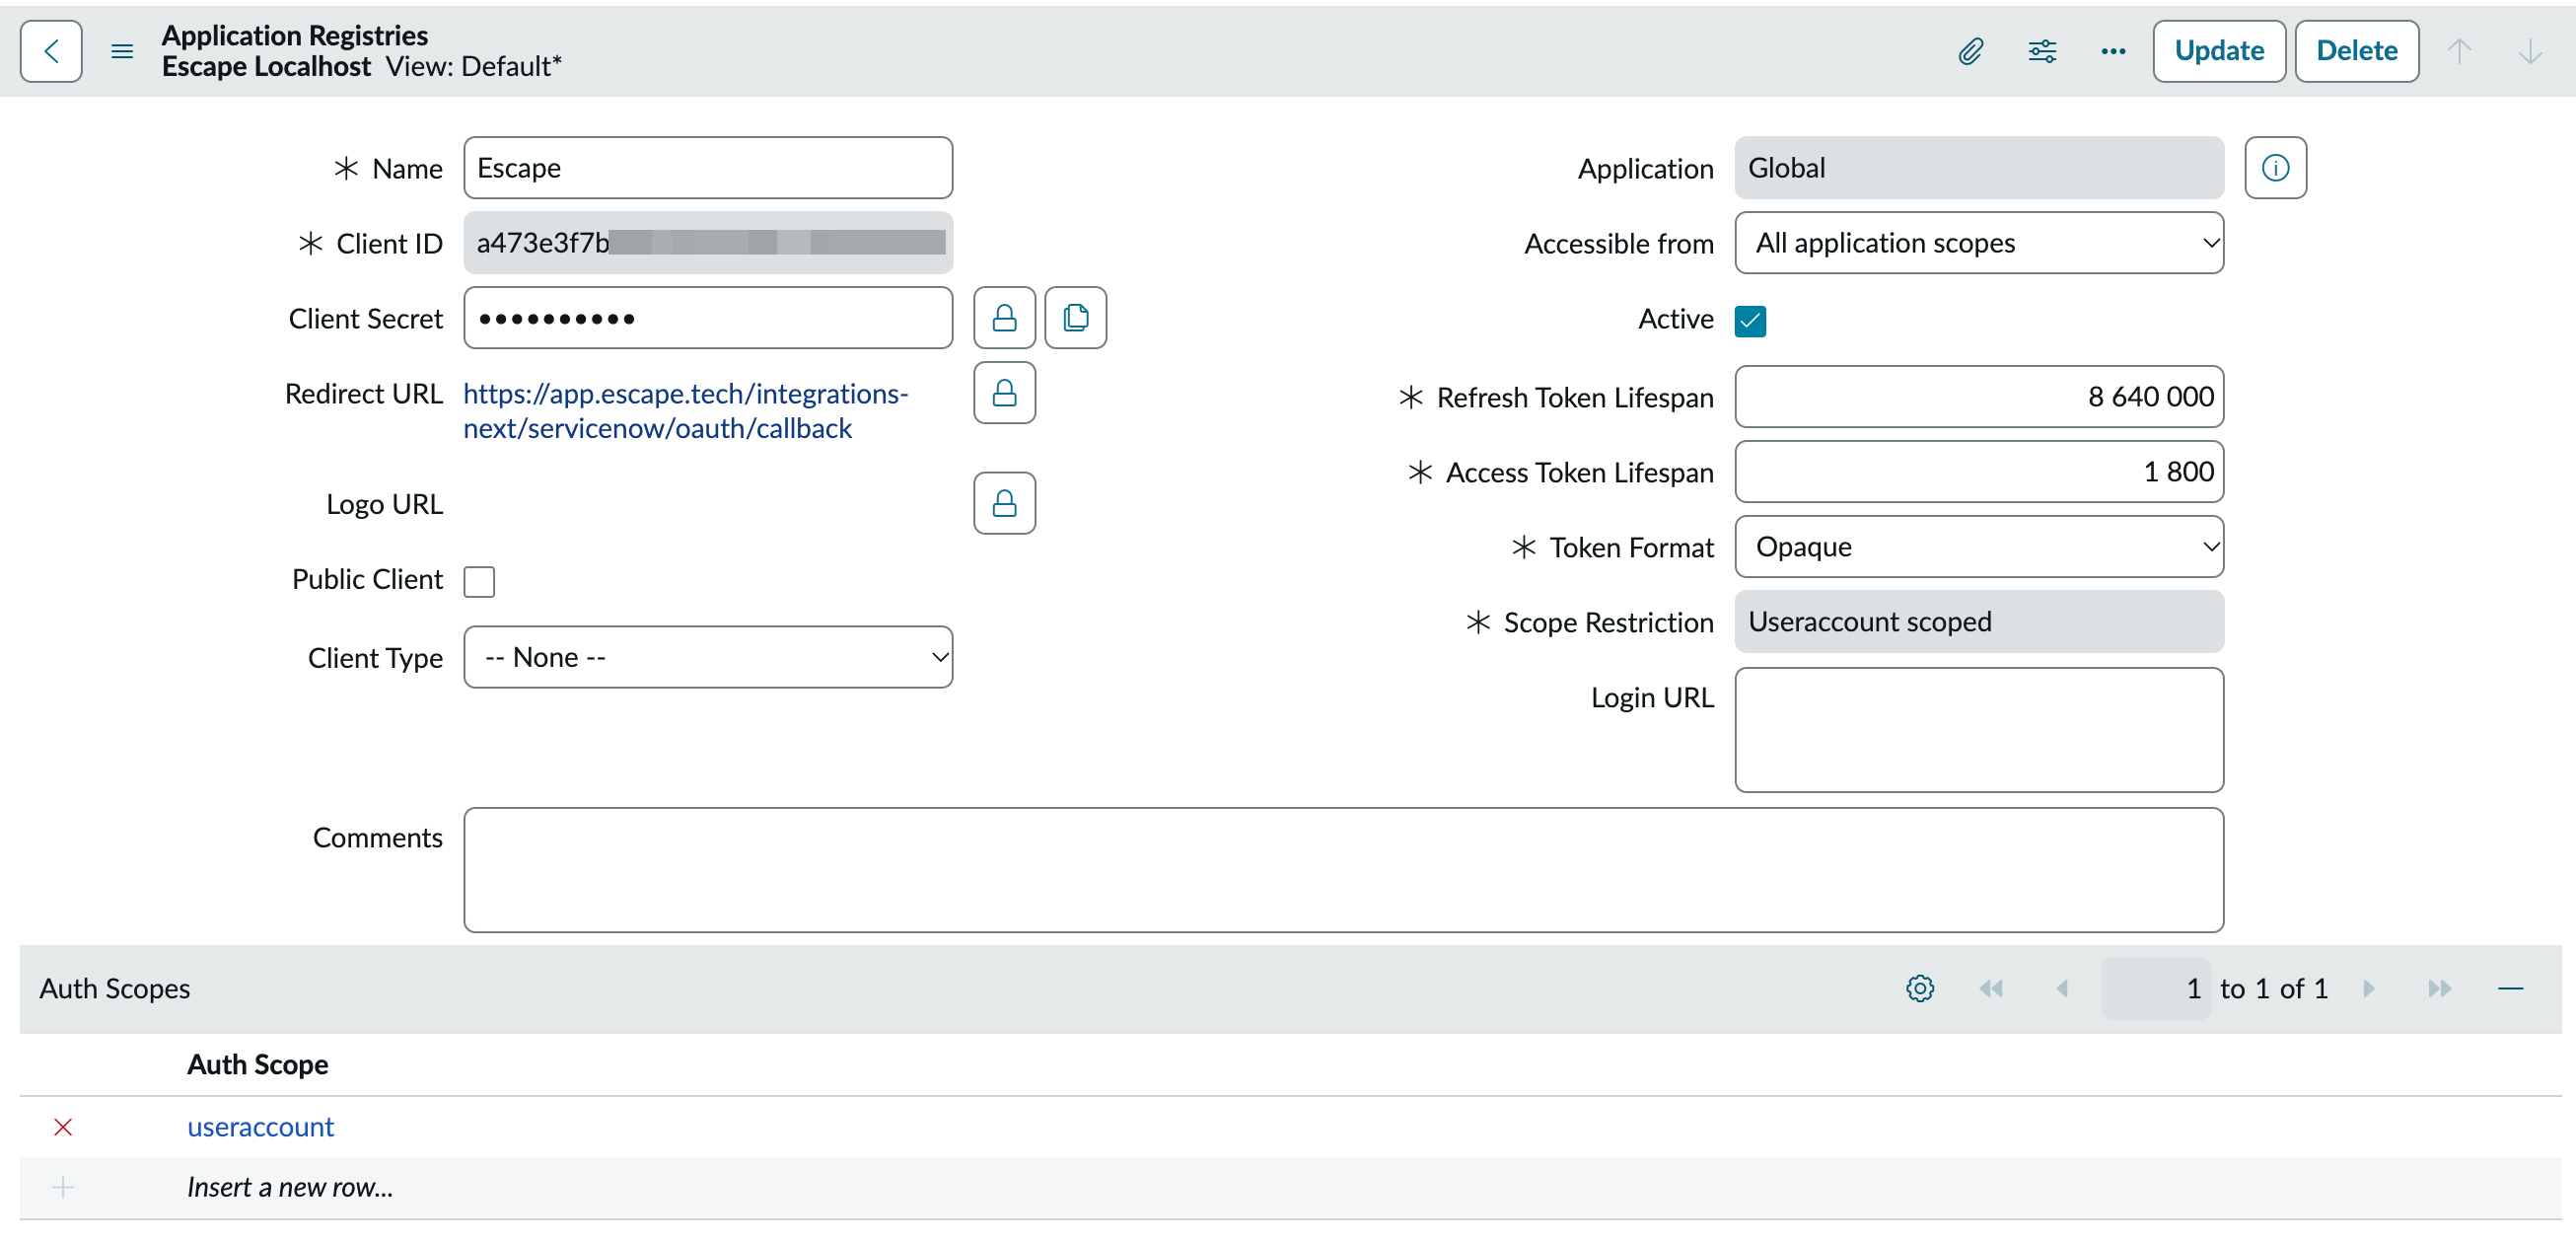
OAuth
Escape uses the OAuth 2.0 authorization code flow with the useraccount scope, so it acts as the user who authorizes it. That user needs the escape_integration role.
-
Go to System OAuth > Application Registry > New, and pick Create an OAuth API endpoint for external clients.
-
Set Redirect URL to:
-
Add the
useraccountauth scope, and leave Public Client unchecked. -
Save, then copy the Client ID and Client Secret.
-
In All > System Web Services > API Access Policies > REST API Access Policies, add the OAuth token authentication profile to the policies of the Table API and the Attachment API, like step 4 of API Key.
Create a ServiceNow Integration
-
Go to the Integrations page from the left navigation menu.
-
Click the ServiceNow card in the Ticketing section.
-
Click + Create new integration.
-
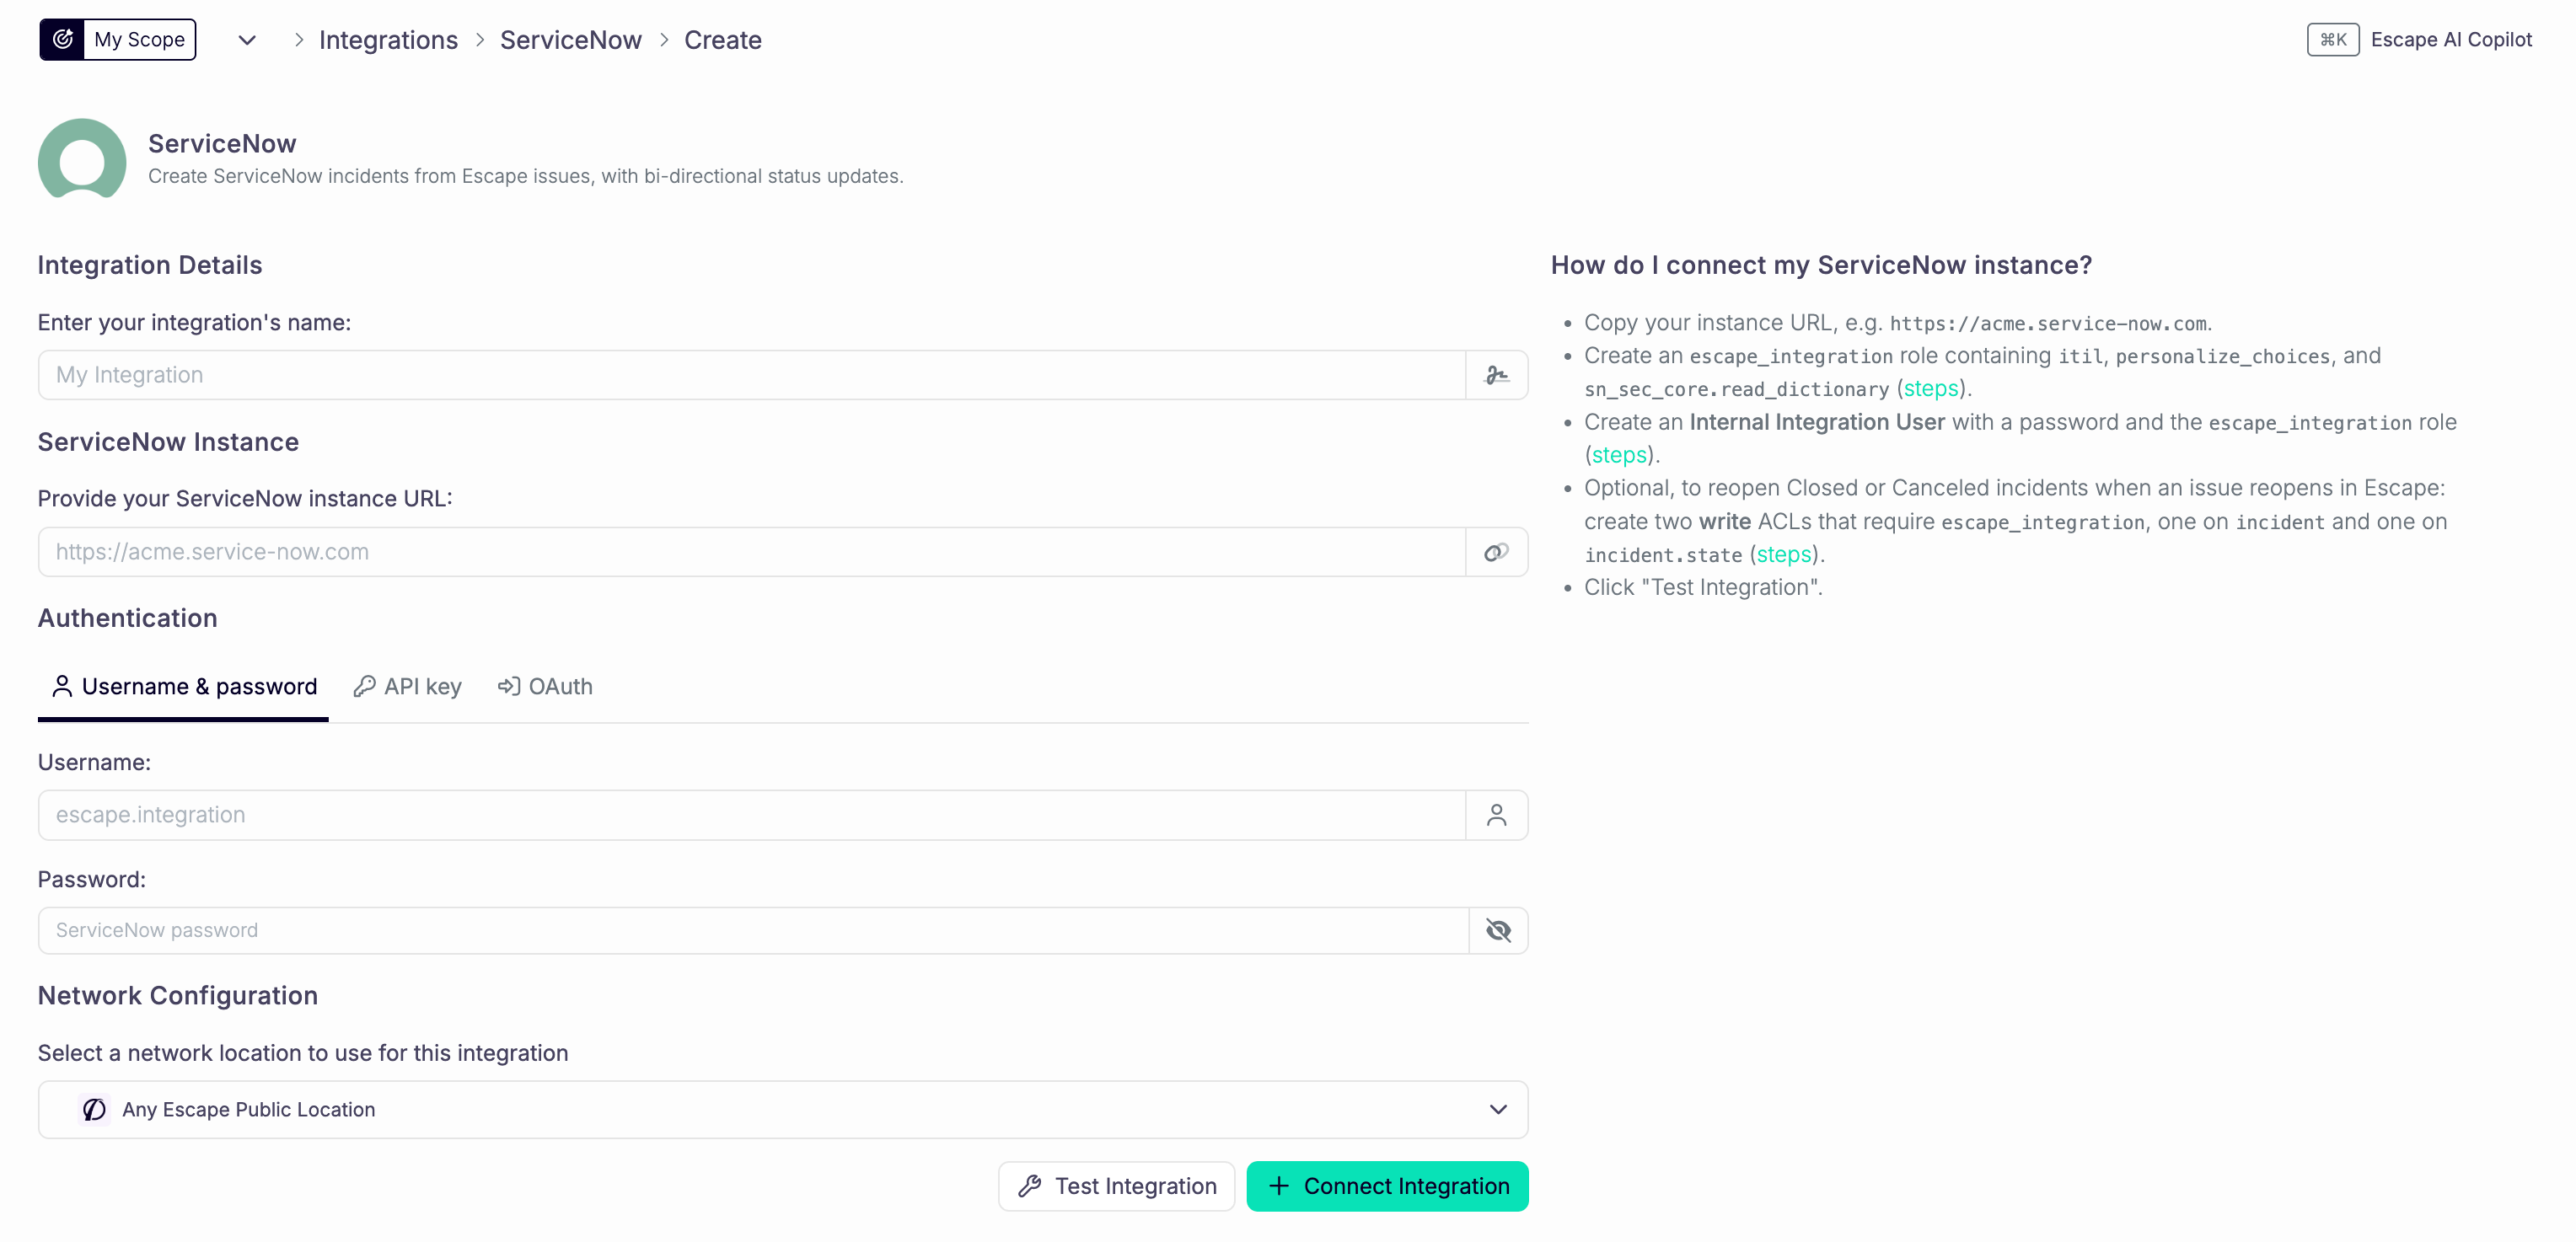
Fill in the form based on your authentication method:
- Name: a name to identify this integration
- Instance URL: your ServiceNow URL, for example
https://acme.service-now.com
For Basic auth:
- Username: the user ID, for example
escape.integration - Password: its password
For API key:
- API key: the key from the Token field
For OAuth:
- Client ID and Client secret: from the OAuth application
-
Under Network Configuration, pick the location Escape should use to reach ServiceNow. Use a private location when the instance isn't reachable from the public internet.
-
For Basic auth and API key: click Test Integration, then Connect Integration.
-
For OAuth:
- Click Connect Integration to save the integration.
- In its Settings tab, click Authorize, then sign in to ServiceNow as the user Escape should act as, and allow access.
- Click Test Integration.
If the authorization expires or is revoked, click Authorize again.
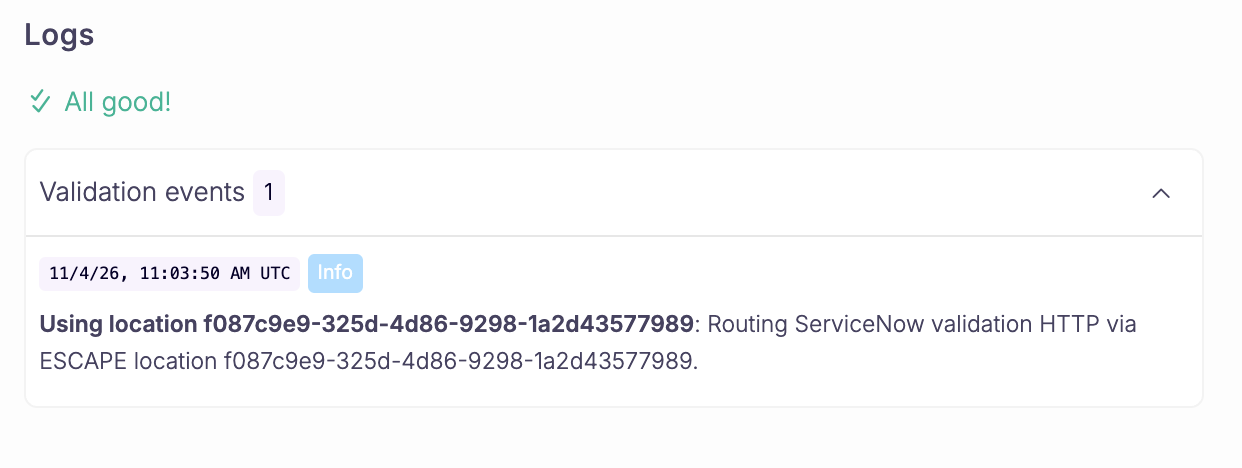
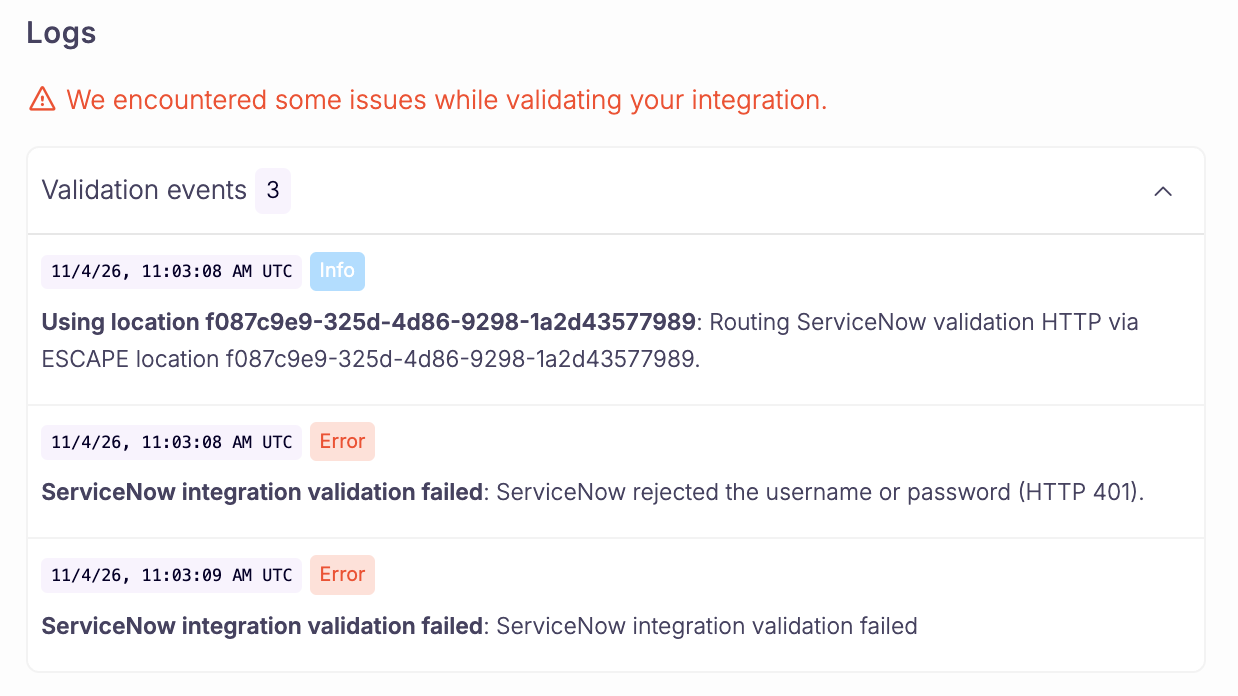
Test Integration checks whether the Table API accepts an incident list request. It does not confirm that the user can see incident records or create and update them. Check the validation logs to see the results.
| When Validation Succeeds | When Validation Fails | |
|---|---|---|
 |
 |
|
| The logs show All good! | The logs show the error message. See the table below for what to check. |
| Error | What to check |
|---|---|
| Could not reach the ServiceNow instance | The instance URL, and the network location if the instance isn't public |
| Rejected the username or password (HTTP 401) | The username and password |
| Rejected the API key (HTTP 401) | The key is active, its user has the escape_integration role, and the Table API and Attachment API policies list its profile |
| Rejected the OAuth token (HTTP 401) | The Table API and Attachment API policies list the OAuth token profile, then Authorize again |
| Not allowed to ... (HTTP 403) | The roles in Create the Escape Role |
| Save the integration first, then click Authorize | For OAuth, save and authorize the integration before testing it |
Never share your password, API key, or client secret
Create dedicated credentials for Escape, and don't reuse them in other tools.
Edit a ServiceNow Integration
- Go to the Integrations page.
- Open the ServiceNow card.
- Click Edit next to the integration.
- Update the URL, credentials, or network location.
- For OAuth, click Authorize again if you need a new authorization.
- Save, then Test Integration.
You can't change the authentication method of a saved integration. To use another method, create a new integration.
Delete a ServiceNow Integration
- Go to the Integrations page.
- Open the ServiceNow card.
- Click Delete next to the integration.
Consequences of Deleting an Integration
Deleting the integration stops workflows that export with it, and you can no longer create incidents from those workflows or the Ticketing sidepanel using that connection.
Update or remove those workflows first, or create a replacement integration.
Using ServiceNow in Workflows
Add an Export action and select ServiceNow, then pick the integration.
| Trigger | What the export does |
|---|---|
| New Issue | Creates and links an incident |
| Manual | Creates and links an incident (used from the Ticketing sidepanel) |
| Issue Updated | Moves the linked incident to the state mapped from the Escape issue status |
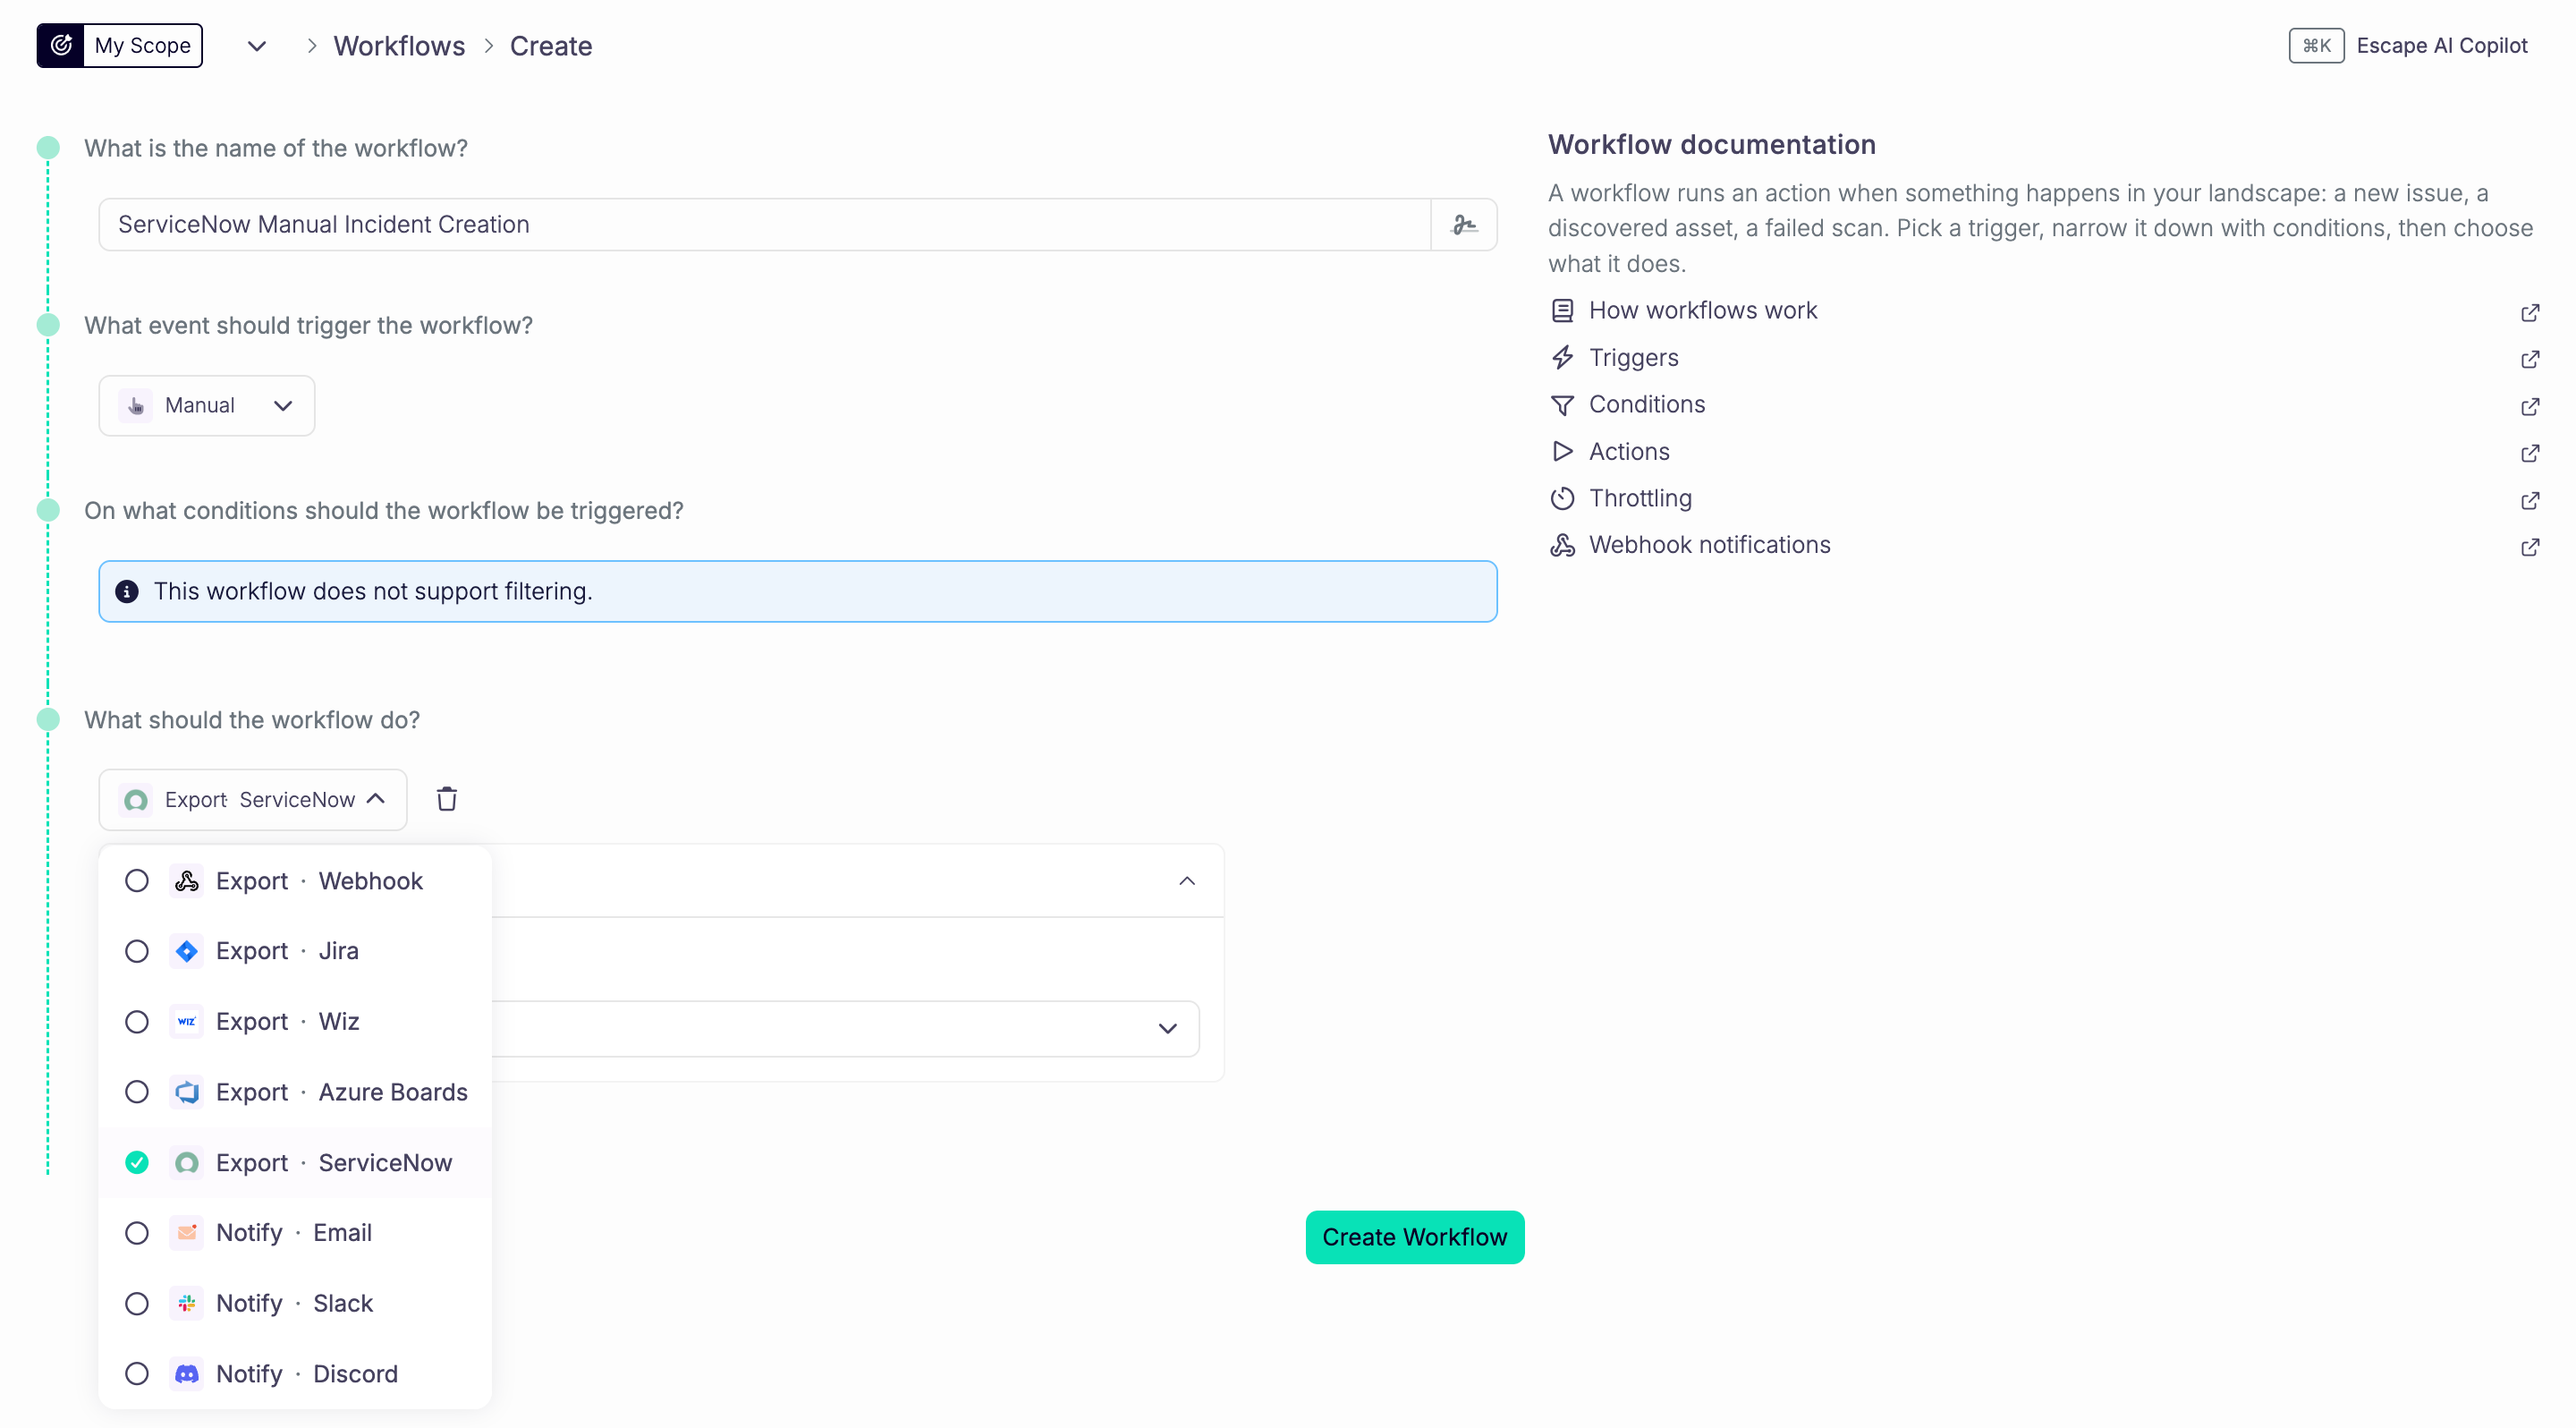
Incident Fields
Each dropdown lists the values of your instance. Fields left empty keep your instance defaults.
- Category and Subcategory: changing the category clears the subcategory.
- Assignment group
- Caller: when empty, the user Escape acts as. If Escape can't read that user's
sys_userrecord, incidents are created without a caller and the run logs a warning.
Default Values
Escape writes these fields on every new incident. They're set once at creation and never synced afterwards.
| Incident field | Value |
|---|---|
short_description |
[Escape] <issue name>, cut at 160 characters |
description |
Issue context and remediation, then View in Escape: <link> |
impact, urgency |
Derived from the severity, see below |
correlation_id |
escape:<issue id> |
correlation_display |
Escape |
ServiceNow has no severity on incidents: it computes priority from impact and urgency. Escape maps severity like this:
| Escape severity | impact |
urgency |
|---|---|---|
| Critical | 1 | 1 |
| High | 1 | 2 |
| Medium | 2 | 2 |
| Low | 3 | 2 |
| Info | 3 | 3 |
With the default priority lookup table, that gives priorities 1 to 5. A field mapping to impact or urgency replaces these values.
Escape also attaches the issue's evidence to the incident: each HTTP request and response is a JSON file named exchange-{id}.json. If an attachment fails, the run logs a warning and the incident is kept.
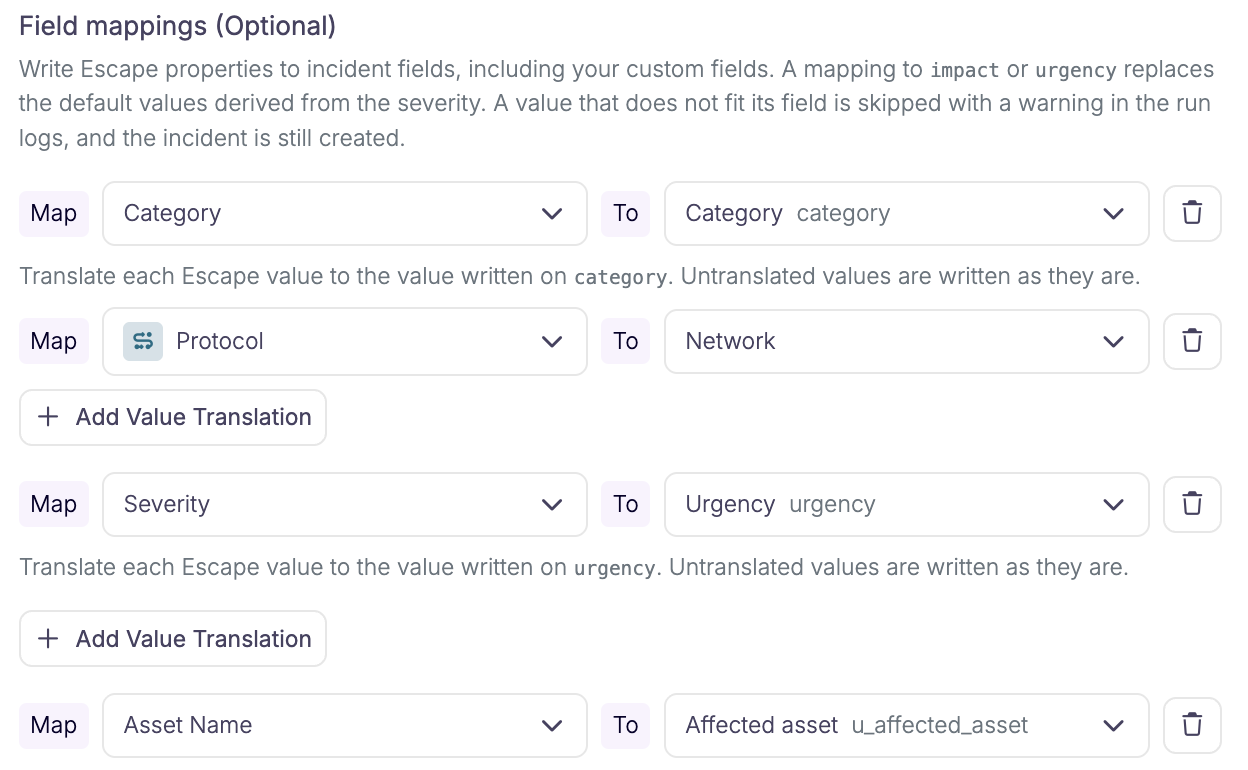
Field Mappings
Write Escape properties to any incident field from the instance dictionary, including custom u_* fields. These properties support option mapping (one Escape value to one ServiceNow choice): Severity, Category, Status, Asset Class, Asset Tags, Asset Type.
Available Escape properties:
Issue: Severity, Created At, Name, Category, Context, Status, Full Remediation, Targets, Link in All Issues, Link in Asset, Link in Scan, Link in Profile
Profile: Profile Name, Profile Scanner Kind
Asset: Asset Name, Asset URL, Asset Tags, Asset External URL, Asset Type, Asset Class
Custom rule: Custom Rule Name, Custom Rule Link
A value that doesn't fit its field is skipped with a warning in the run logs, and the incident is still created.
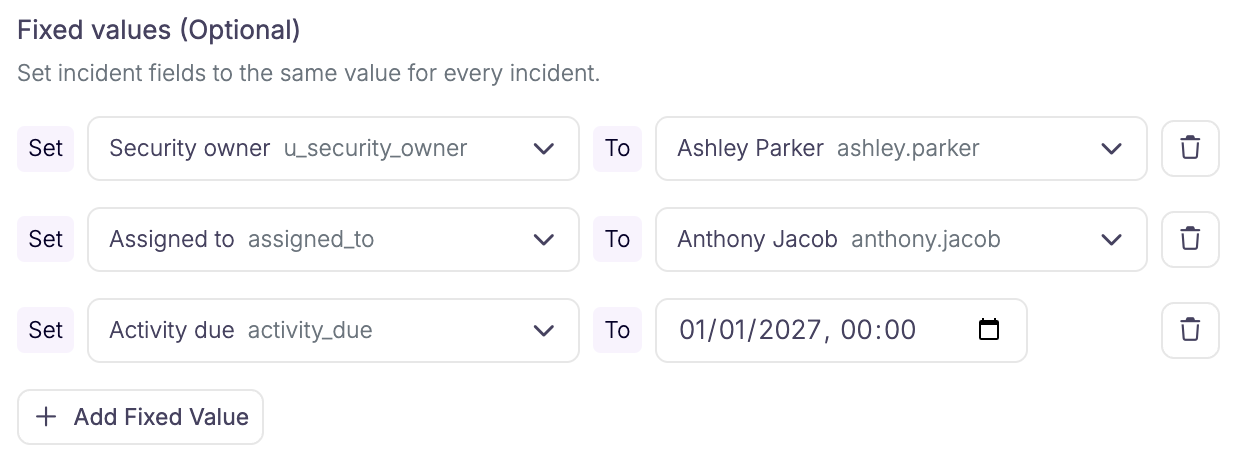
Fixed Values
Use fixed values for fields that should have the same value on every incident, whatever the issue. For example, set contact_type so every incident shows where it came from, or set a custom u_* field your team filters on.
Pick the incident field, then its value. How you enter the value depends on the field:
| Field type | Value input |
|---|---|
Choice field, for example contact_type |
A dropdown of the field's choices |
| Reference to a user or a group | A search by name |
| Reference to another table | The record's sys_id: in ServiceNow, open that table's list, right-click the record, then Copy sys_id |
| Any other field | Free text |
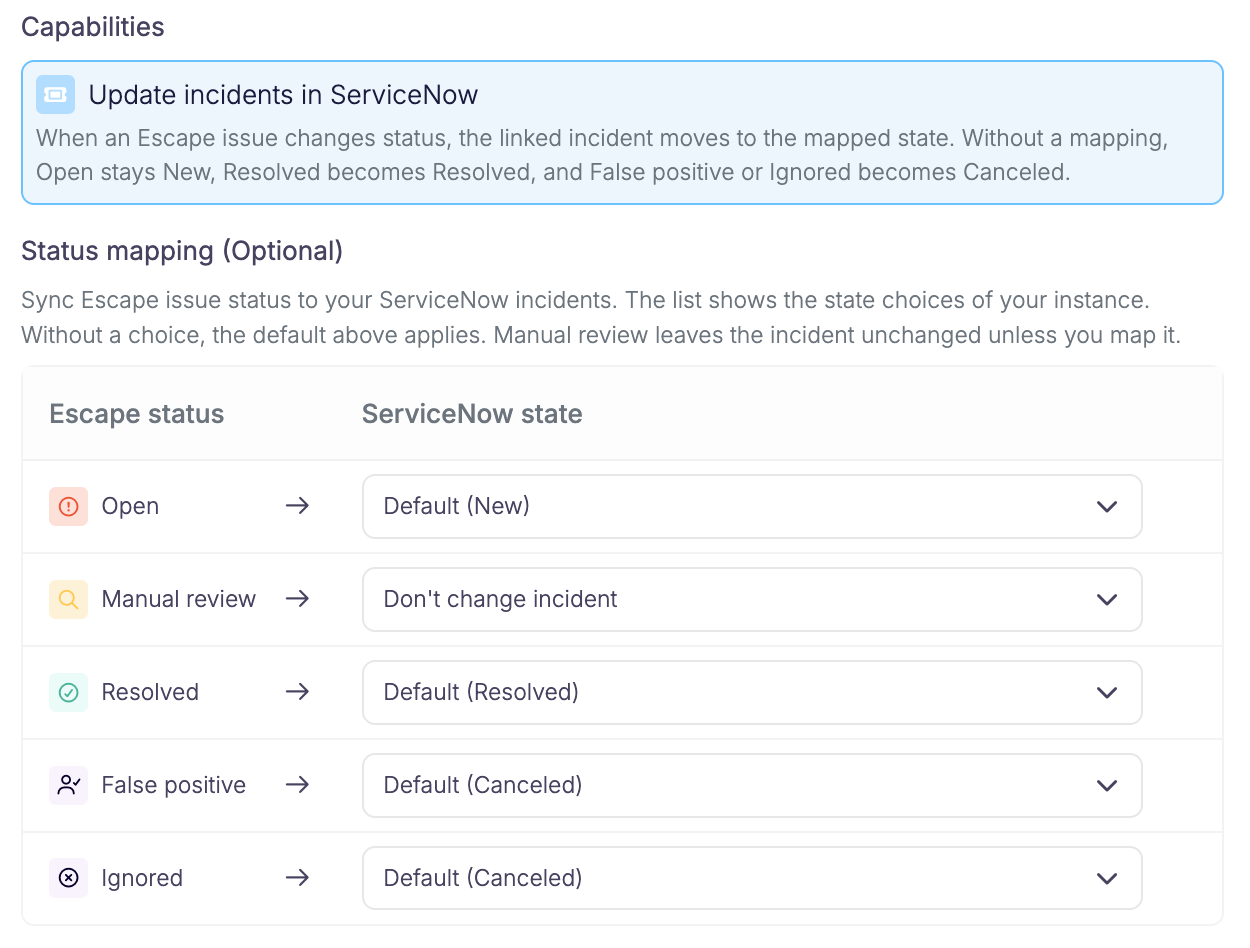
Status Mapping
The status mapping decides which incident state Escape sets when an issue changes status. It's optional: without it, Escape uses these defaults. You can change any of them, and each dropdown lists the incident states of your instance.
| Escape status | Default incident state |
|---|---|
| Open | New |
| Resolved | Resolved |
| False positive, Ignored | Canceled |
| Manual review | Unchanged |
Escape finds the default states by their label (New, Resolved, Canceled), so if your instance renamed one, map that status yourself.
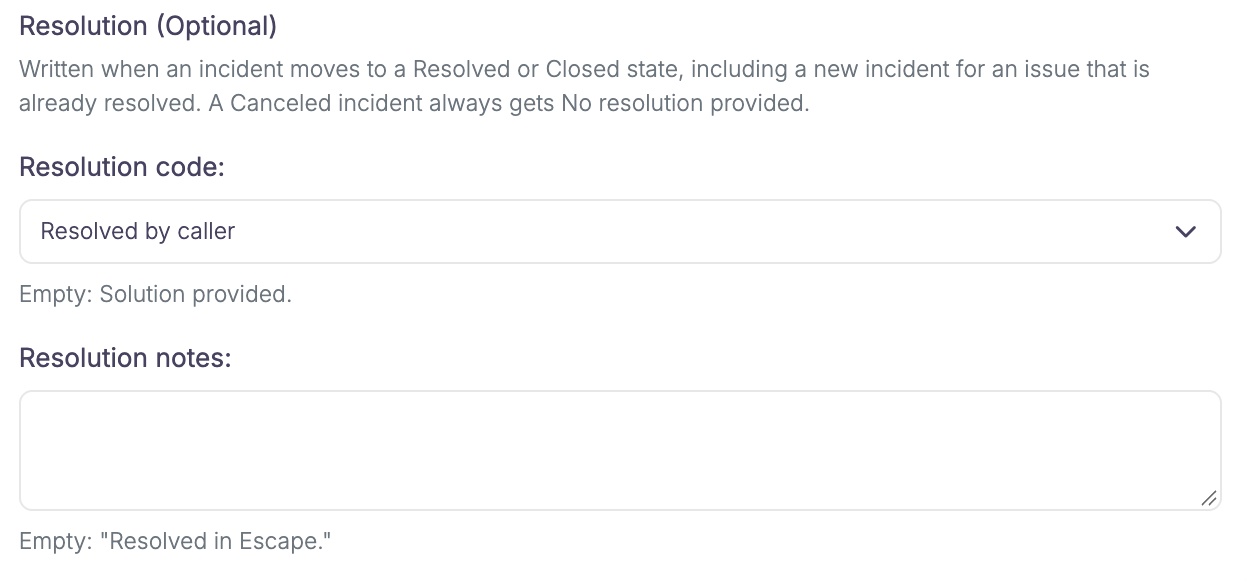
Resolution
ServiceNow requires a resolution code and notes to resolve or close an incident. Escape fills them in when it moves an incident to a Resolved or Closed state, including a new incident created for an issue that's already resolved.
- Resolution code: when empty,
Solution provided. - Resolution notes: when empty,
Resolved in Escape.
A Canceled incident always gets No resolution provided.
Usage
Creating Incidents From Workflows
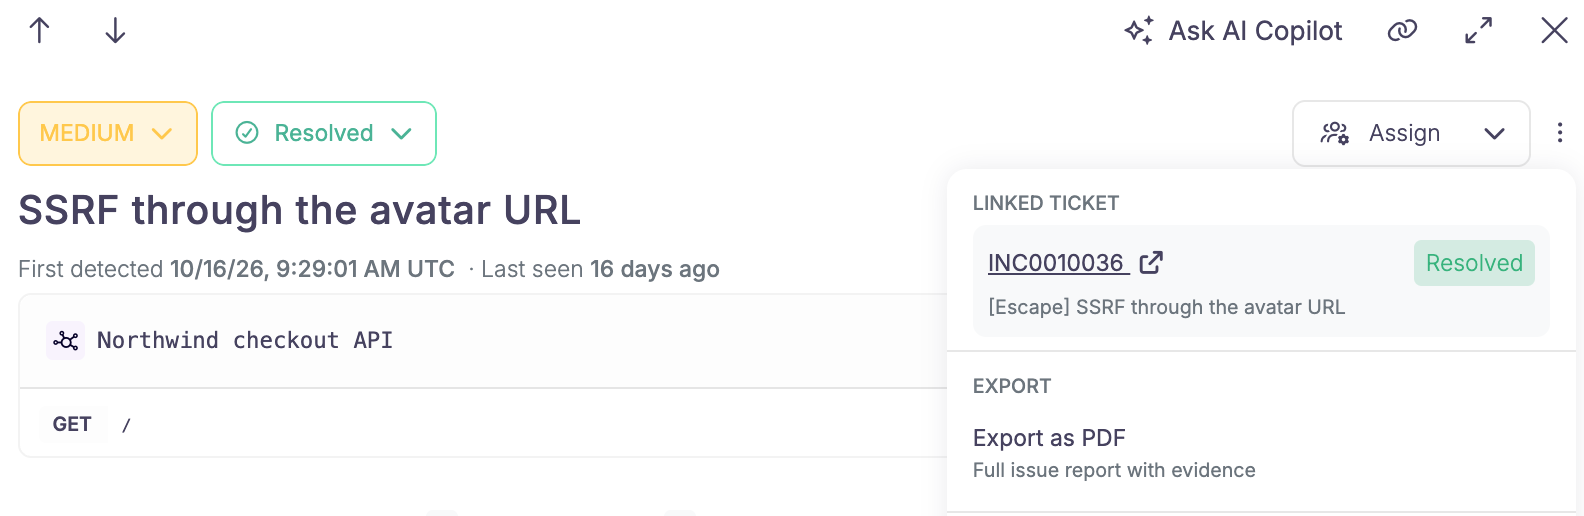
When a New Issue workflow fires, Escape creates one incident per matching issue, then stores the incident number and link on the Escape ticket.
Creation skips Ignored and False positive issues. An issue that already has a ticket is skipped, including tickets from other workflows. Manual can recreate an incident only when its ticket belongs to that workflow and Escape confirms the incident no longer exists.
Before creating an incident, Escape looks for one with the issue's correlation_id. If it finds one, it links it instead of creating a duplicate, so a run that was interrupted can safely run again.
If the issue is already resolved, Escape resolves the new incident right away.
Creating Incidents Manually
- Open an issue sidepanel.
- Open the Ticketing tab.
- Select a workflow whose export action uses ServiceNow.
- Click Create Ticket.
The workflow's fields, mappings, and fixed values are used. The sidepanel then shows the incident number, its live state, and a link to it.
Bi-Directional Status Sync
Escape to ServiceNow
Use a workflow with trigger Issue Updated and a ServiceNow export.
When the issue changes status, Escape moves the linked incident to the mapped state (see Status Mapping), with a resolution code and notes when it resolves, closes, or cancels it (see Resolution). Escape adds a work note with the new status, the date, and a link to the issue. When the incident reopens, it also adds a comment the caller can see.
Reopening a Closed or Canceled incident needs the write ACLs.
ServiceNow to Escape
No extra workflow is required.
Escape runs a built-in pull for each ServiceNow integration at least once per day (the scheduler also runs after you create or update the integration). It reads the state of every incident the integration created.
| Incident state | Escape issue |
|---|---|
| A state you mapped in Status mapping | The status mapped to it |
| Resolved or Closed | Resolved |
| Canceled | Ignored |
| Any other state | Open |
When an issue and its incident both changed since the last sync, the most recent change wins. Status changes pulled from ServiceNow don't trigger Issue Updated workflows.
Keep the Incident State Duration Metric Active
Escape uses ServiceNow's Incident State Duration metric to know when each incident changed state, so it can tell which side changed last. The metric is active by default. If you turn it off, Escape guesses from the incident's dates and can pick the wrong side.