Issue Management
Issue Management in Escape helps you identify, prioritize, and remediate security issues and sensitive data exposures uncovered during ASM, AI Pentesting, and Business Logic Aware DAST scanning. Use filters and bulk actions to triage findings and track recurring issues.
Viewing Vulnerabilities
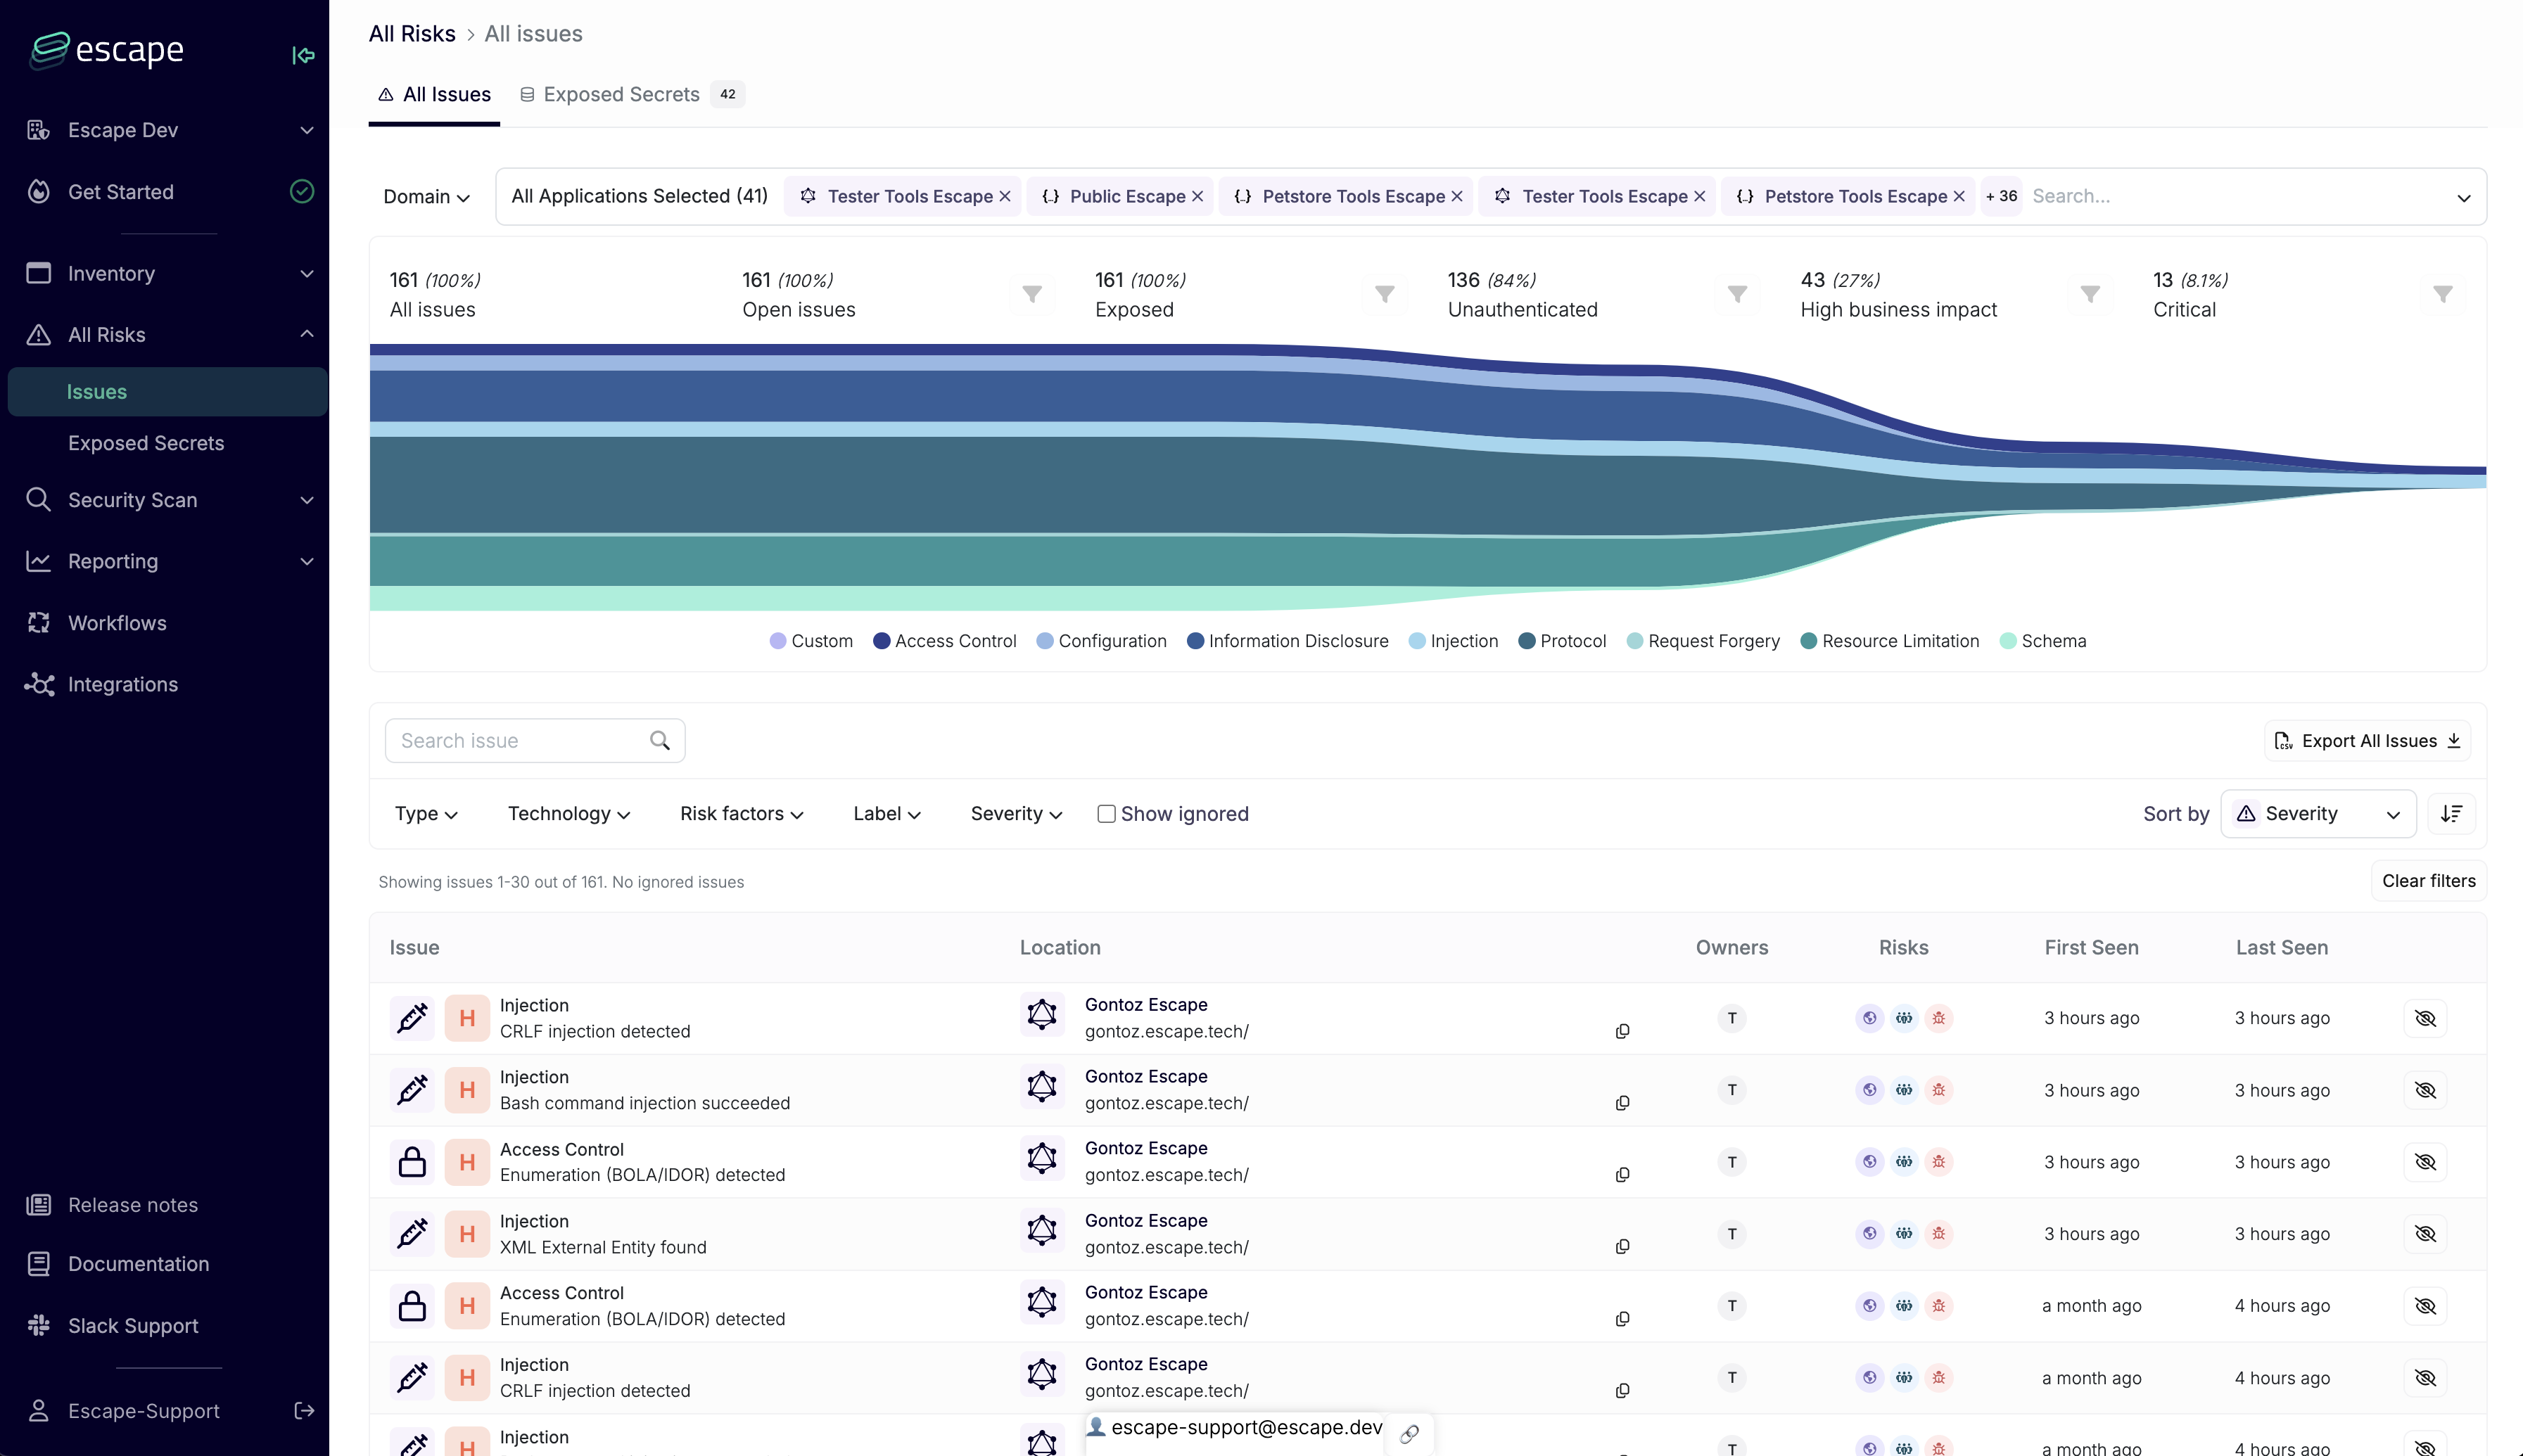
Issues and sensitive data can be viewed inside a scan (in a scoped view), or globally to the organization in the All Risks section:
-
Scoped (Per-Scan) View: After initiating and completing a DAST scan (see Start a new Scan and Understanding Results for details), you can drill into that specific application’s vulnerabilities. This scoped view helps you see issues in the direct context of a single API or SPA.
-
All Risks Section (Global View at Scale): For a broader overview including ASM and DAST findings, navigate to the All Risks section. This is your organization-wide “control tower,” listing every vulnerability (issues and sensitive data) detected by Escape DAST across all scanned applications. From here, you can quickly spot overarching patterns and manage large batches of findings.
Asset-Level Issue Scoping
Escape stores Issues at the Asset level. An Asset (an API, SPA, domain) represents a single real-world system. All Profiles (scan configurations) that test the same Asset share its Issue state.
Why Asset-Scoping?
If Issues were stored per Profile, scanning the same Asset with two Profiles (for example, an authenticated and an unauthenticated DAST Profile on the same API) would duplicate every finding. Asset-scoping gives you a single, deduplicated view of each Asset's security state.
Consequences of Asset-Level Scoping
Because an Issue's state (Open, Resolved, Ignored, False positive, Manual review) is stored globally on the Asset, any Profile that scans that Asset can affect that state:
- Multiple Profiles on the same Asset: When two or more Profiles scan the same Asset (for example, two DAST Profiles pointing at the same base URL, or an ASM Profile and a DAST Profile covering the same domain), they share the same pool of Issues for that Asset.
- Resolving and Reopening: Profiles share issue state. When a scan detects a Resolved Issue again, it returns to Open. Rediscovery alone doesn’t reopen Ignored, False positive, or Manual review Issues.
- Ignoring Propagates: Ignoring an Issue on one Profile ignores it for the Asset everywhere. The same is true in reverse: un-ignoring it on any Profile un-ignores it for all Profiles scanning that Asset.
- Shared Asset State: The Asset view shows the same issue state across the Profiles that scan it.
Edge Case: Overlapping DAST Profiles
Two DAST Profiles targeting the same base URL are, by design, scanning the same Asset. They will open and close each other's Issues. If you want Profiles to maintain independent Issue states, point them at distinct Assets (for example, different subdomains or base URLs).
How Assets Are Identified
- ASM: An Asset is uniquely identified by its canonical URL / host.
- DAST: An Asset is derived from the scan target (base URL / schema). Two Profiles with the same target will resolve to the same Asset.
- AI Pentesting: Findings are attached to the Asset under test, following the same model.
For details on how individual Issues are deduplicated within a single Asset, see Issue Deduplication.
Bulk Editing of Issues and Sensitive Data
Large organizations often deal with hundreds or thousands of vulnerabilities at once. Bulk editing makes your remediation workflow more efficient by enabling actions on multiple findings simultaneously:
- Change Status: Open, Resolved, Ignored, False positive, or Manual review.
- Apply Tags to findings for filtering.
The API also supports bulk severity changes; the bulk-edit UI offers status and tags.
This significantly reduces the operational overhead, especially when triaging common or repeated issues.
Intelligent Query Builder
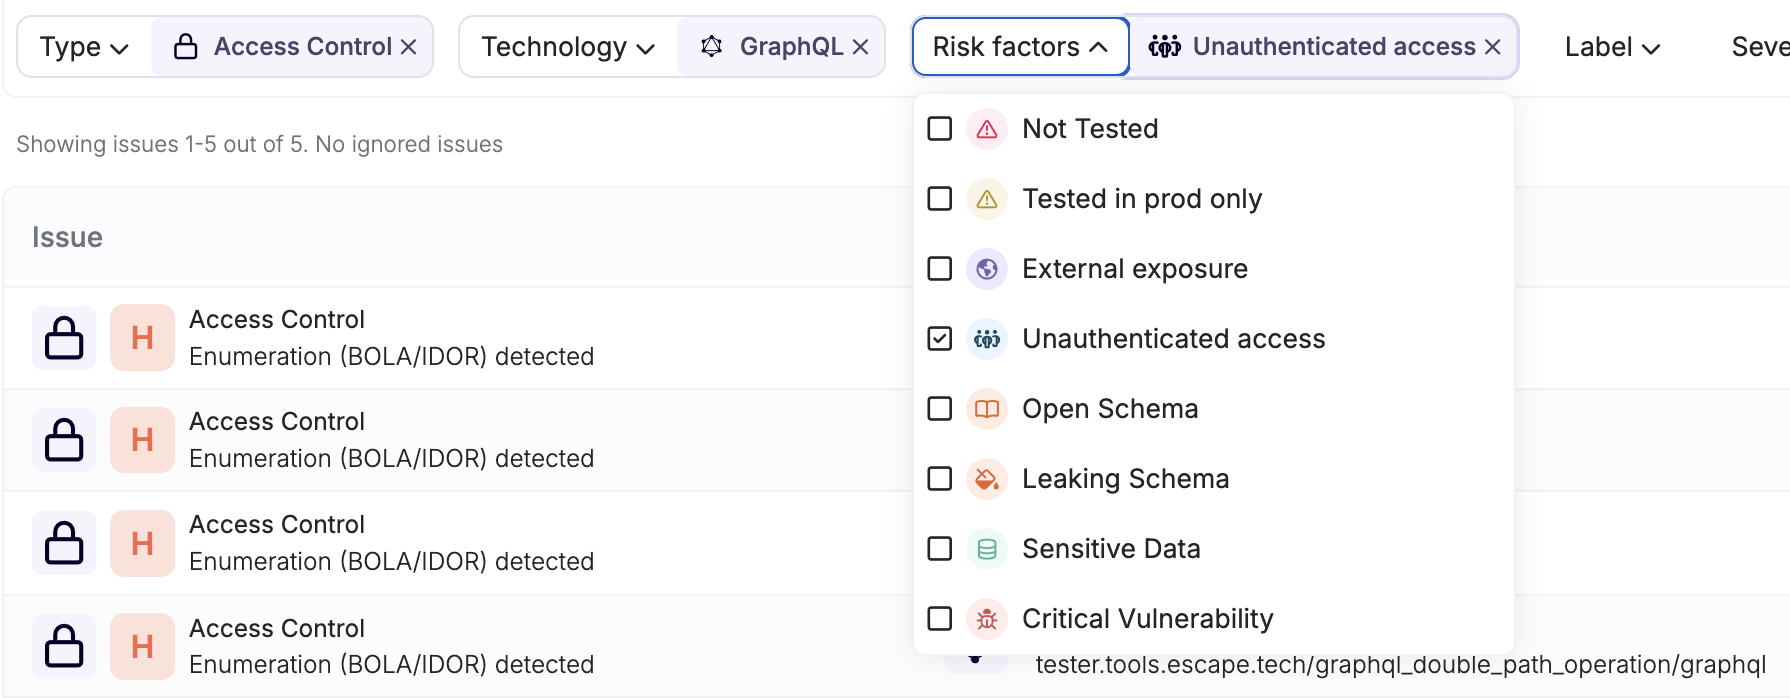
The Query Builder in the All Risks section allows you to locate and categorize vulnerabilities using multiple criteria:
- Filter by severity, risk level, environment (production vs. dev), technology (GraphQL, REST, SPA), and labels defined in the ASM or Business Logic Aware DAST scans.
- Search by keywords or specific vulnerability IDs.
- Sort results based on attributes like detection date (last seen), severity, or affected asset.
By building flexible queries, Security Engineers can tailor the interface to suit their immediate needs, whether it’s prioritizing urgent vulnerabilities or investigating suspicious patterns. Save your queries as they are reflected in the URL, so you can share them with your team.
Ignoring Vulnerabilities
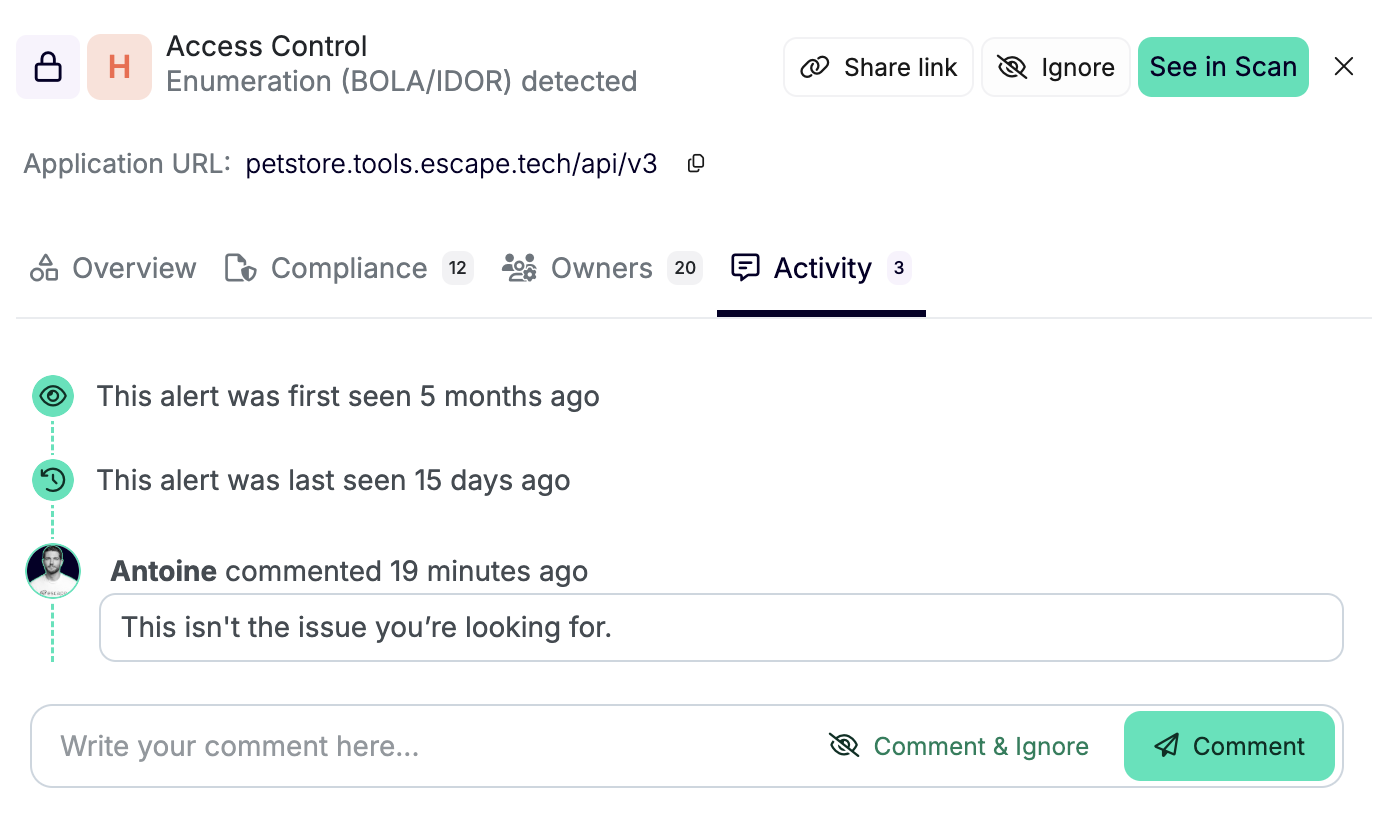
Review each finding’s evidence before deciding whether to fix it, accept the risk, or mark it as a false positive.
Use ignore to record a triage decision for specific findings:
- Accepted Risk: You’ve determined the vulnerability’s impact is low or otherwise mitigated by design.
- Operational Constraints: You've deferred remediation and want to temporarily move the finding out of your active risk queue.
- False Positives: Your review shows the finding isn't exploitable.
How Ignoring Works
-
Add Comments: Provide context when ignoring a vulnerability: for example, “risk accepted,” “pending redesign,” or “legacy endpoint to be deprecated.” These notes help your team stay aligned on why certain issues are left unaddressed.
-
Recurring Findings: When Escape recognizes a recurring finding on the same asset, it updates the existing issue. Rediscovery alone doesn't reopen Ignored issues. Findings that aren't recognized as the same issue create separate issues.
AI false-positive analysis can mark findings as False positive.
-
Transparent Tracking: Ignored items stay available for review outside the active risk queue. You can revisit or unignore them at any time (for example, if business priorities shift).
Choosing Between Ignoring and Fixing
-
Consider Ignoring
- An issue is a known, truly acceptable business risk.
- A vulnerability is tied to an application scheduled for decommissioning, and short-term mitigation isn’t necessary.
-
Consider Fixing
- Issues involving critical or sensitive data flows.
- Repeat occurrences that indicate a deeper, systemic flaw.
- Issues with high severity or relevant risk tags in the Risk-Based Prioritization matrix.
Use ignore to focus your active queue on remediation while keeping other findings available for future review.
Risk-Based Prioritization
Escape uses risk tags to describe finding context. Filter issues by risk and sort them by severity to decide what to review first.
| Risk | Application Service | Security Issue |
|---|---|---|
| External Exposure | The application service is externally accessible. | The issue is publicly reachable, increasing exploitation risk. |
| Unauthenticated | The application service doesn’t enforce authentication. | The issue is exploitable without credentials (public user). |
| Sensitive Data | The service is leaking sensitive data (PII, tokens, secrets). | The issue involves the exposure of sensitive information. |
| Critical Vulnerability | The service has a critical flaw that could be exploited to compromise data or operations. | Requires immediate remediation to prevent severe breaches. |
How Risk Influences Your Workflow:
- External vs. Internal Assets: Publicly reachable APIs usually outrank internal ones in urgency.
- Unauthenticated vs. Authenticated: If an attacker can exploit a flaw without credentials, it’s top priority.
- Sensitive Data Leaks: Potential compliance breaches often get immediate attention.
- Critical Vulnerabilities: Review these first and plan remediation.
Use these factors alongside severity to decide which findings to review first.
Interactive Prioritization Funnel
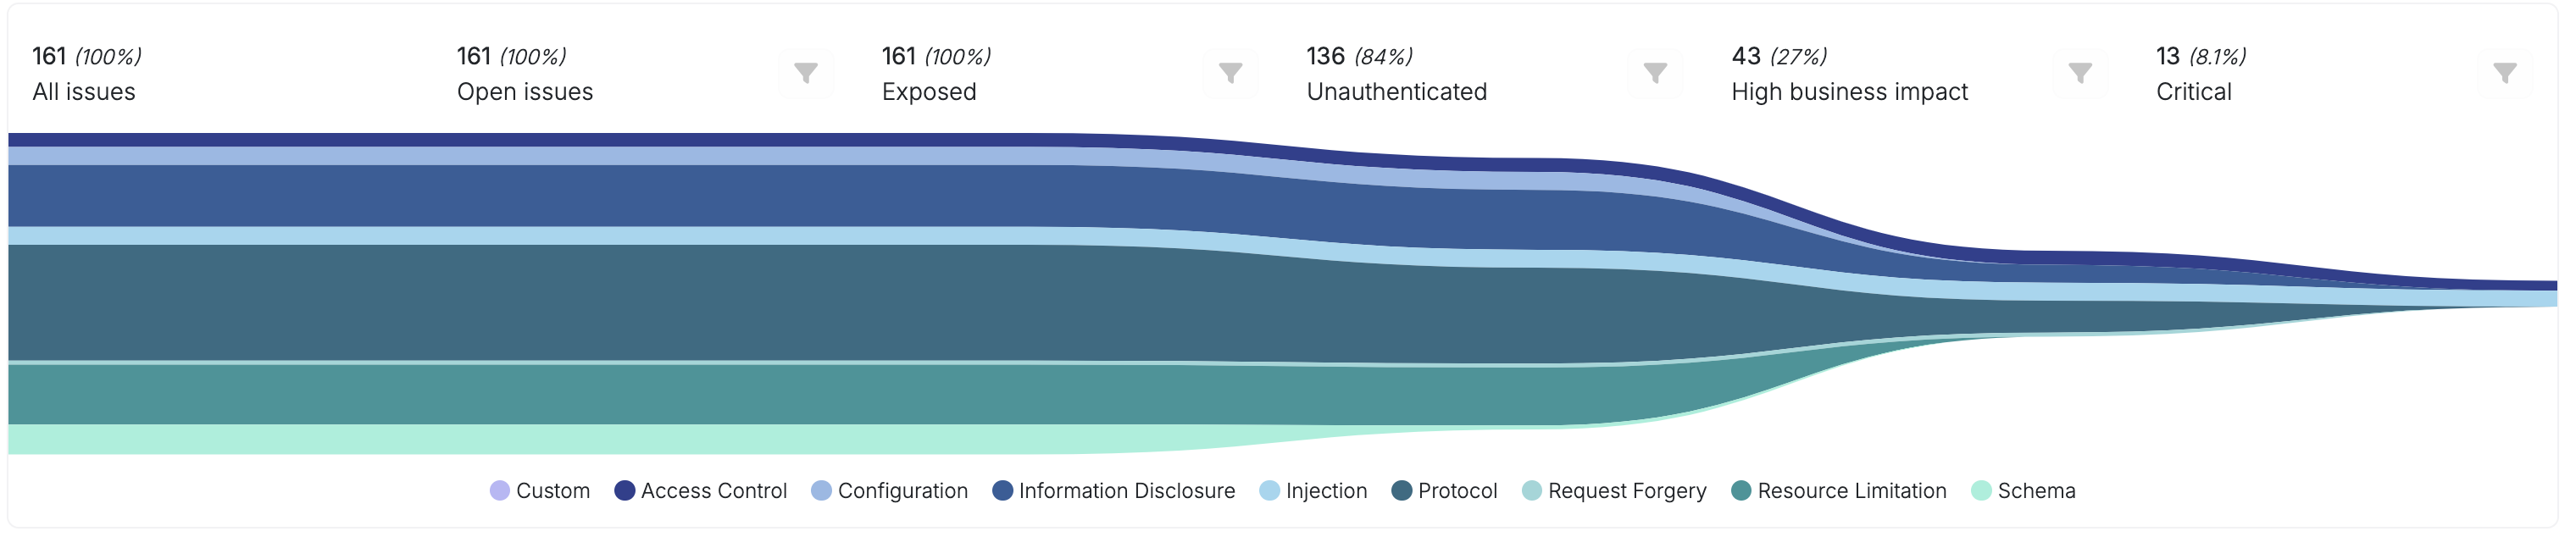
Escape’s Interactive Prioritization Funnel shows how issue counts narrow by status and risk context. Use it to select findings for review.
How It Works
-
Review the Funnel: The stages are All issues, Open issues, Exposed, Unauthenticated, High business impact, and Critical.
-
Apply Contextual Filters: At each stage of the funnel, context is applied to refine the list of vulnerabilities:
- Risk Context: Review critical findings, external exposure, and sensitive data risks alongside severity.
- Business Logic Context: Escape tests how attacks flow through an application’s business logic, flagging genuinely exploitable paths over harmless anomalies.
- Remediation Coordination: Share relevant findings with the developers responsible for the affected application.
-
Use the Query Builder for Granular Views: If you need to narrow your focus further, the Query Builder lets you layer in additional conditions: for example, “production environment,” “externally exposed,” or “unauthenticated APIs.” With each added filter, the funnel narrows, delivering a concise list of vulnerabilities that truly warrant immediate attention.
-
Visualize the Narrowing Risk: As the funnel progresses, you’re left with a small set of issues that match your most critical risk criteria, such as publicly accessible APIs with no authentication or sensitive data leaks in a payment flow. These are presented in a visual layout so you can see exactly how many issues were filtered out at each stage and why.
Exporting Issues and Sensitive Data Leaks
Escape allows you to export issues and sensitive data leaks in several formats:
- Single-issue PDF: from the issue side panel Actions menu, choose Export as PDF to download one formatted report for the finding you're viewing. See Export a Single Issue as PDF.
- Compliance reports in PDF, for frameworks with dedicated report sections: Compliance
- Executive security reports in PDF, dedicated to the executive and management teams: Reporting
- Technical security reports in PDF, containing all the reproduction details of the issues, dedicated to the security and development teams, or auditors: Reporting
- Technical CSV, containing all the reproduction details of the issues, for custom integrations or reporting tools.
Export Issues as CSV or SARIF
In an Issues view, select Export View. Choose Export View (CSV) for a tabular export or Export View (SARIF) for the Static Analysis Results Interchange Format. Escape downloads SARIF files using SARIF 2.1.0.
The export respects the current Issues filters and your access to Issues. Each result includes the Escape security-test rule, severity, status, category, a stable Escape Issue ID fingerprint, and an available target URL, code path, or asset root domain as its location. SARIF exports support up to 5,000 Issues. Narrow the filters before exporting a larger result set.
Source Location Coverage
DAST and AI Pentesting can run without access to source code. For black-box testing, SARIF uses the available target URL or asset as the Issue's location.
SARIF exports don’t include repository revisions or source-line ranges. If an Issue has no target URL, code path, or asset root domain, its SARIF result has no location.
Practical Tips for Security Engineers
-
Use the All Risks Section Strategically: Start each day by checking the global risk dashboard. Filter for Critical severity or relevant risk tags first, then coordinate remediation with the responsible developers.
-
Document Everything: Comments on vulnerabilities are crucial. They provide valuable context to future you or your teammates on why a vulnerability was ignored or how it was addressed.
-
Create Saved Queries: For recurring concerns (for example, externally exposed unauthenticated APIs), save your query parameters for quick access. All queries are reflected in the URL, so you can share them with your team.
-
Maintain a Feedback Loop: If you keep seeing certain false positives, consider adjusting scanning parameters or updating your code to reduce noise. Continuous improvement in scanning configurations leads to cleaner, more actionable results.
-
Combine With Compliance Reporting: After you’ve triaged vulnerabilities, generate compliance reports to confirm you’re meeting the standards your organization cares about most. This ensures that your fixes align with external regulations and internal best practices.
Lifecycle of a Vulnerability
-
Discovery: Escape detects a potential issue, either in production or development mode.
-
Triage: The vulnerability shows up in either the scoped or global view. You filter, sort, and review its details, often referencing the Risk Matrix.
-
Remediation: Share the finding with the responsible developers, including remediation guidance and reproduction details such as cURL commands for APIs or page context for SPAs.
-
Validation: Once fixed, run another scan or rely on Escape’s continuous scanning to confirm the issue no longer appears. If Escape detects the same resolved issue again, it reopens it.
-
Compliance & Reporting: Export final reports to demonstrate your risk posture and compliance status to stakeholders or auditors.
Putting It All Together
Use Escape Issue Management to review findings, apply bulk status and tag changes, and prioritize remediation using severity and risk tags.
Key Takeaways:
- Scoped vs. Global: View issues per scan or across the entire organization.
- Bulk Editing: Save time by applying actions to multiple vulnerabilities at once.
- Recurring Findings: Review recurring issues and record triage decisions in comments.
- Risk-Based Prioritization: Align efforts with potential impact.
- Continuous Improvement: Use queries, comments, and insights to refine your issue management strategy over time.
- Workflows & Ticketing: Streamline communication and tracking with automated workflows.
Next Steps
-
Already Completed a Scan? Explore the results in detail (see Understanding Results).
-
Time to Generate a Compliance Report? Head over to the Compliance Reports and Reporting sections to demonstrate your adherence to industry standards.
-
Need Additional Help? Reach out via our Slack channel, where our experts can guide you through complex scenarios or troubleshooting steps.
Use filters, comments, and workflows to keep remediation decisions visible to your team.