Jira Integration
Configure Jira integration to create and manage tickets for vulnerabilities from workflows or manually.
Workflow Required for Ticket Creation
After connecting Jira, create an active workflow with a Jira export action. Escape uses that action's configuration to create tickets, both automatically and from the Ticketing sidepanel.
Configuration
Create a New Jira Integration
-
Go to the Integrations page from the left navigation menu.
-
Click the Jira integrations card in the Ticketing section.
-
Click + Create new integration.
-
Select your authentication method:
- Jira Cloud: For cloud instances (for example,
https://example.atlassian.net) - Jira Server: For self-hosted Jira instances
- Jira Cloud: For cloud instances (for example,
-
Fill in the form based on your authentication method:
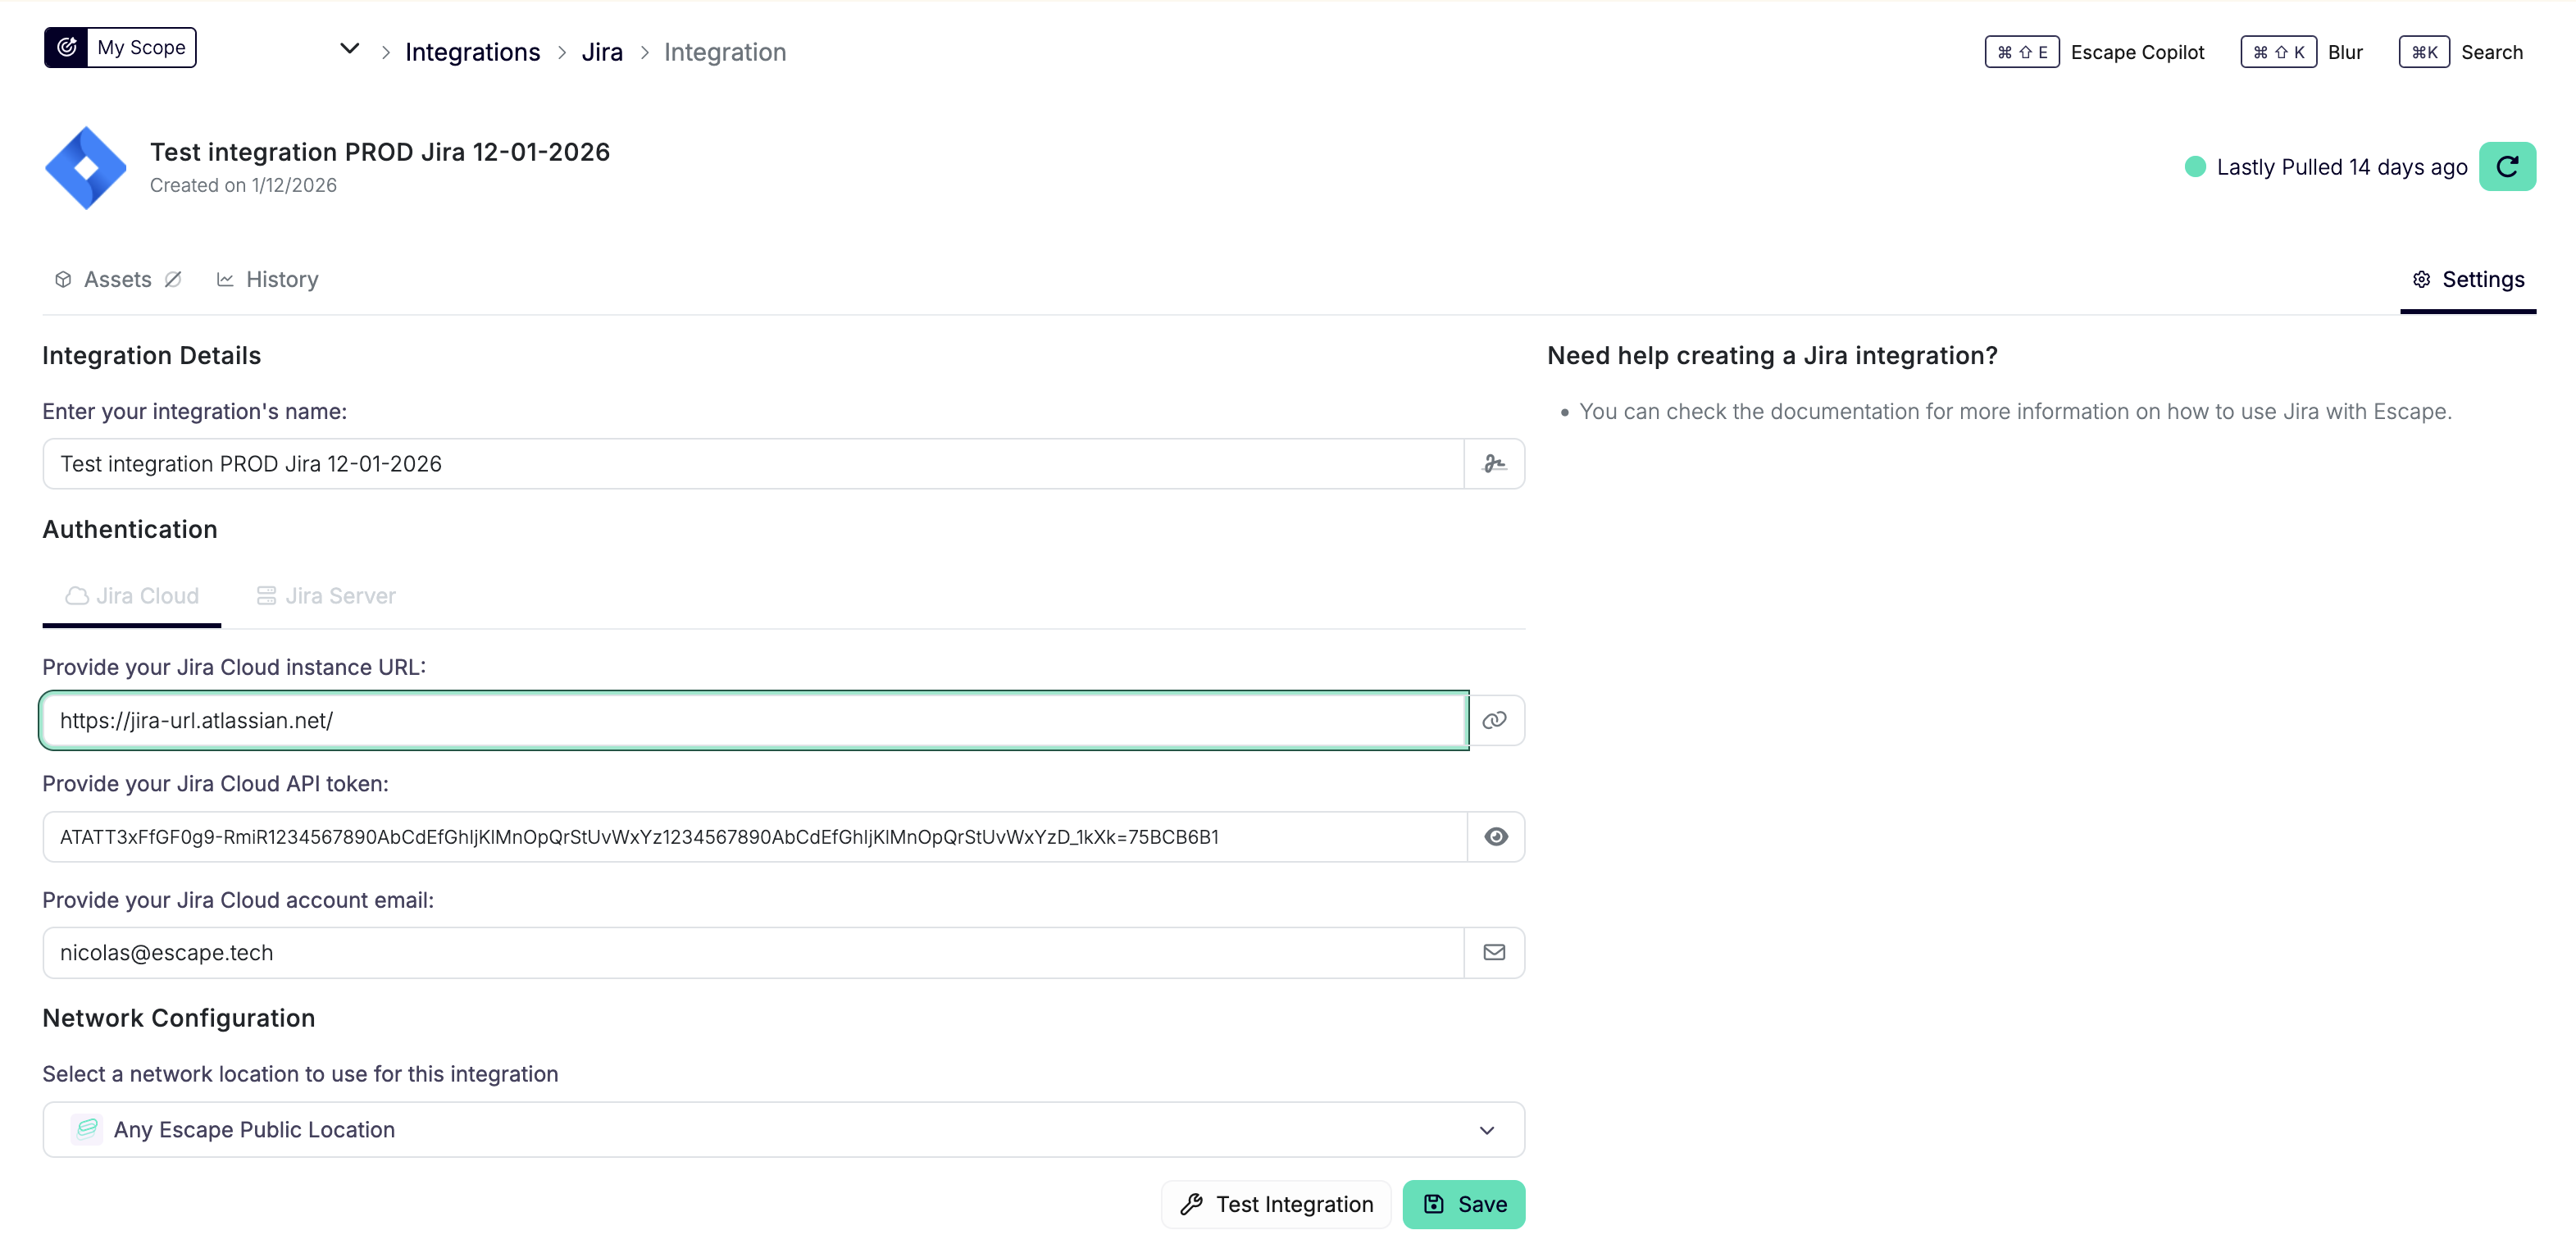
For Jira Cloud:
- Name: A name to identify this integration
- Jira instance's URL: Your Jira Cloud URL (for example,
https://<organization-name>.atlassian.net) - Jira API token: Generate an API token from your Jira account
API Token Type
You can use either a standard API token or a scoped API token:
- Standard token: Click "Create API token". No scopes need to be configured.
- Scoped token: Click "Create API token with scopes". Select Jira as the app, then add the following scopes so the integration can create tickets, list projects, and manage issue data:
Scope Purpose read:jira-userView user profiles (assignable users) read:jira-workRead projects, issues, priorities, labels, statuses write:jira-workCreate and edit issues, add attachments, transition issues manage:jira-projectList and create project components - Jira account email: The email used to generate the API token
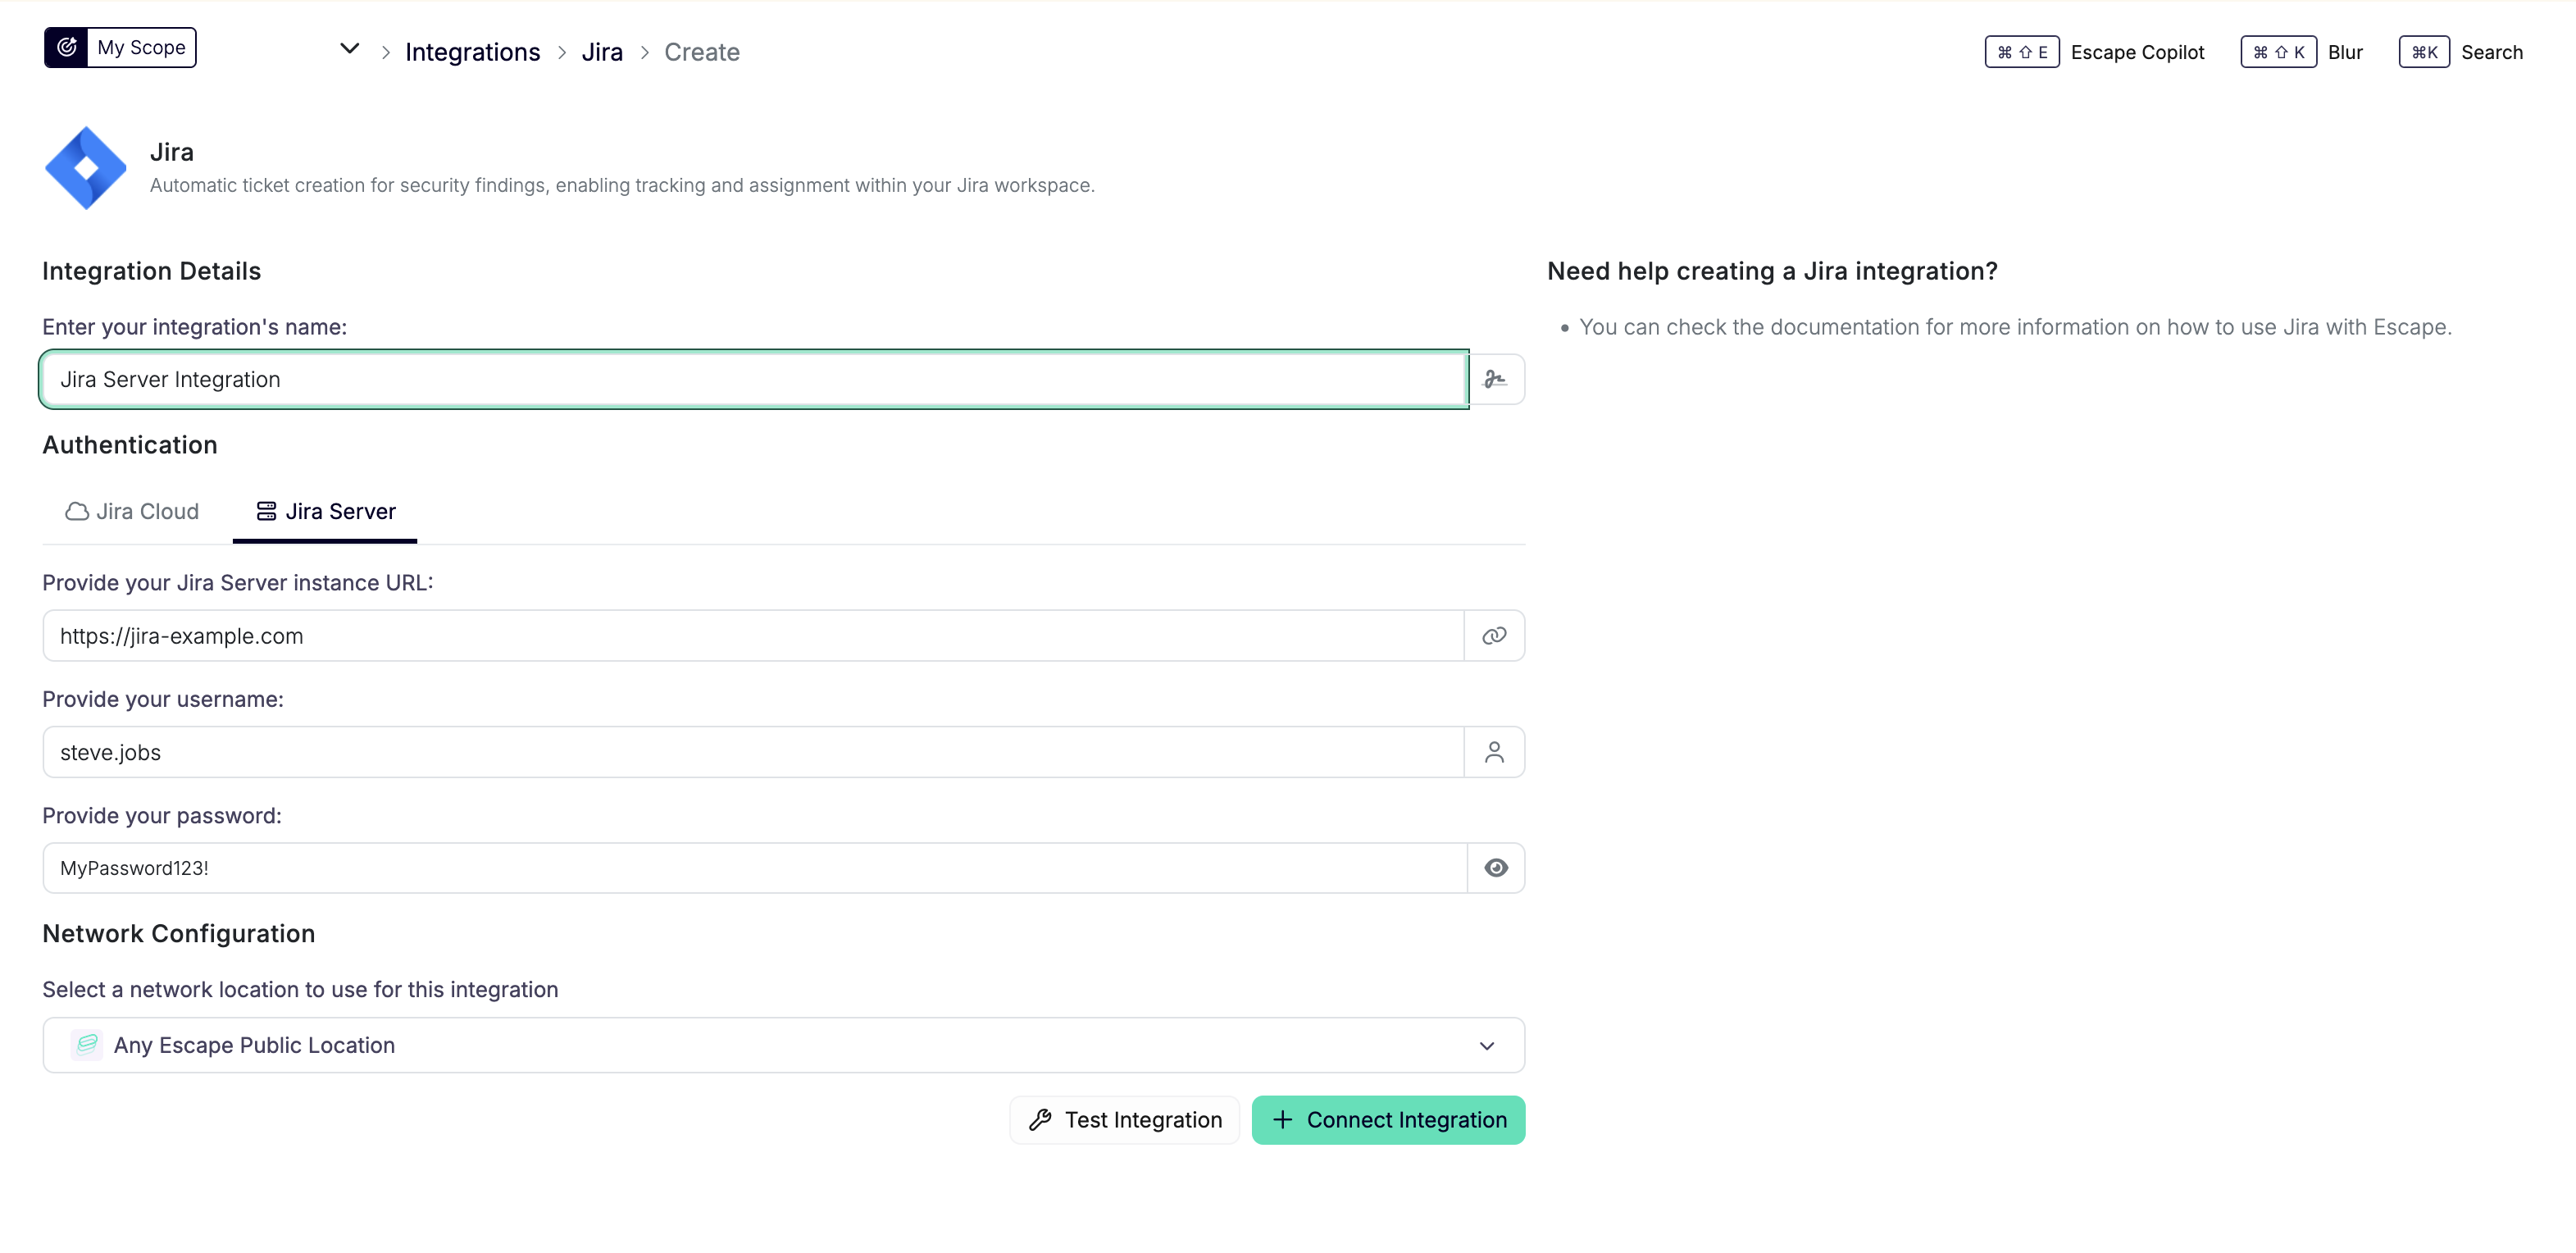
For Jira Server:
- Name: A name to identify this integration
- Jira instance's URL: Your self-hosted Jira base URL (for example,
https://jira.example.com) - Authentication: Choose Username & password or Personal access token
Username & password
- Username: Your Jira username
- Password: Your Jira password
Personal access token (PAT)
Use this on Jira Data Center (and other self-hosted instances that expose PATs). Create a token in your Jira profile, then paste it into Personal access token. The account that owns the token needs the same project access as for username/password (at least one visible project, permission to create and update issues for workflow export).
-
Click Test Integration to verify the connection.
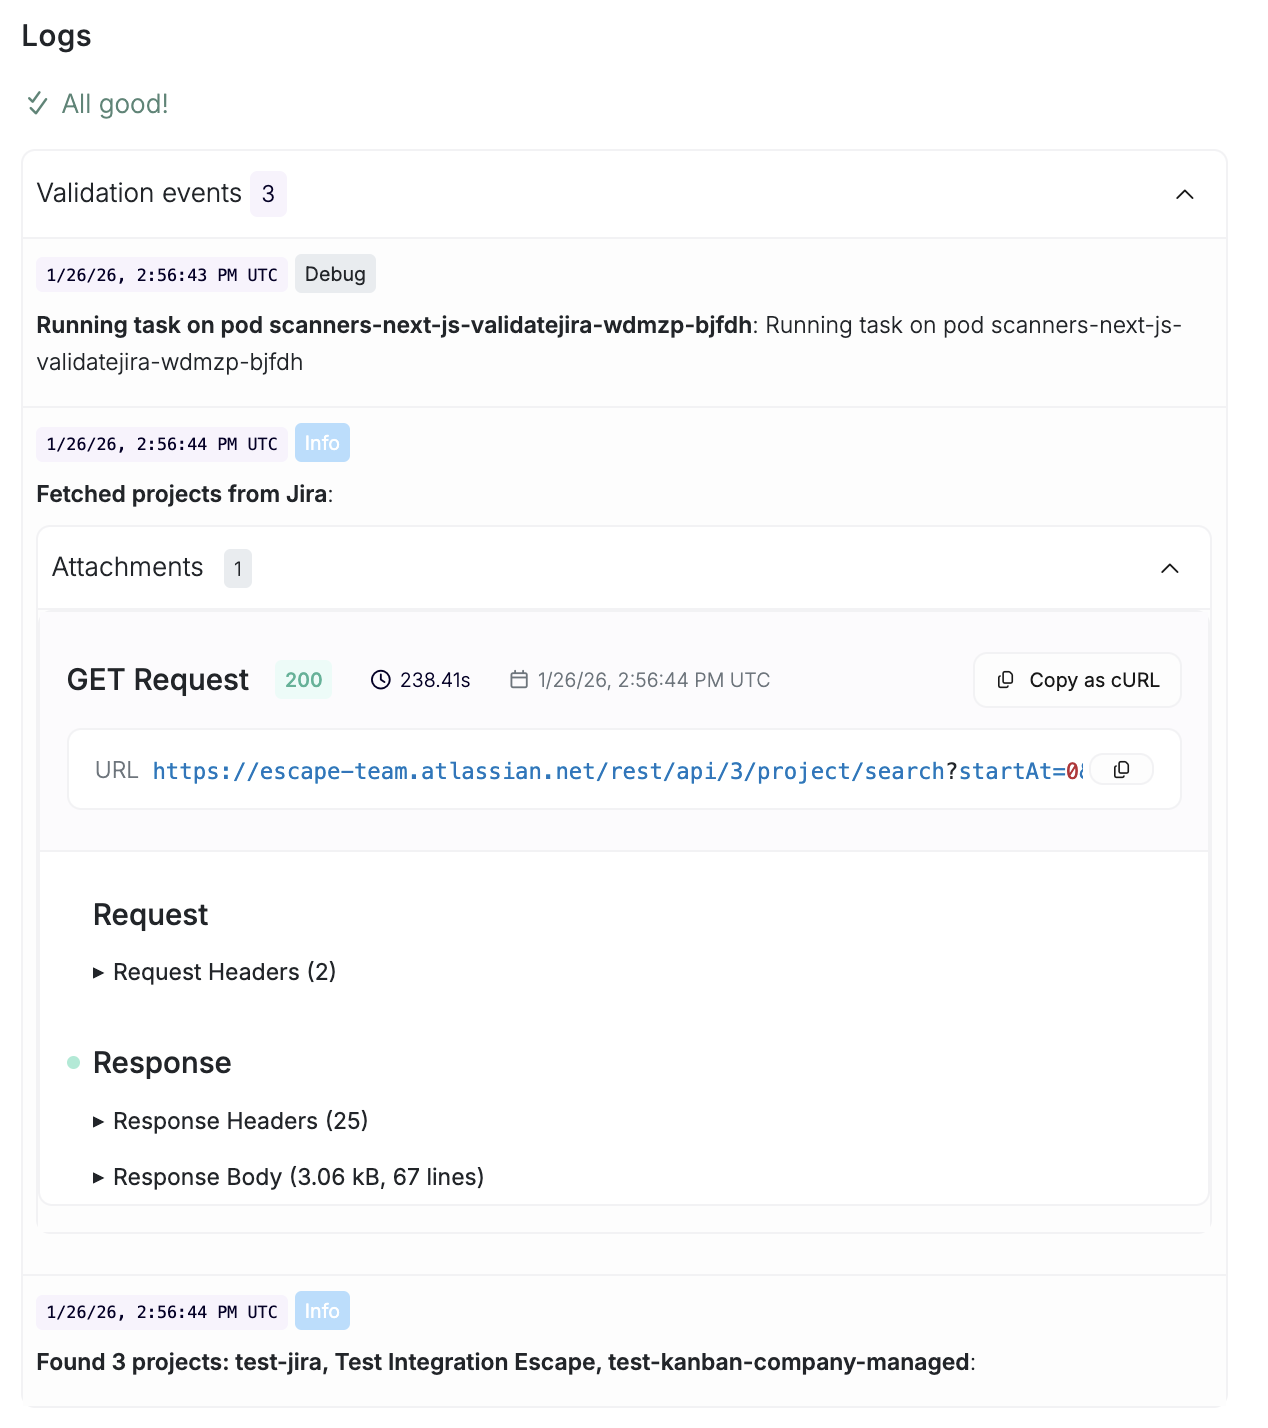
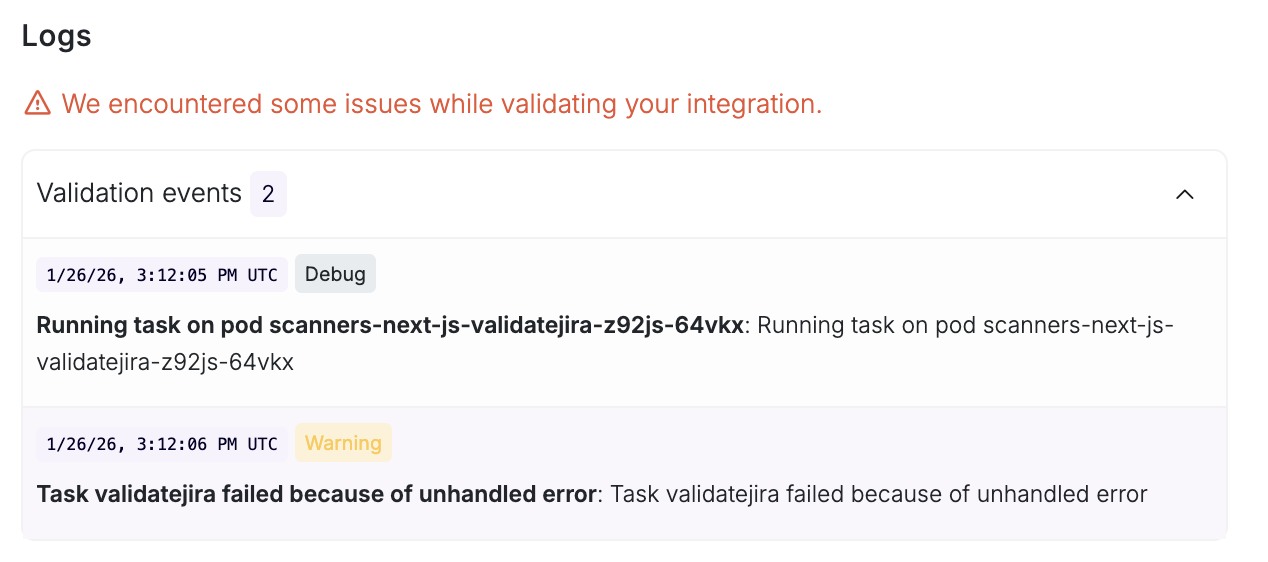
The validation process tests your credentials by connecting to your Jira instance and fetching projects. Check the validation logs to see the results.
-
Click Connect Integration to create the integration.
To find your organization name for Jira Cloud, go to the Atlassian administration page > Click on Settings, then search for "Organization name".
Never share your API key or password
Never share your API key or password with anyone. A good practice is to generate a new API key for each Escape integration.
Credential Validation
The Test Integration button tests your connection by fetching projects from your Jira instance.
| When Validation Succeeds | When Validation Fails | |
|---|---|---|
 |
 |
|
| When validation succeeds, you'll see: • Status: validation succeeded • A list of projects found in your Jira instance | When validation fails, check the validation logs for error messages. Common issues: • Invalid credentials: Verify your API token (Cloud), username/password (Server), or PAT (Server) • No projects found: Ensure your account has access to at least one project • Connection issues: Verify the instance URL is correct and accessible |
Edit a Jira Integration
- Go to the Integrations page from the left navigation menu.
- Click the Jira integrations card in the Ticketing section.
- Click the Edit (pen icon) button next to the integration you want to edit.
- Update the fields you want to change.
- Click Save to save.
Delete a Jira Integration
- Go to the Integrations page from the left navigation menu.
- Click the Jira integrations card in the Ticketing section.
- Click the Delete (trash icon) button next to the integration you want to delete.
Consequences of Deleting an Integration
Deleting a Jira integration will:
- Break workflows: Any workflows using this integration for Jira actions will stop working and may fail when triggered
- Delete associated assets: Assets that are only associated with this integration will be scheduled for deletion
- Prevent ticket creation: You will no longer be able to create Jira tickets using this integration from workflows or the Ticketing sidepanel
Before deleting, ensure you:
- Update or remove any workflows that use this integration
- Create a replacement integration if you still need Jira functionality
Using Jira in Workflows
Jira can be used as an export action in workflows to automatically create tickets when workflow conditions are met.
Configuration
When creating or editing a workflow:
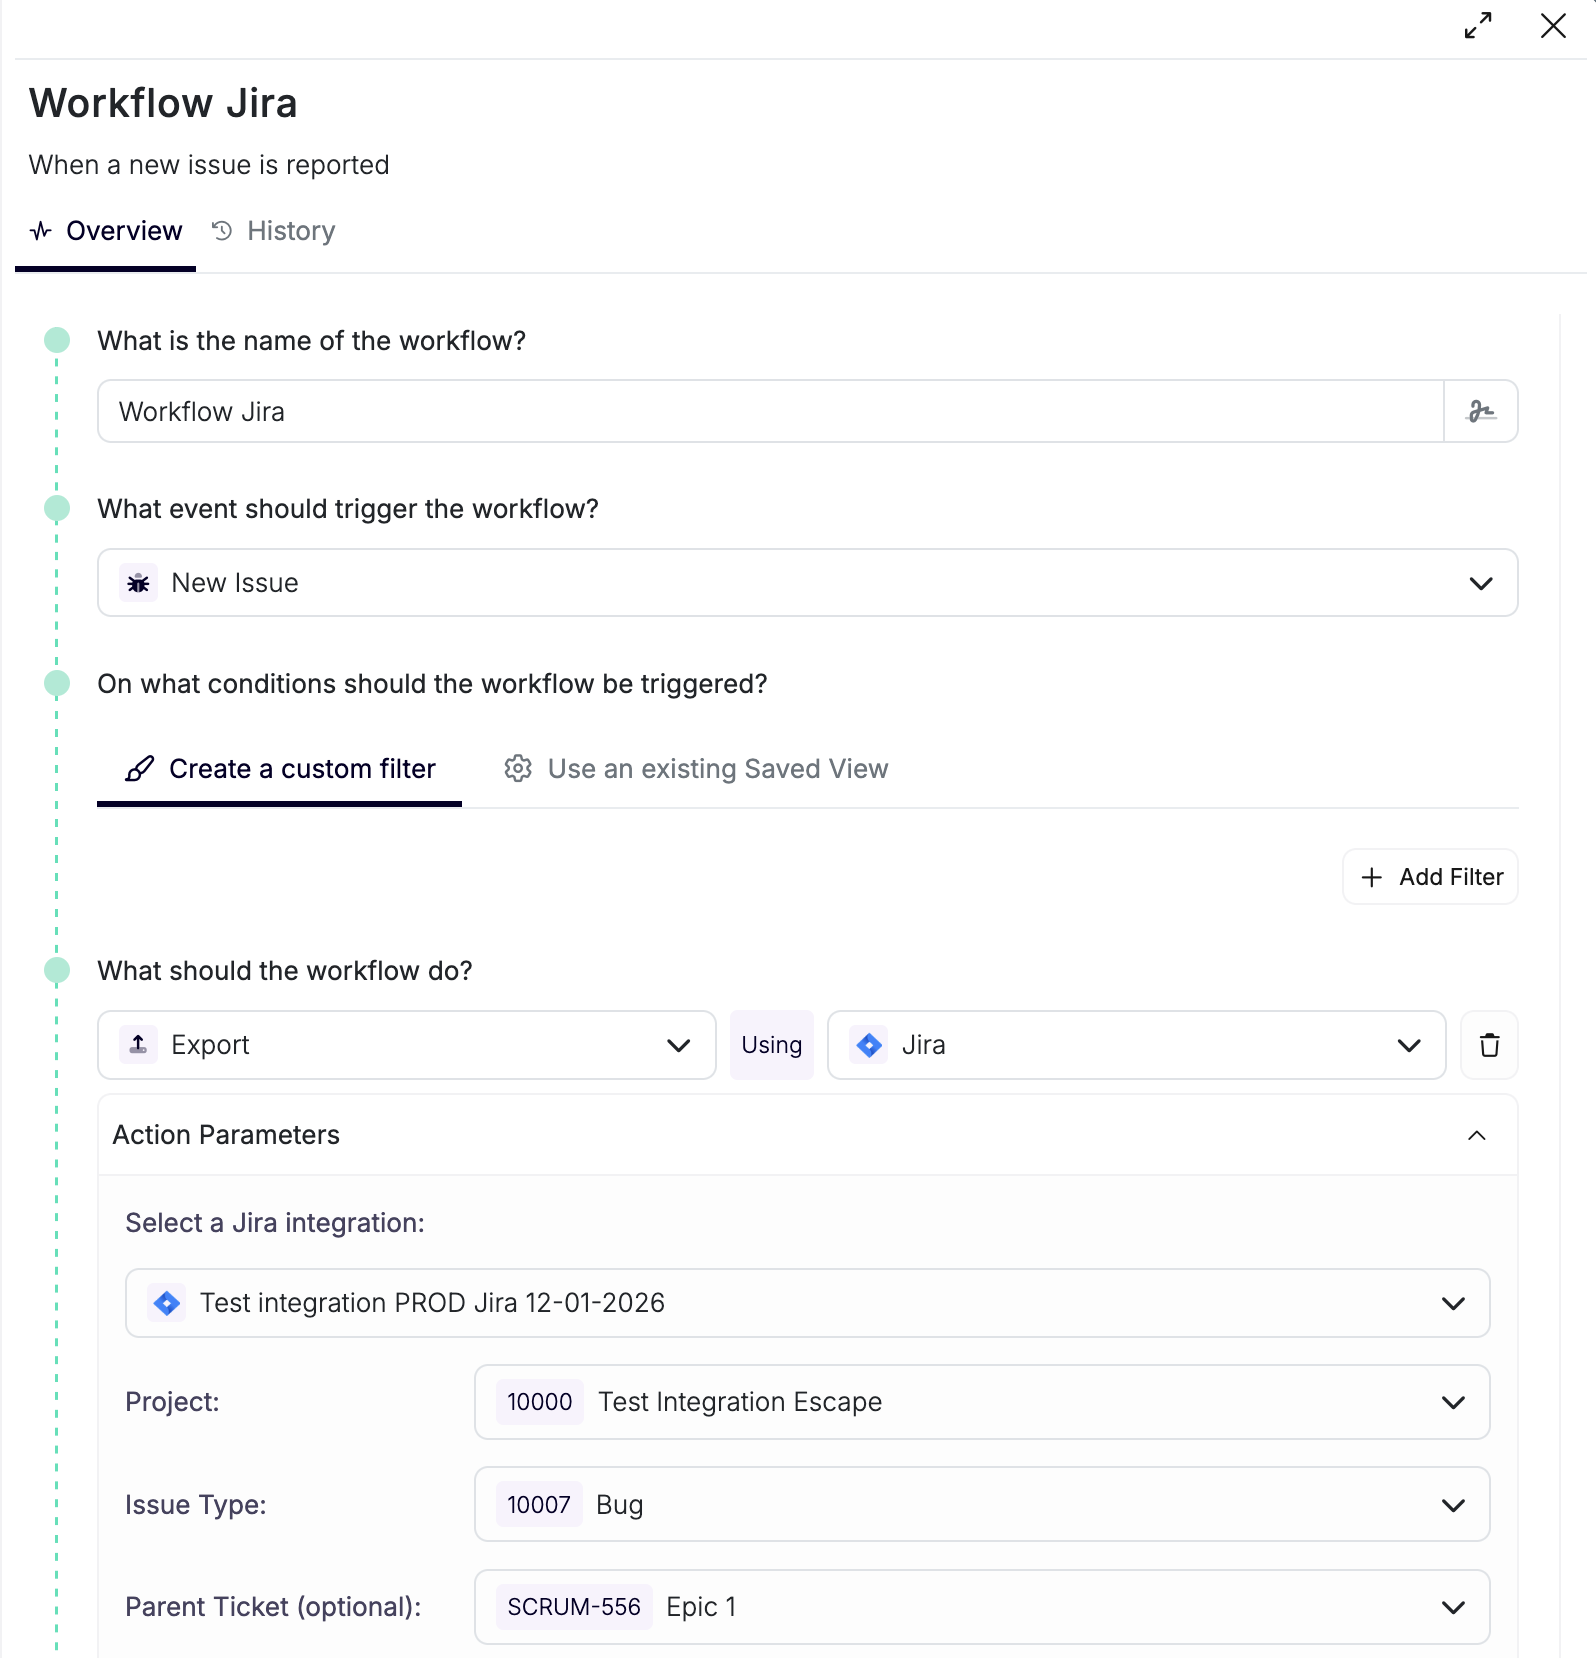
- Go to Workflows → Create (or edit an existing workflow)
- In the Actions step, add an Export action
- Select Jira as the integration type
- Select your Jira integration from the dropdown
- Configure the following:
Project and Issue Type
- Project: Select the Jira project where tickets will be created
- Issue Type: Select the issue type (for example, Bug, Task, Story)
- Parent Ticket (optional): Optionally select a parent ticket to create subtasks
Default Mappings
Unless Disable default mappings is enabled, Escape fills the following Jira fields:
-
Summary: Set to the issue's full name
-
Description: Automatically populated with:
If you add a static mapping for the description field, your custom content will be prepended to the automatically generated description.
Disable default mappings removes the default summary and suppresses description generation entirely, including static and property description mappings. Supply a summary mapping if you enable it.
Property Mappings
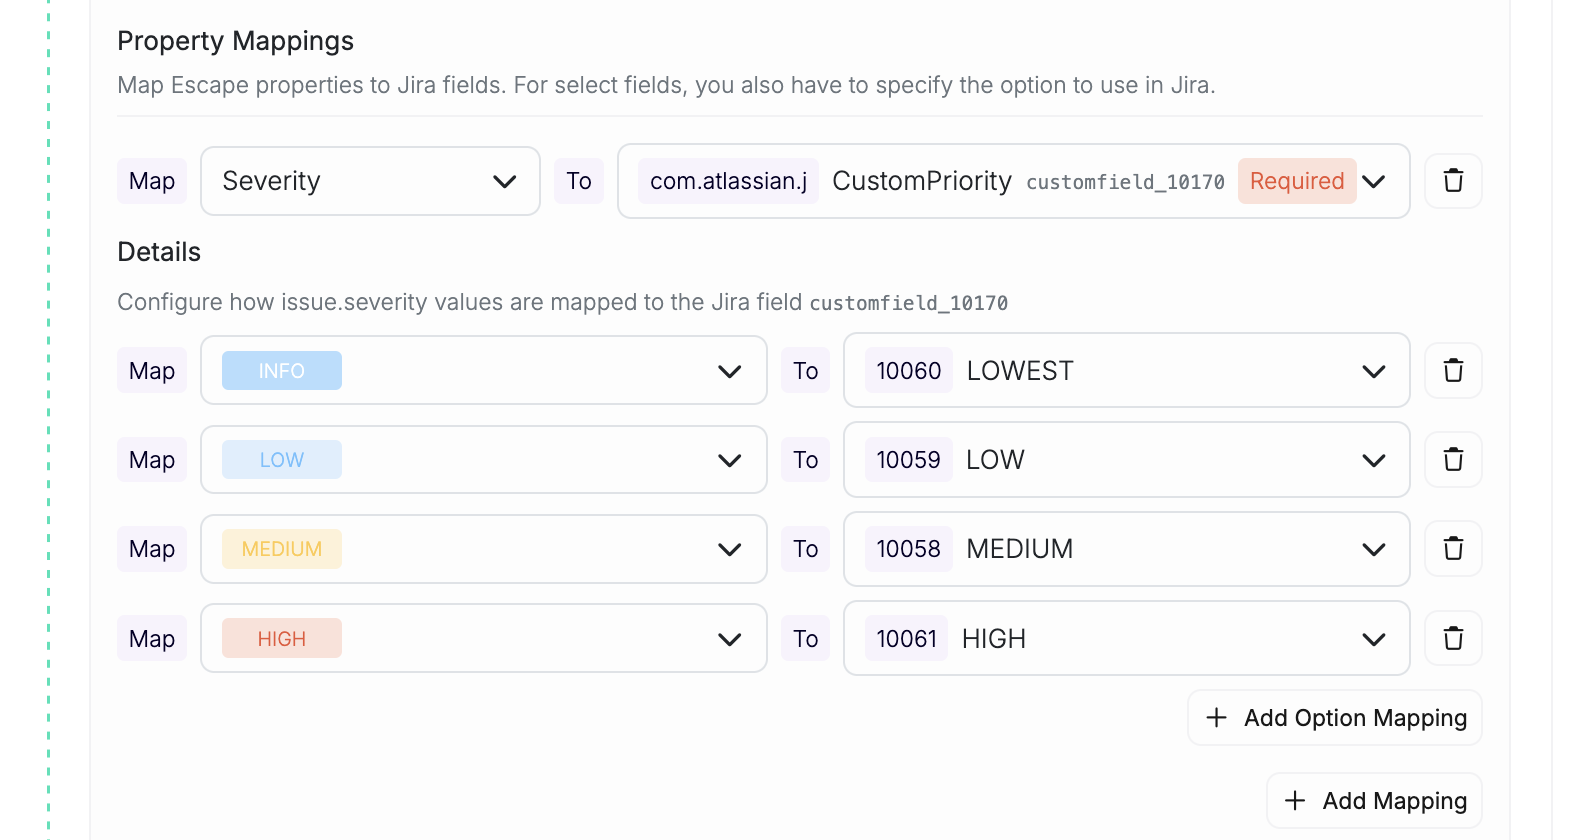
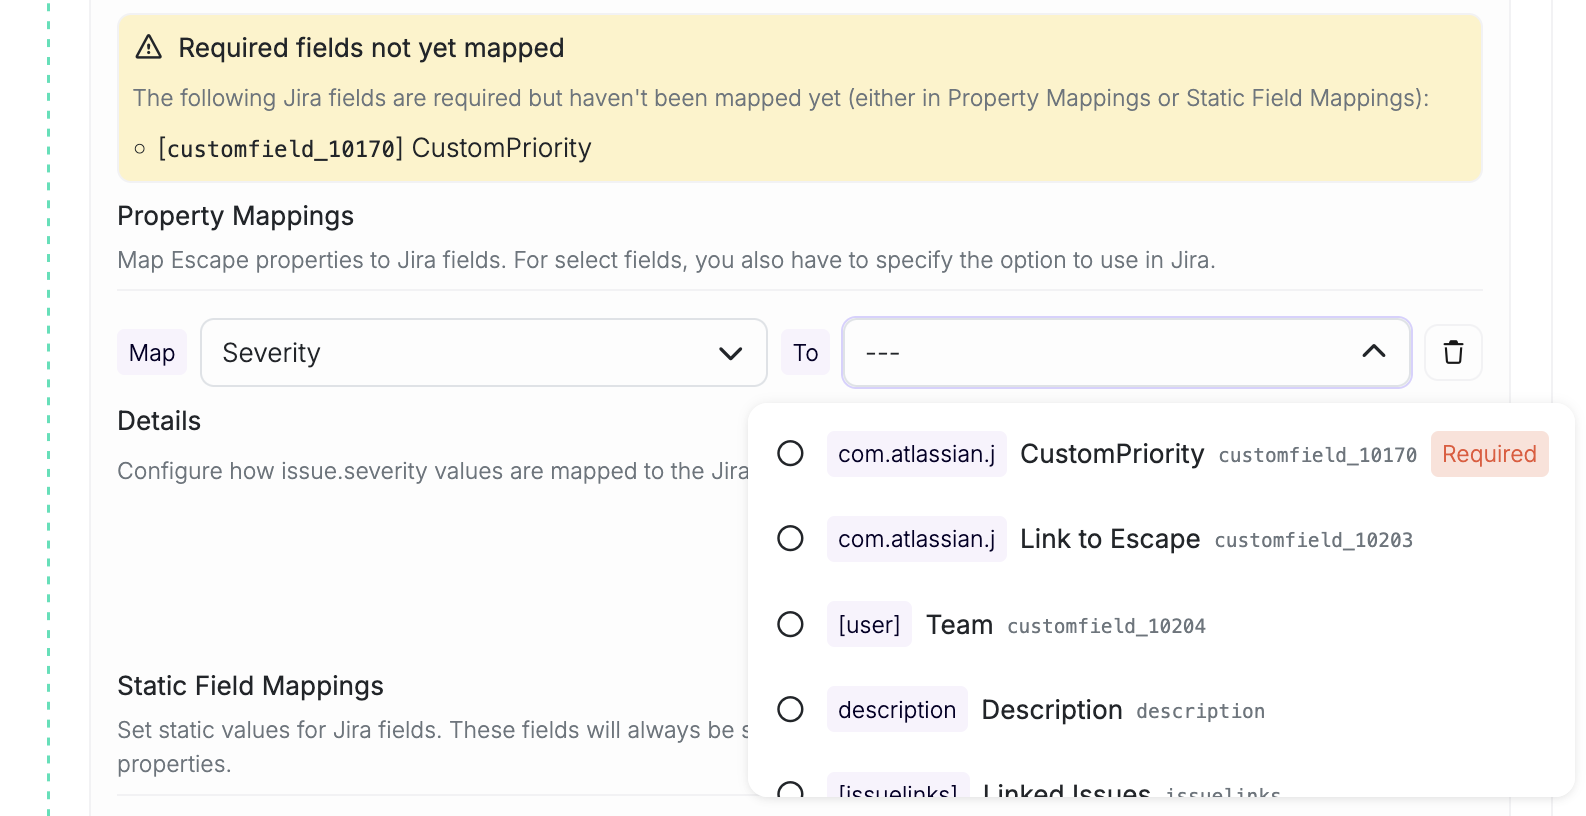
Property mappings allow you to map Escape properties to Jira fields dynamically based on the issue data.
Multiple Mappings for the Same Field
Summary and description concatenate multiple mappings. Other fields are overwritten by later mappings: dynamic mappings are applied first, then static mappings.
For summary, property mappings come before static mappings. For description, static mappings come first, then the generated content, then property mappings.
Available Escape properties for mapping:
Issue Properties:
- Severity
- Created At
- Name
- Category
- Context
- Status
- Full Remediation
- Targets
- Link in All Issues
- Link in Asset
- Link in Scan
- Link in Profile
Profile Properties:
- Profile Name
- Profile Scanner Kind
Asset Properties:
- Asset Name
- Asset URL
- Asset Tags
- Asset External URL
- Asset Type
- Asset Class
Custom Rule Properties:
- Custom Rule Name
- Custom Rule Link
For certain fields (Severity, Category, Status, Asset Class, Asset Tags, Asset Type), you can configure value mappings. This allows you to map specific Escape values to specific Jira field options. For example, you can map "Critical" severity to "Highest" priority in Jira.
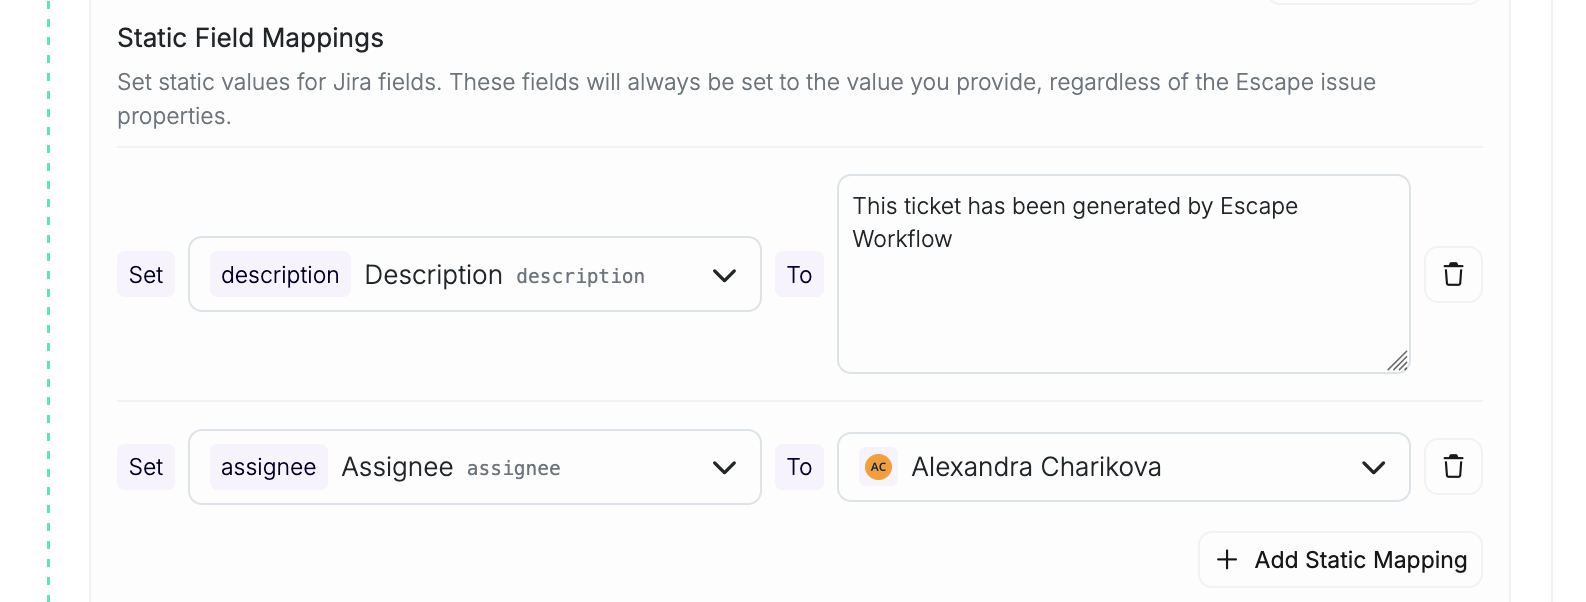
Static Properties
Static properties mappings allow you to set fixed values for Jira fields regardless of the Escape issue properties. This is useful for fields that should always have the same value, such as assigning tickets to a specific team or setting a default component.
Required Fields
The system automatically detects required fields for the selected project and issue type. If any required fields aren't mapped (either through property mappings or static mappings), a warning will be displayed listing the unmapped required fields.
Usage
Creating Tickets From Workflows
New Issue and Manual workflows create tickets according to the configured mappings. Issue Updated workflows synchronize linked-ticket status.
Creation skips Ignored and False Positive issues. An export with only Ignored or False Positive issues fails. Existing tickets are skipped, including tickets from other workflows. Manual workflows can recreate a ticket only when it belongs to that workflow and Escape confirms it no longer exists in Jira.
Creating Tickets Manually
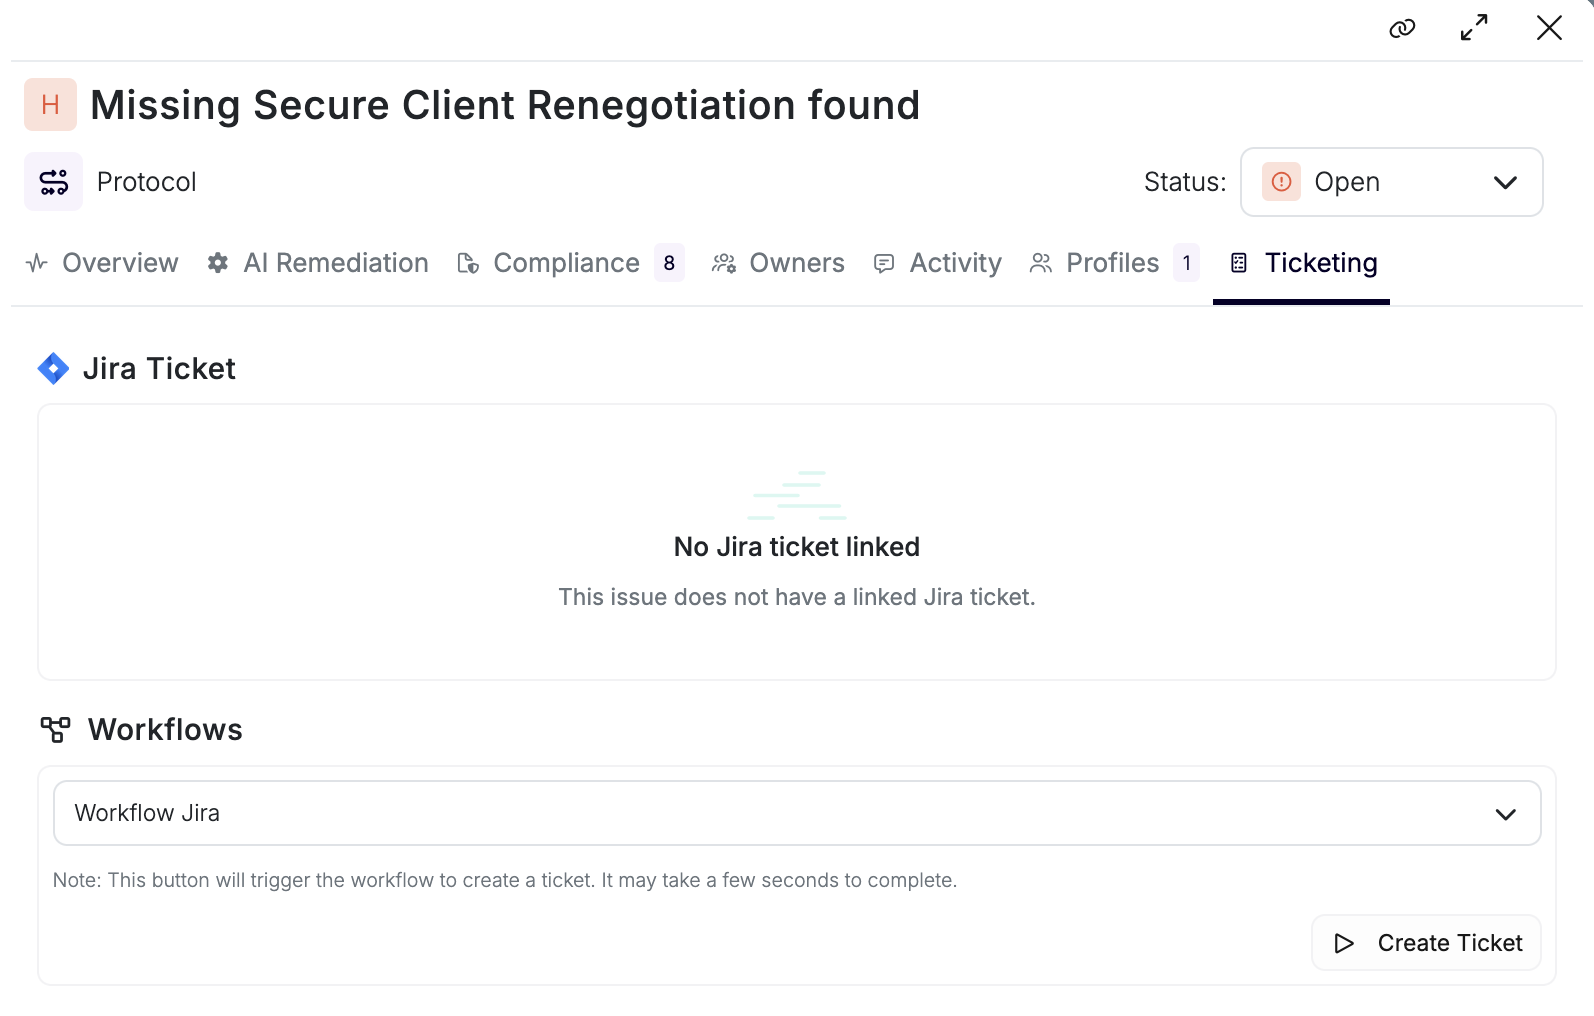
You can also create Jira tickets manually from the Ticketing sidepanel on any issue. This uses workflows configured with Jira export actions.
To create a ticket:
- Navigate to an issue sidepanel
- Open the Ticketing tab
- Select a workflow that includes a Jira export action
- Click Create Ticket
The workflow's Jira export action configuration (project, issue type, and mappings) will be used to create the ticket.
Filtering Issues By Ticket Presence
On the All Issues page, use Has Ticket to select issues with or without a linked ticket across supported providers, including Jira.
Bi-Directional Sync and Status Behavior
This section answers how Escape and Jira stay in sync when issues or tickets change state.
Jira → Escape (When a Ticket Is Closed in Jira)
When a Jira ticket linked to an Escape issue is closed in Jira (for example, moved to a "Done" status or given a resolution), Escape will resolve the corresponding issue the next time the Jira integration is pulled. Pull runs on a schedule (at least once per day per integration). If you reopen the ticket in Jira, the next pull will reopen the issue in Escape.
No workflow configuration is required for this direction: the sync is performed by the built-in Jira pull.
Retest After Closing in Jira
Closing the ticket resolves the linked Escape issue on the next pull. That doesn't replay the finding. To check the fix, start an Issue Retest from a Jira automation rule that calls POST /v3/retests.
The route needs the Escape profile id and the Escape issue id. Those ids aren't Jira fields on their own. They're inside the links Escape can write on the ticket:
| Escape property | URL |
|---|---|
| Link in All Issues | https://app.escape.tech/all-risks/issues/<issue id>/overview/ |
| Link in Profile | https://app.escape.tech/profiles/<profile id>/summary/ |
The default description already includes Link in All Issues as "View in Escape". Map both properties to their own text fields so the rule can read the raw URLs. Link in Profile is empty when the issue has no profile. Issue retest only runs on a DAST or AI Pentesting profile.
-
In the Jira export workflow, map Link in All Issues and Link in Profile to two text fields.
-
In Jira, create an automation rule. On Jira Cloud the trigger is Work item transitioned to Done. On Data Center it's Issue transitioned to Done. Limit the rule to the project that receives Escape tickets. Atlassian documents the trigger and the Send web request action in Jira automation actions.
-
Add a condition so the rule runs only when the profile link field isn't empty.
-
Add Create variable twice. The custom field ids below are placeholders. Replace them with the ids of your two text fields. Smart value text functions are documented in Automation smart values - text fields.
Variable
escapeIssueId:Variable
escapeProfileId: -
Add Send web request with custom data:
- Web request URL:
https://public.escape.tech/v3/retests - HTTP method:
POST - Headers:
Content-Type: application/jsonandX-ESCAPE-API-KEYset to an Escape API key. Hide the API key value. - Web request body:
- Web request URL:
The response id is the scan id. How to read verdicts is in Retesting issues.
A Verified fixed verdict resolves an open issue. A Vulnerable verdict opens a resolved issue again. With an Issue Updated workflow and a Jira export action, that reopen can move the ticket out of Done. The Jira pull can still resolve the issue before the retest finishes. A later Vulnerable verdict opens it again.
A retest doesn't start while another scan on the same profile is starting or running.
Escape → Jira (When an Issue Is Resolved or Updated in Escape)
| Action in Escape | Effect on the linked Jira ticket |
|---|---|
| Issue marked as Resolved (manually in Escape) | If you have a workflow with trigger Issue Updated and a Jira export action, the linked Jira ticket is transitioned to a Done-category status. |
| Scanner auto-resolves an issue (issue no longer seen in scans) | To close the linked ticket after a regular scan, either mark the issue as Resolved manually in Escape with an Issue Updated Jira export workflow configured, or close the ticket in Jira. Regular scan resolution leaves the ticket unchanged because it doesn’t trigger Issue Updated. |
| Issue marked as Ignored, False positive, or Accepted risk | Manage the linked ticket directly in Jira. Status sync maps Open to "To Do" and Resolved to Done. Other statuses, including Ignored, False positive, Accepted risk, and Manual review, leave the linked ticket unchanged. |
Keeping Jira in sync when the scanner resolves issues
If you want Jira tickets to reflect that an issue was fixed (no longer found by the scanner), either:
- Close the ticket in Jira when the fix is deployed. The next Jira pull will mark the issue as Resolved in Escape (and when the scanner no longer sees the issue, it will also be resolved on the Escape side).
- Mark the issue as Resolved in Escape after confirming the fix. If you have a workflow with trigger Issue Updated and a Jira export action, the linked Jira ticket will be transitioned to Done automatically.