Skip to content

2025

#142 · Improved Identification of Escape DAST Traffic

Escape DAST now makes it simpler to identify and securely whitelist scan traffic in your WAF.

To ensure your application remains accessible to Escape scans, you now have three supported options:

Screenshot 2025-12-24 at 14.05.31.png

  1. Whitelist Escape Public Locations IPs

  2. Use a Private Location

    → Private Location documentation

  3. Whitelist the Sec-Escape-User header in your WAF

    → Firewall configuration documentation

Sec-Escape-User Header for Secure WAF Whitelisting

As mentioned, all HTTP traffic generated by Escape DAST now automatically includes the Sec-Escape-User header.

This header identifies the Escape user who initiated the scan, making it easier to recognize legitimate DAST traffic in logs and WAF rules.

To configure custom HTTP headers and include a shared secret following the example configuration below:

network:
  sec_escape_user: true
custom_headers:
  X-MyCustomHeader:
    - secret123

Full documentation is available here.

For backward compatibility:

  • The x-escape-user header is still sent in API traffic and iin Web App DAST only if it was previously enabled

More details are available in the DAST configuration documentation.

⚠️ Security reminder: This can be used to identify HTTP traffic coming from Escape, but make sure to also verify the IP as headers can easily be spoofed by anyone!

With this new configuration:

  • Escape continues to send the default Sec-Escape-User header.
  • A custom header with a secret value is added to every DAST request.
  • Your WAF can allow traffic only when both the trusted IP range and secret header are present.

Why it matters

  • Fewer blocked scans in WAF-protected environments
  • Stronger verification of legitimate DAST traffic
  • Simple, flexible setup without weakening security controls

This update gives security teams greater control and confidence when running Escape DAST against production-like environments.

#141 · New Prerequisites Before Testing Scan Profile Configuration

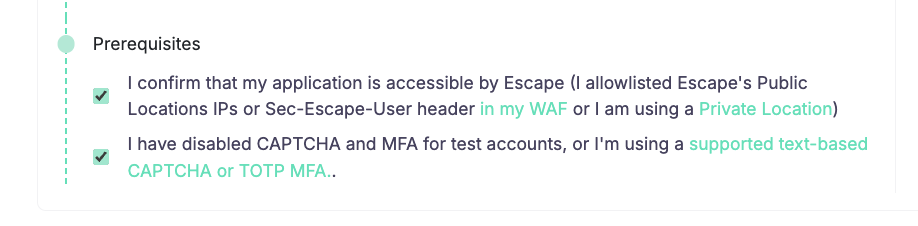
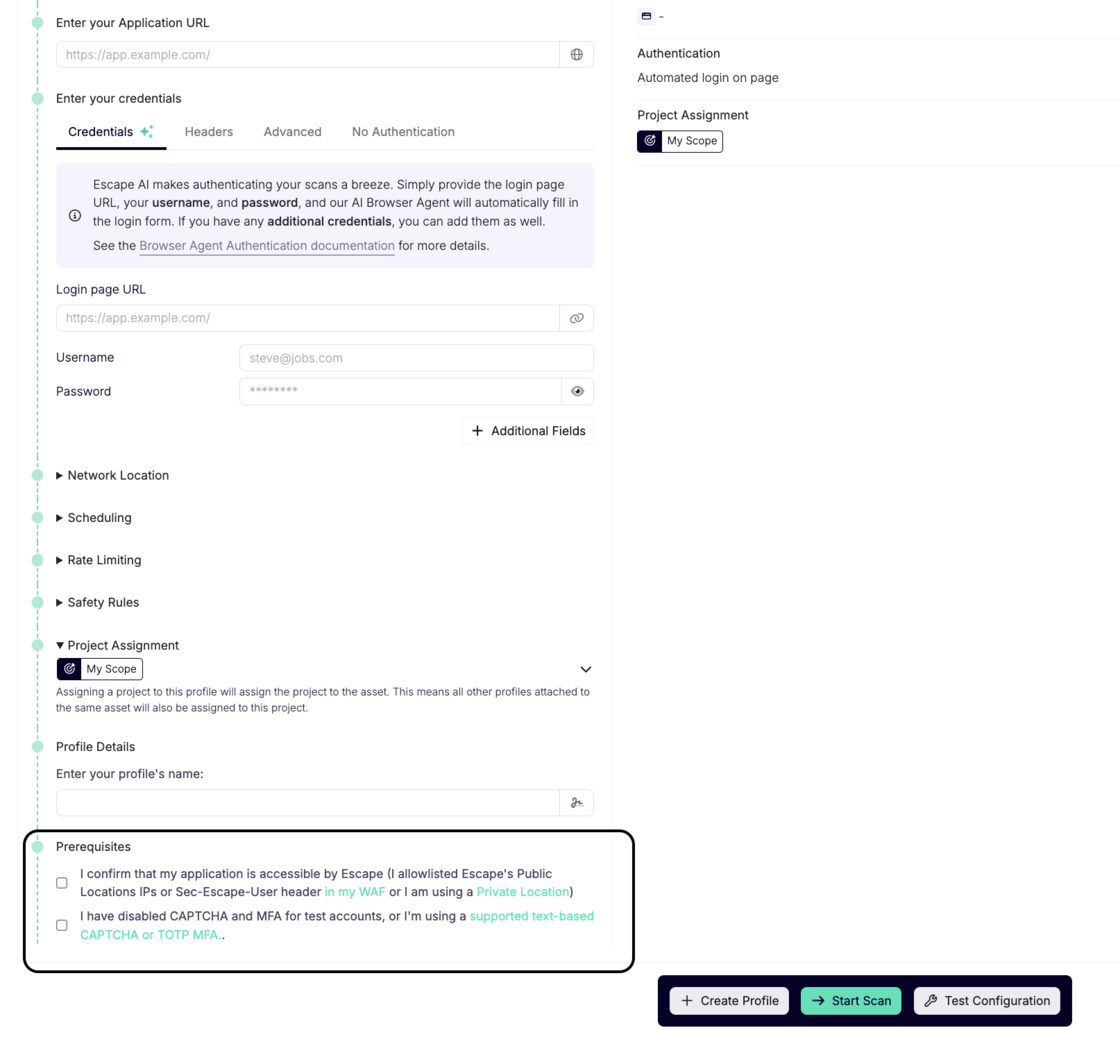
To ensure smoother and more efficient scan profile configurations, we’ve introduced new prerequisites that must be met before testing your scan profile (including testing authentication).

These steps will help prevent issues during testing your configuration and ensure a successful scan:

Screenshot 2025-12-24 at 13.39.42.png

  1. Application Accessibility

    I confirm that my application is accessible by Escape. This means either:

    Why this is required: Ensuring your application is accessible to Escape is essential for accurate scanning. If the application cannot be accessed due to IP restrictions or incorrect network settings, the scan will not run properly.

  2. Authentication Configuration

    I have either:

    Why this is required: CAPTCHA and MFA can block automated scanning tools. To prevent interruptions during testing, we require these features to be disabled or configured in a supported way for test accounts. This allows the scanning process to proceed without authentication issues.

Important Note: If these prerequisites are not met, the scan configuration will be blocked, preventing the testing from proceeding. By ensuring these conditions are in place, we can offer a smoother and more reliable scanning experience.

#140 · Escape now detects React2Shell exposure across your entire application surface with two dedicated checks

The recently disclosed React2Shell (CVE-2025-55182) vulnerability is already being exploited in the wild, with over 30 organizations breached and more than 77,000 Internet-facing IP addresses confirmed vulnerable.

Because React2Shell is actively exploited and can appear across many applications and environments, you need a way to identify exposure quickly and at scale.

Over the weekend, we added support for this vulnerability.

Escape DAST now provides continuous, automated detection of React2Shell at scale across all your applications and environments.

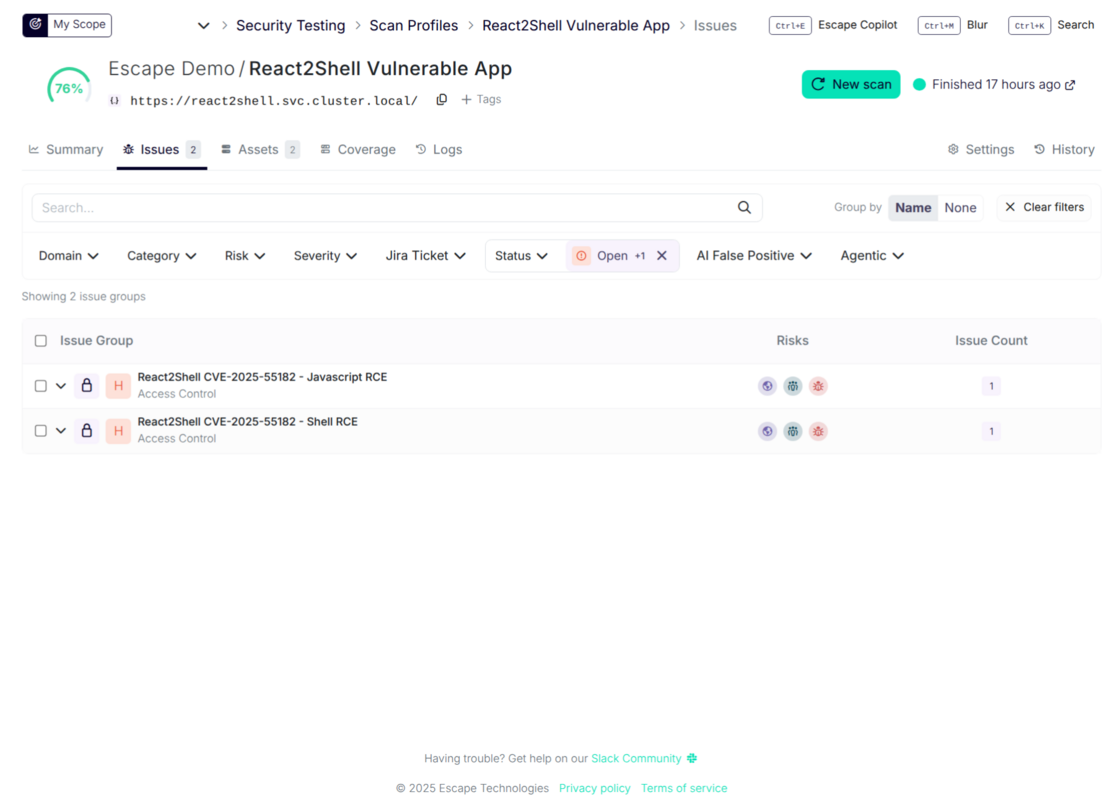
To give teams complete visibility into both vulnerability presence and real-world exploitability, we’ve introduced two dedicated checks:

1. React2Shell CVE-2025-55182 – JavaScript RCE

This check identifies whether the underlying JavaScript runtime is vulnerable to the core React2Shell issue.

Benefit: Quickly determine which assets are at risk of the vulnerability itself

2. React2Shell CVE-2025-55182 – Shell RCE

This simulates a full server compromise by testing whether remote command execution (system-level shell access) is achievable.

Benefit: Confirms whether an attacker could escalate to total server takeover

react2shell2.png

To safely and reliably confirm RCE, Escape uses controlled payloads that spawn a subprocess executing a harmless expression, for example:

echo $numberA + $numberB

Escape then inspects the application’s response for the computed result, proving whether arbitrary commands can execute without performing any destructive action. This ensures both zero-risk validation and high-confidence detection.

Escape’s detection is designed to be safe and non-destructive. Some environments may block or filter subprocess calls, which can lead to false negatives. To reduce this, Escape runs multiple payload variants and provides two separate checks—one for vulnerability presence and one for full Shell RCE—offering high-confidence detection across diverse environments.

Two complementary checks (JS RCE + Shell RCE) reduce the chance of missing exploitable cases.

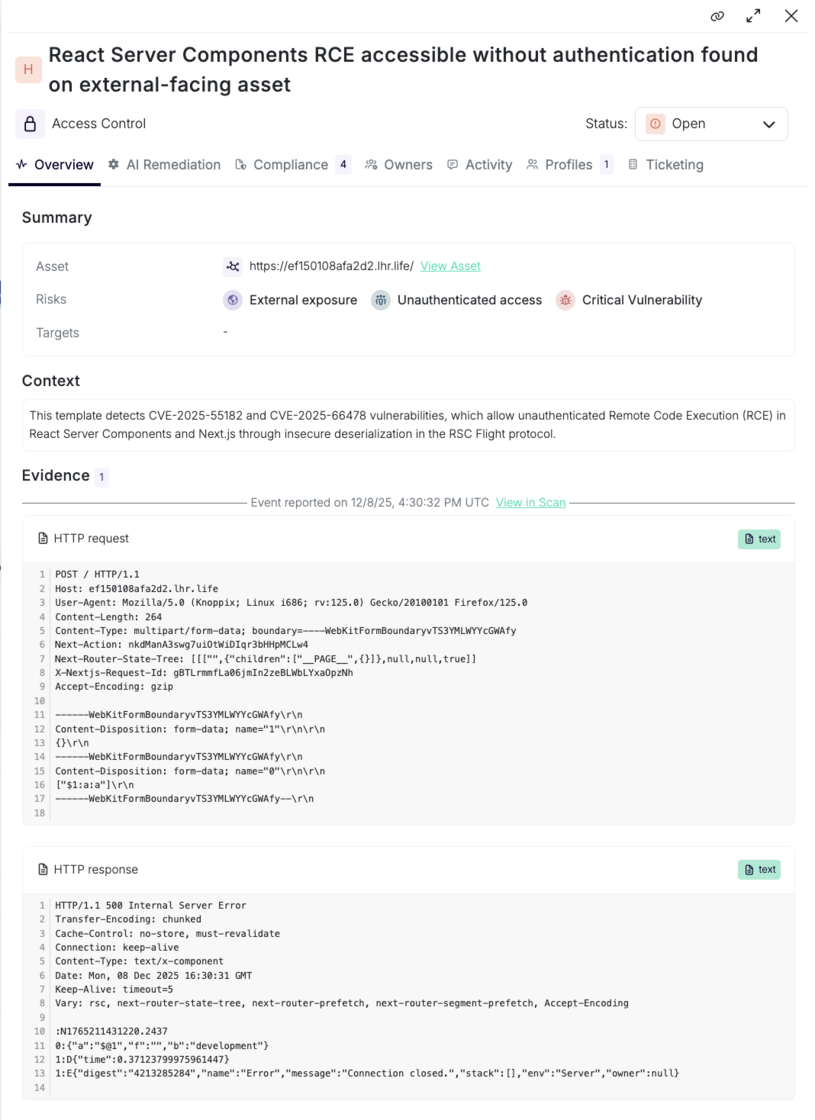
Proof of exploitation

Escape provides clear, reproducible evidence whenever React2Shell is exploitable.

By using safe, controlled payloads that trigger the server to execute a harmless command, Escape can confirm whether remote code execution actually occurred. The result is shown directly in the scan findings, giving teams:

  • High-confidence confirmation of real RCE
  • A precise payload/response pair demonstrating the exploit
  • Clear separation between vulnerability present and vulnerability exploitable

This allows security teams to triage React2Shell based on verified impact:

evidence.png

Guided remediation

Each finding includes detailed remediation guidance tailored to your environment. Escape highlights:

  • How to validate and reproduce the vulnerability associated with the React2Shell CVE-2025-55182
  • Recommended remediation steps

For all organizations, we recommend implementing a WAF rule to block exploitation immediately (if not already done) and updating the React versions in use to 19.0.1, 19.1.2, and 19.2.1, which are not vulnerable.


With these new checks, organizations can immediately:

  • Detect React2Shell vulnerabilities anywhere in their environment
  • Understand which systems are merely exposed versus fully exploitable
  • Prioritize patching and mitigation based on true attacker impact
  • Maintain continuous monitoring as environments change

By combining proof of exploitation with actionable fixes, Escape enables security and engineering teams to prioritize and remediate React2Shell quickly and confidently—across all applications and environments.

#139 · Introducing Projects: Turn Visibility Into Action With Clear Ownership

Today, we’re releasing Escape Projects, a new way to organize your assets within Escape platform and assign access so teams can quickly act on the findings that matter to them.

For companies operating across multiple brands, managing acquisitions, or running split engineering teams, the old tag-based RBAC model made it hard to know what assets belong to what team, who should have access to it, and who should fix what. Too many people had access to too many assets, saw too many findings, and not enough action followed.

Projects change that.

“We’re looking forward to this because it will be easier for us to add the right people, put the assets in the right project, and let them start reviewing findings and patching what they need to patch.”

Why This Matters (the real problem we’re solving)

Security teams can have great overall visibility — but ownership isn’t clear, which means findings linger.

Projects give you:

1. Clear ownership

Teams see the assets and findings they’re actually responsible for.

2. Less noise, more action

Engineers stop sifting through information that doesn’t belong to them.

3. Faster remediation loops

By mapping subdomains, apps, or brands to their owners, teams can act immediately and remediation progress over time.

4. Enterprise-scale flexibility

Perfect for companies with multiple brands, complex org charts, or frequent M&A activity.

In short:

You turn visibility into action. And action into real security improvements.

What’s New

1. Project-Based Access Control

Create Projects that map directly to your real-world structure (brands, business units, product teams, regions, etc.).

Assign assets to Projects and bind the right users with scoped permissions.

2. Tags Are No Longer Used for RBAC

Tags stay in the product for filtering and scanning logic—but they no longer control access.

3. Old Team Roles Have Been Removed

We’ve replaced legacy team roles with clearer, more predictable project-scoped roles.

4. Assets Drive Access, Not Profiles

Profiles themselves aren’t tied to Projects.

Their assets are — giving you flexibility as your org evolves.

5. Global Elements Stay Global

For compatibility:

  • Custom Rules remain global and need a global role binding to edit
  • Workflows also remain global
  • During scans, existing tag-based rules still apply

How It Works

  1. Go to Organization Settings → Projects: This is where you create, edit, and manage Escape Projects.
  2. Create a Project:

Projects can represent brands, teams, BU's, regions, or any logical ownership boundary. Examples: “Brand A”, “Payments”, “EU Web Team”, “Team A”.
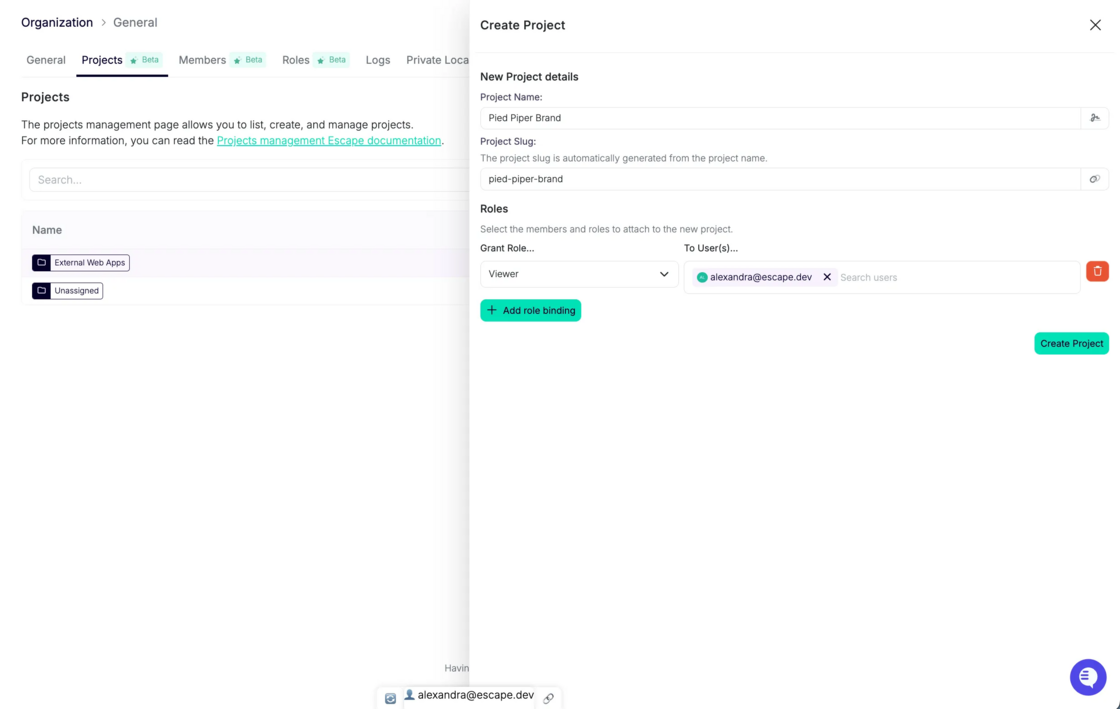
image.png

  1. Bind users to the Project with the appropriate role: Give team members the right level of access: Viewer, Editor, Admin, etc.
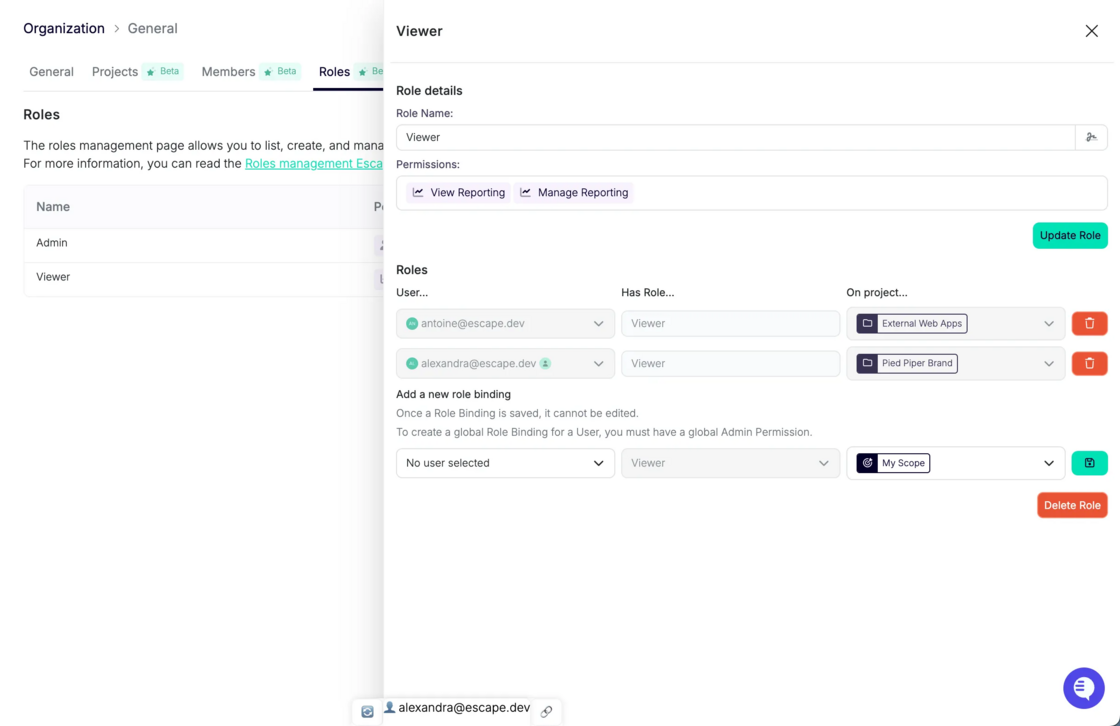
image.png

  1. View All Members of a Project: Under the Members tab, you can see who has access and with which role.
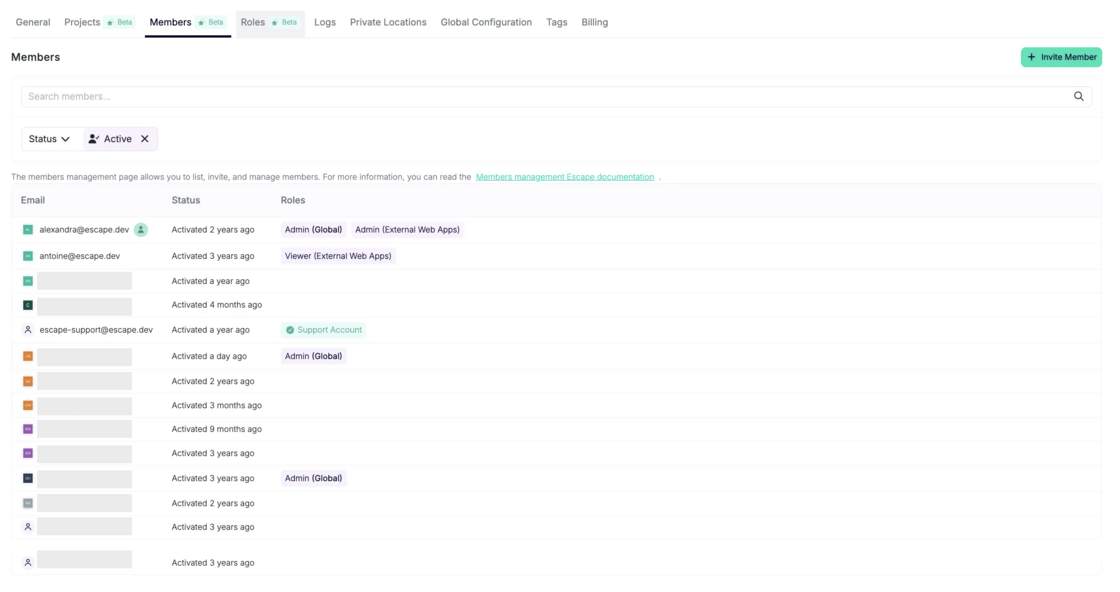
admin-users.png

  1. Assign assets to that Project:

Projects are powered by the assets they contain. Assign domains, subdomains, schemas, and profiles to each Project. All associated scan profiles and issues will be auto-assigned as a result.
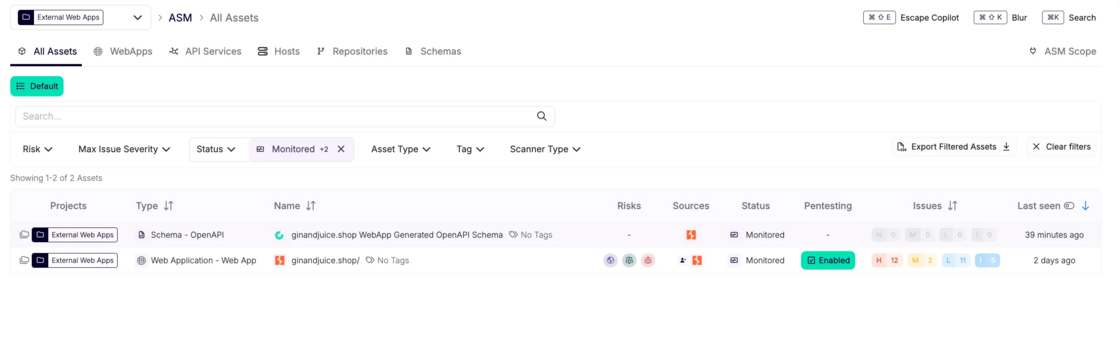
image.png It is possible to bulk assign par domain name or other filter of your preference:
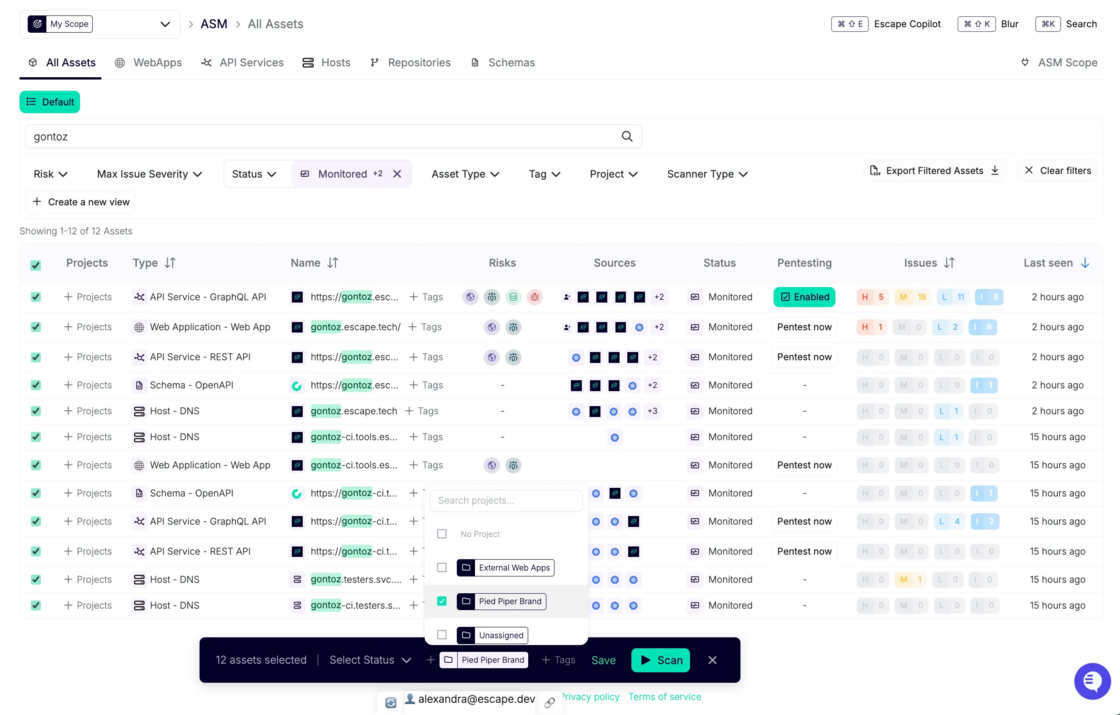
image.png

  1. Teams can now filter on the assets and findings they own:
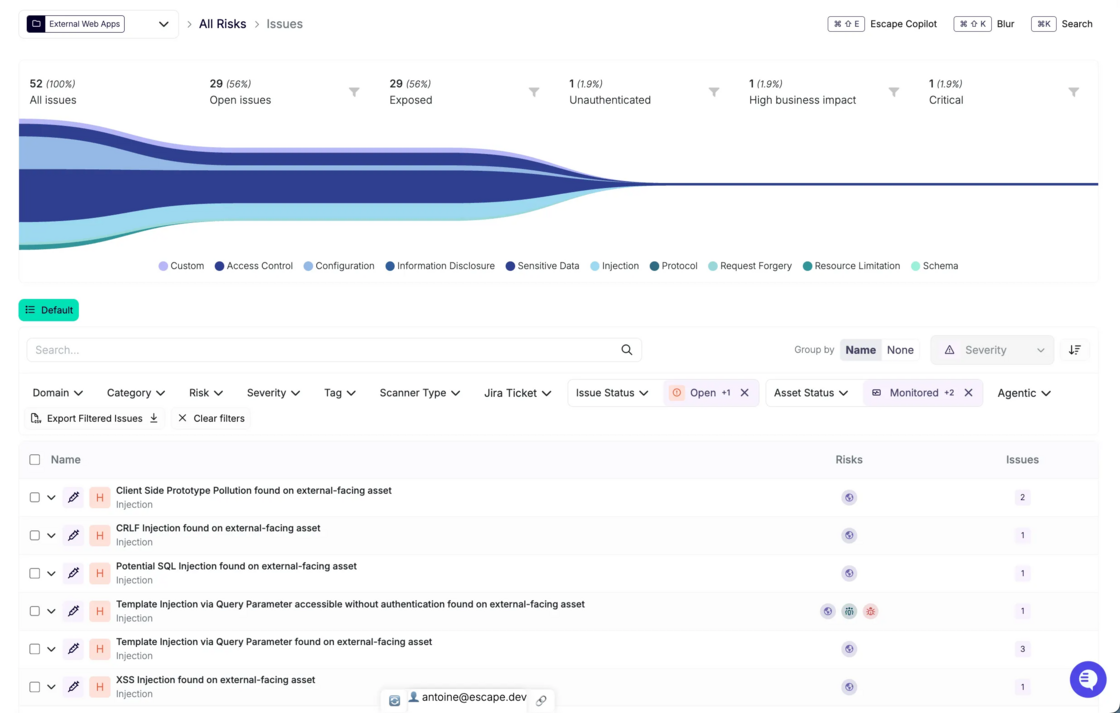
image.png

  1. Critical operations happening on projects (creating, editing, deleting) are audited and can be viewed in the audit logs page:
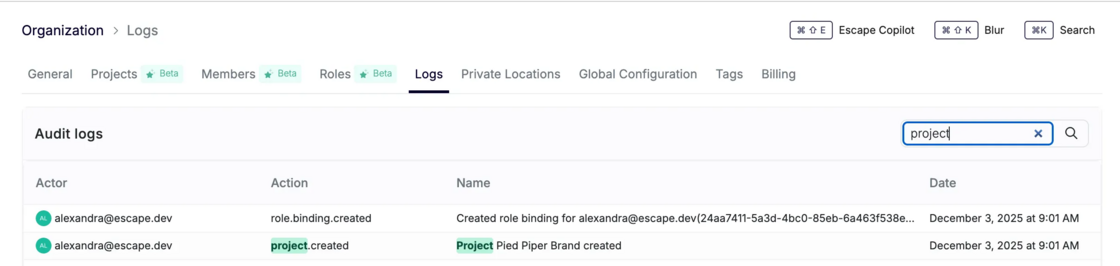
image.png

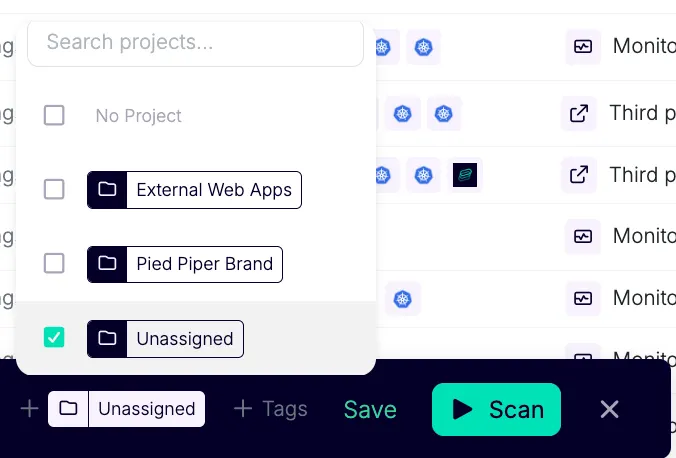
Assigning “Unclassified” Assets — Important

Every asset must belong to a Project.

If you have assets that are not yet classified, we recommend creating a dedicated Project such as: “Not Assigned”

You can bulk-assign these assets later from the Inventory. image.png
Use the Project filter and select “No project” to filter on any assets that are not yet assigned to a specific scope.
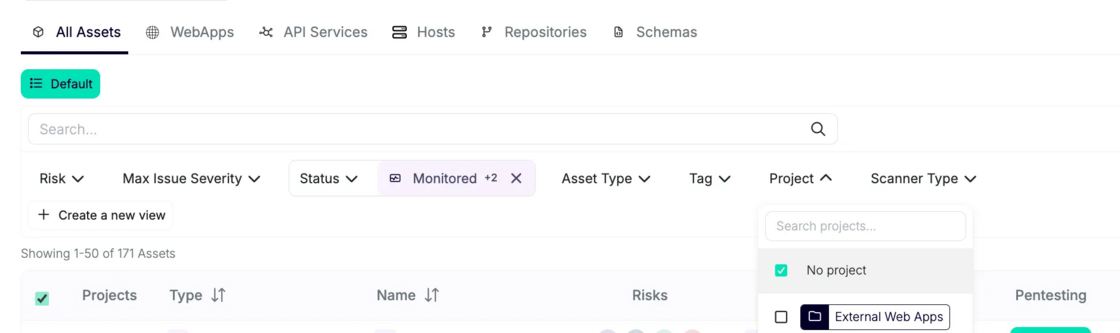
image.png

Why this matters:

Assets not assigned to any Project are visible org-wide, which breaks scoped visibility.

If you want clean, project-based access, everything must be assigned.

Concrete Example of How Projects Can Fit into Your Workflows

Let’s say you want a specific software engineer to only view vulnerabilities for the assets they work on — nothing else.

You would:

  1. Create a Project called “Team A”
  2. Assign the relevant assets to that Project
  3. Bind the engineer to the Project with
    • View Reporting
    • Manage Reporting
  4. When they log in, they will only see
    • The assets they own
    • The vulnerabilities and findings related to those assets
    • Their filtered list inside the All Issues tab

If the engineer works across multiple projects, their scope will simply be the union of those Projects, and they can still filter down to a single Project when needed.

⚠️ Important Note About Deleting Projects

Deleting a Project currently deletes all assets it contains.

This will change in an upcoming update.

For now, please unlink assets before deleting a Project.

What’s Coming Next

We're already working on scoping more functionality to Projects, so teams can operate independently end-to-end.

Coming soon:

  • Workflows scoped to Projects
  • Integrations scoped to Projects (Slack, Jira, etc.)
  • Project-scoped reporting
  • Automated alerts for each team, routed only to the relevant Project
  • More granular API support

For now, automated workflows can be built through the Escape API (Beta): https://public.escape.tech/v3/#tag/beta/post/projects
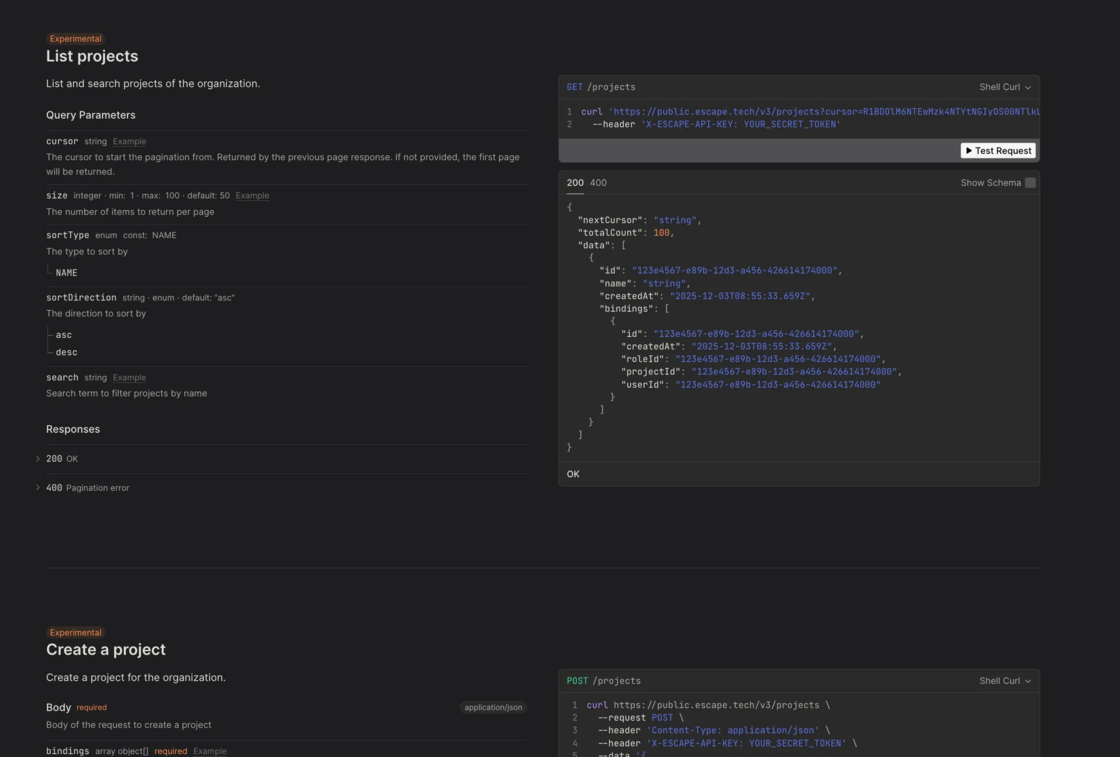
image.png

To sum up, with Projects in place, your organization gains:

  • Deeper visibility into ownership
  • Clearer accountability across teams and brands
  • Actual action on findings — not just reporting
  • A scalable RBAC model that grows with your environment

It’s a practical step toward helping teams move from simply seeing issues to actually addressing them — with the right people looking at the right assets from day one.

Want to make sure Escape Projects are available on your account? Reach out to your dedicated Escape representative.
#138 · Verify and Filter API Scans for Method-Specific Coverage (GET, PUT, POST, DELETE)

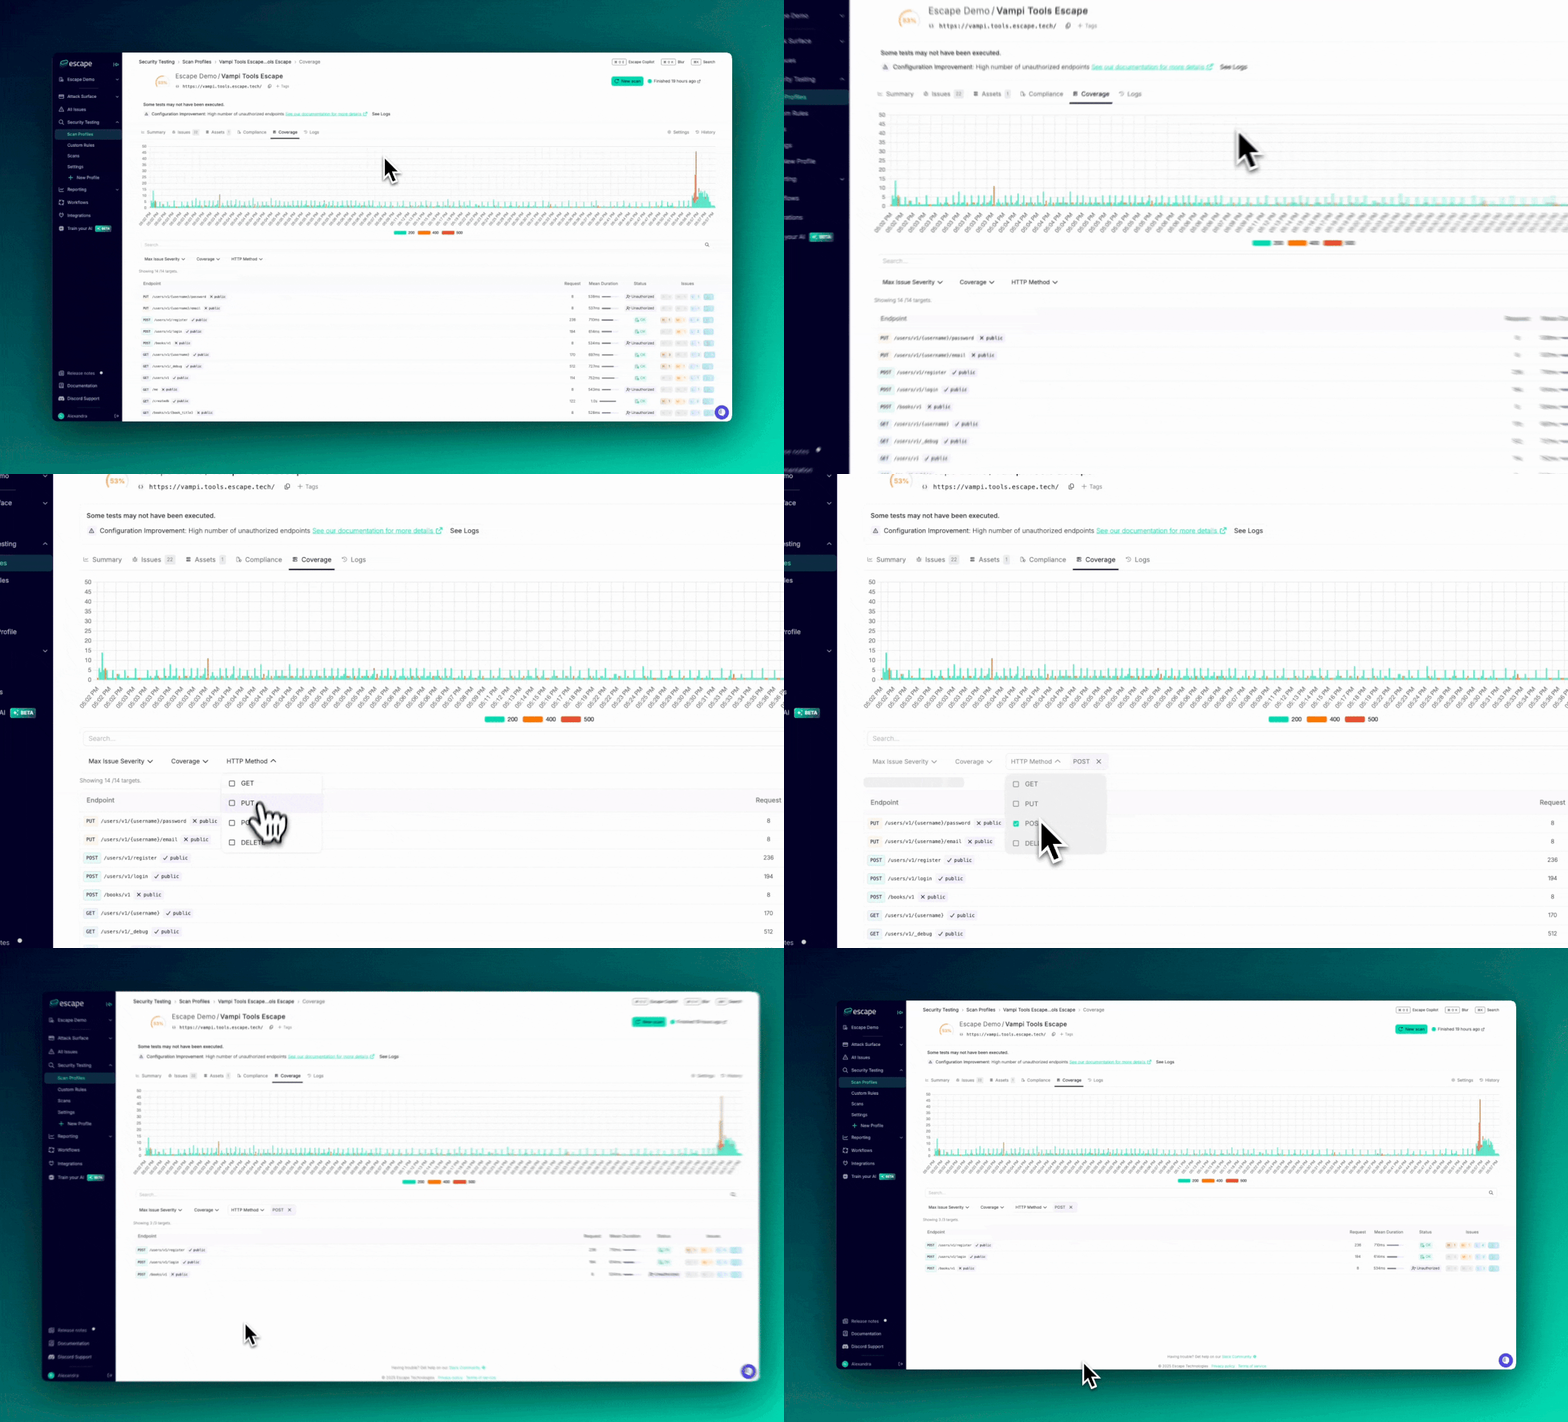
As a security engineer, you need to ensure thorough testing of all API request methods. With our new HTTP Method filter, you can now easily focus on verifying whether specific request methods (GET, PUT, POST, DELETE) were tested when reviewing your scan coverage.

Why This Matters :

Different HTTP methods can introduce different types of vulnerabilities. For example:

  • PUT requests might enable file uploads or modifications, increasing the risk of improper access control.
  • POST requests often involve sensitive data, making them prime targets for attacks.
  • GET requests could expose information, putting data security at risk.
  • DELETE requests introduce the potential for data loss or accidental deletions.

By filtering targets by HTTP method, you can ensure that each method was thoroughly tested for vulnerabilities. This also provides a clear view of your scan coverage, making it easier to demonstrate to leadership that all critical methods have been properly tested.

filter.gif

Key Benefits:

  • Focused Vulnerability Testing: Easily check that the most sensitive request methods (PUT, POST, DELETE) have been adequately tested.
  • Improved Efficiency: Filter out unnecessary data and concentrate on the most relevant request methods to save time.
  • Comprehensive Coverage: Make sure no high-risk request methods are overlooked in your security reviews.

How to Use:

  1. Go to your Scan Profiles.
  2. Navigate to the Coverage tab for a specific scan.
  3. Apply the HTTP Method filter and choose GET, PUT, POST, or DELETE to refine your targets.

This update helps you stay focused and ensures that your API security testing is comprehensive and efficient.

#137 · Reproduce Complex Exploits in Escape: Multi-Step Custom Rules Are Here

Until now, custom rules in Escape were limited to single-request vulnerabilities. You could only define and test one request at a time.

This meant that more complex vulnerabilities, such as those requiring multiple chained steps (e.g., creating a user, then editing that user to escalate privileges), couldn’t be implemented.

That changes today.

Introducing Multi-Step Custom Rules

You can now chain multiple requests together in a single custom rule, allowing you to simulate complex attack flows, just like a pentester would.

With multi-step rules, you can:

  • Extract data from one request (e.g., a token, user ID, or session key)
  • Modify and reinject it into subsequent requests
  • Recreate full exploitation chains that were previously impossible to model in Escape

Plus, you can now learn from bug-bounty and external reports: when a report (for example, a HackerOne finding) describes a multi-step exploit, you can implement it directly in Escape to validate, triage, and create reproducible test cases.

This unlocks the ability to implement virtually **any vulnerability scenario (**even the most advanced ones) directly inside Escape.

Get started: this is available now in our API scanner. See the docs and specific examples here.

#136 · New Escape's Public Locations available

We’ve added three new Escape Public locations to the platform, located on West Coast, USA, along with their associated IPs. If you want to allow incoming traffic from these locations, you'll need to enable them.

Previously, Escape locations were available only in Europe and Canada. You can find the complete list of public Escape locations and their corresponding regions in our available on our documentation.

To enable these locations, go to Settings → Private Locations and activate the "United States" locations. While these locations are accessible to all organizations, they are disabled by default.

#135 · Quickly Validate and Streamline Scan Profile Configuration Before Launch

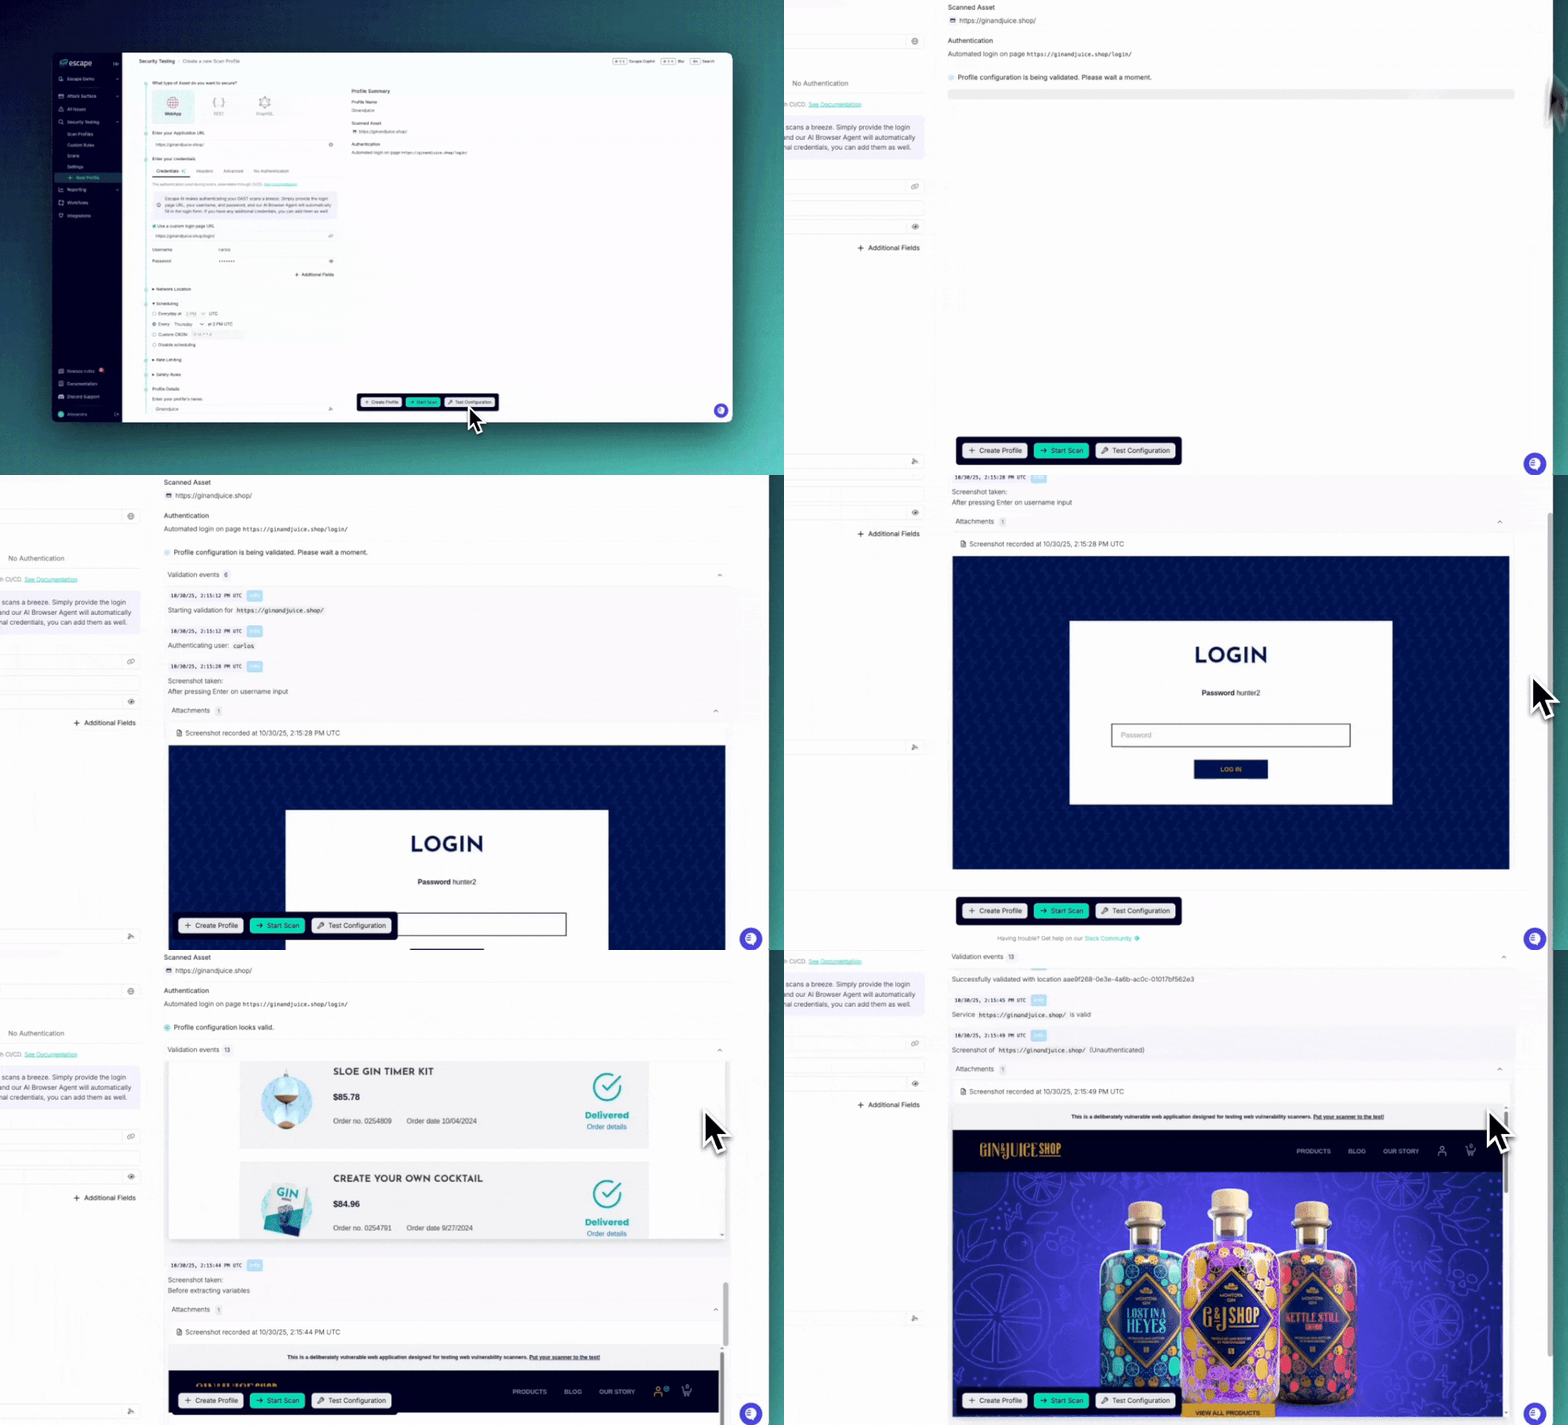
We’ve improved our Test Configuration feature in the scan profile creation form that allows you to quickly validate your settings and ensure your scan profile is correctly set up before launching. This enhancement helps you save time and avoid potential errors by allowing you to review all your settings in real-time. Clipboard-20251030-145314-667.gif

What’s New:

  • Streamed Validation: When validating configurations, such as Browser Authentication, screenshots and results are now streamed progressively. This means you can see feedback in real-time, rather than waiting for the entire process to finish, giving you quicker insights and enabling adjustments on the fly.
  • Validate Before Profile Creation: You can now validate your settings before creating a scan profile or integrating it with other systems. This ensures that everything is properly configured, reducing the likelihood of issues when the scan starts.

How to Use:

Once you’ve set up your new scan profile, simply click on the Test Configuration button. This will trigger the validation process, allowing you to review and adjust key settings such as authentication, scheduling, rate limits, and more before finalizing your scan setup.

image.png

#134 · New "Create New Scan Profile" Form

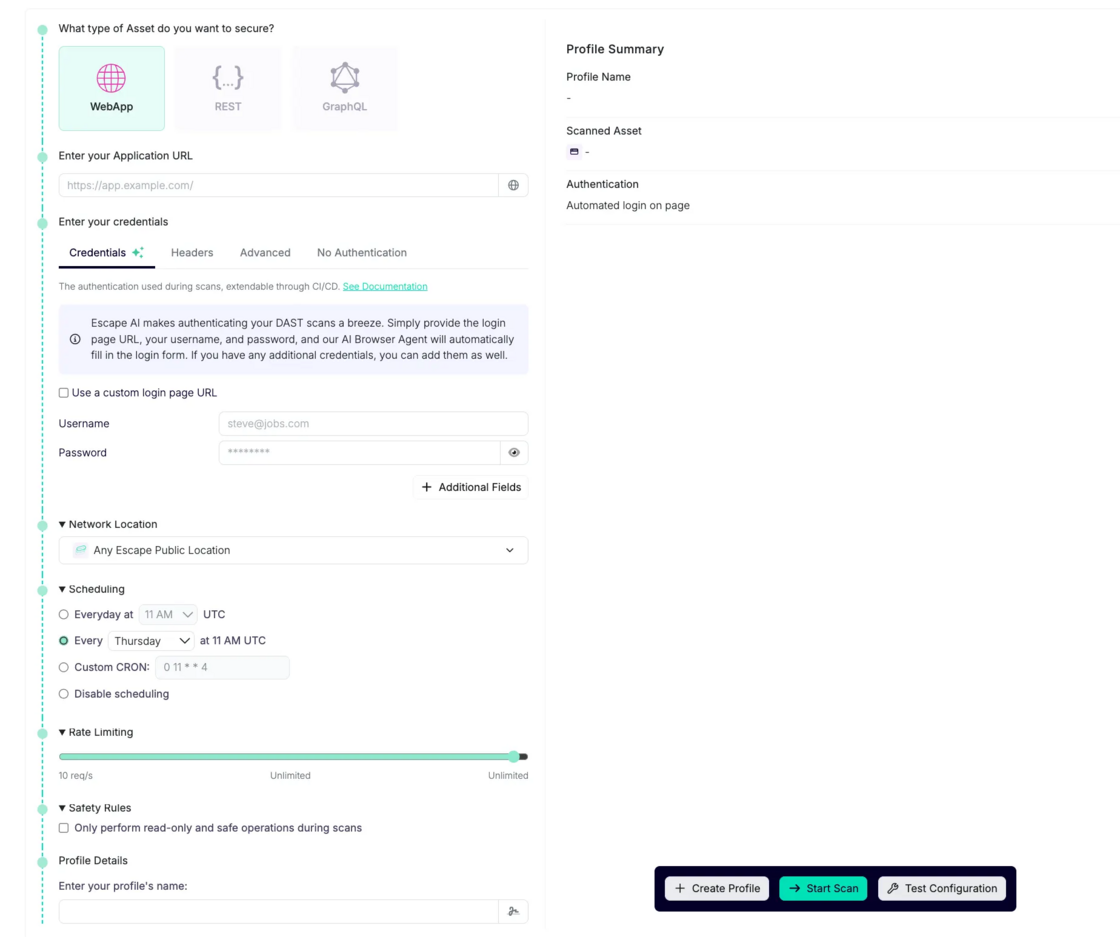
We’re excited to introduce an improved "Create New Scan Profile" form that addresses several key customer pain points. Users previously had to navigate through settings after creating an app to configure their scans, but now, this process is simplified, allowing for a much more in-depth setup right from the start.

image.png

Addressing Your Pain Points

Many of our users requested a more comprehensive way to set up their scans when creating a new scan profile, instead of configuring them separately through the settings later on. Here are the key features that were previously lacking but are now included in the new workflow:

  • Configure Advanced Authentication: Set up advanced authentication configurations during profile creation, including custom login page URLs, usernames, and passwords.
  • Create Profiles Without Starting the Scan: Scan profiles can be created without automatically starting the scan.
  • Configure Safety Rules: Check the box during scan profile setup to only perform read-only and safe operations during scans
  • Rate Limiting and Scheduling During Profile Creation: Configure scan rate limiting and set scheduling preferences directly while creating the profile, saving time and making setup smoother.
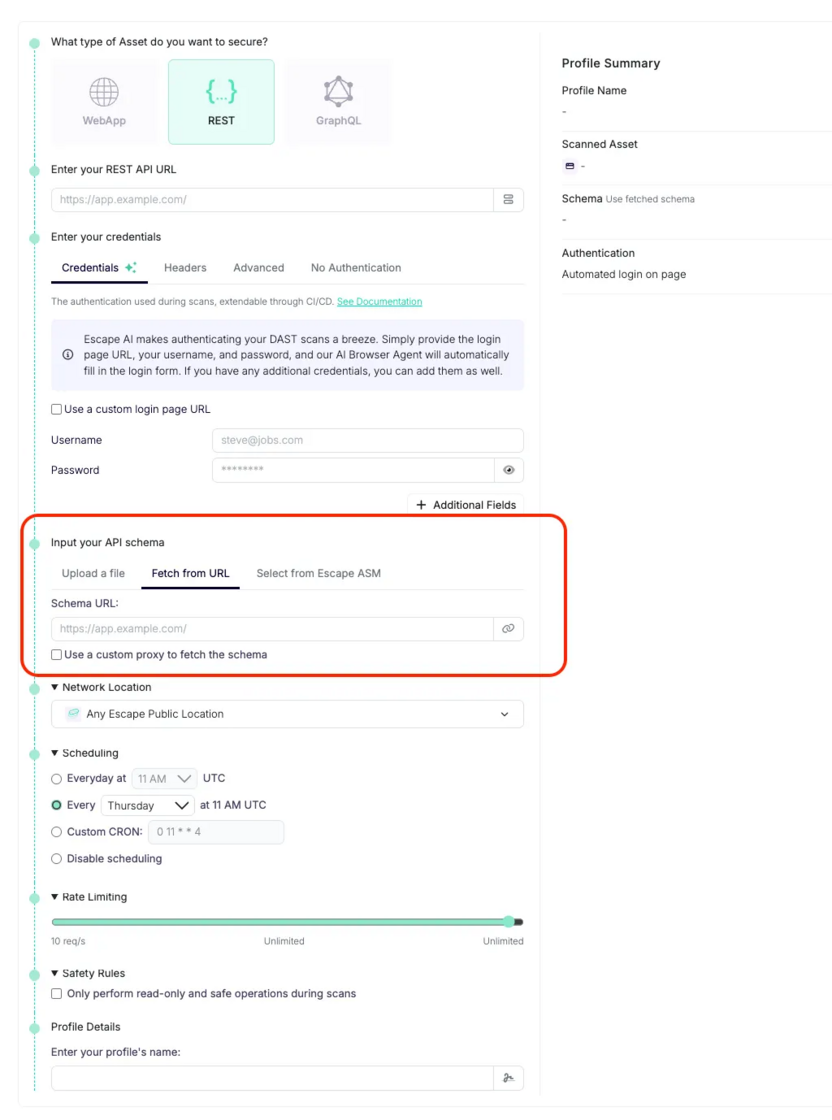
  • Fetch API Schema from Different Locations: Fetch API schemas from locations other than the app’s schema—useful if the API schema is stored separately.

All of these new creation steps are available via Escape API.

image.png

This new form simplifies and streamlines the process of creating and configuring scan profiles, ensuring that you can set up your scans with all necessary parameters from the start.

#133 · Scan Visualization by Time Period

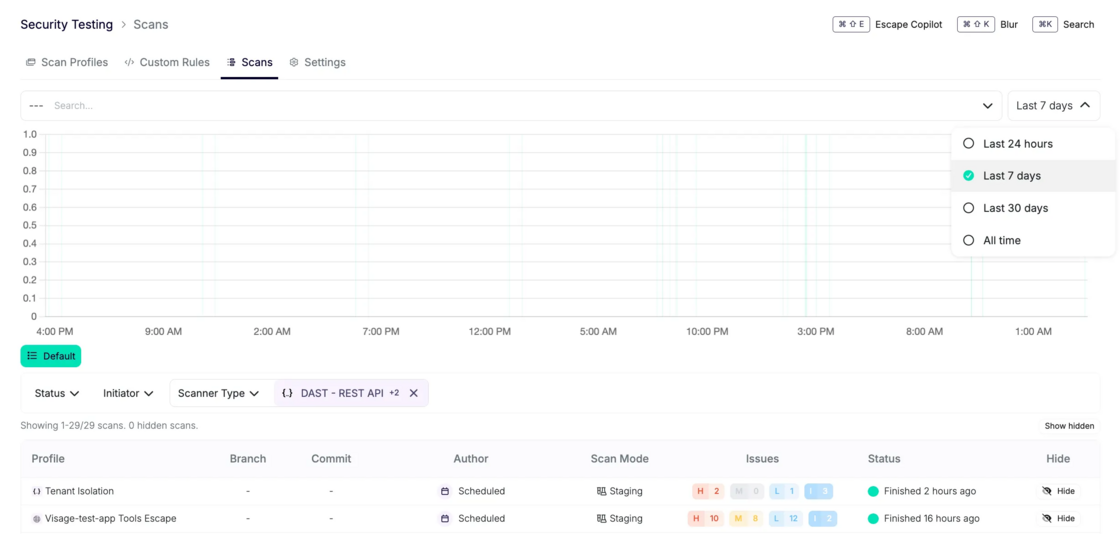
We’ve introduced a new improvement that allows you to visualize scans finished within a selected time period. You can now filter and view scans run within specific timeframes, such as 24 hours, 7 days, 30 days, or all time. By default, the scan data will be displayed for the last 24 hours.

This improvement gives full transparency and audit capabilities of all ASM and DAST scans and makes it easy to track scan activity over different time periods.

image.png