Skip to content

2024

#63 · Manage Labels at the Org Level

We have enhanced the existing app label management functionality to provide better organization-level control and scalability. Previously, labels were managed on a per-service basis, but now you can define and update labels centrally at the organization level while still retaining the flexibility to assign and customize labels at the service level.

What are Labels?

Service labels are custom tags that help you categorize, filter, and organize your applications. They are especially useful for teams managing large numbers of apps or workflows.

How it works

  1. Navigate to the Organization Settings by clicking on the name of your org.
  2. Select the Labels section. Screenshot 2024-12-17 at 14.53.22.png
  3. Create or update org-level labels with names and dedicated colors.
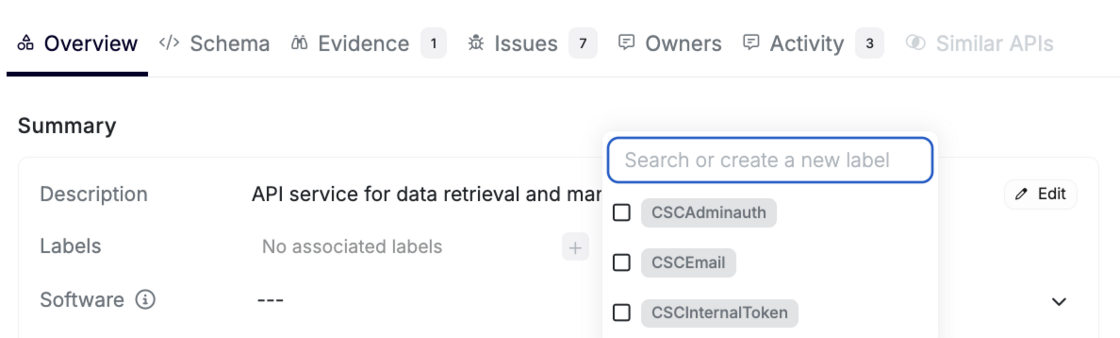
  4. Go back to Inventory -> All Services, click on the Service, and assign a dedicated label to the service in question. Screenshot 2024-12-17 at 14.54.19.png
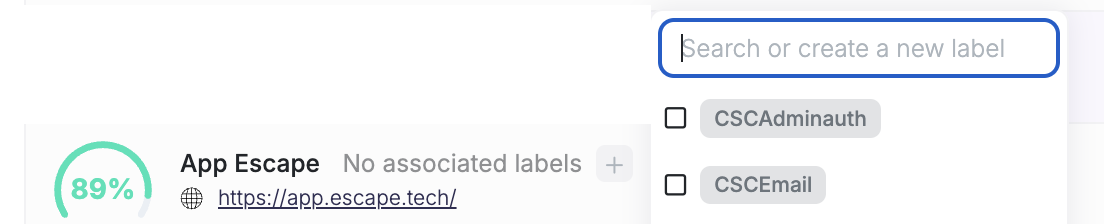
  5. You can also add a label to each scanned application by going to the Security Scan -> Tested Applications page and clicking on the plus button. Add as many labels as you want! Screenshot 2024-12-17 at 14.57.27.png
Improvement Highlights

Org-Level Label Management

You can now create and update standardized labels at the organization level. Existing app-level labels will remain unaffected unless explicitly overridden.

Permissions Control

Organization admins and editors retain exclusive permissions to manage org-level labels.

Users with viewer permissions can view or use these labels without altering org-level definitions.

Simplified Bulk Updates

Modifications made to org-level labels automatically propagate to all associated apps, reducing manual updates.

Now it's the perfect time to organize your inventory 😉
#62 · New Kubernetes Integration: Discover APIs in Kubernetes

As organizations scale their Kubernetes deployments, the number of services and APIs grows rapidly. Maintaining visibility into these resources is critical for securing the API attack surface and ensuring compliance.

Escape now supports Kubernetes integration, enabling users to discover services running in their Kubernetes clusters.

This integration simplifies the process of discovering undocumented and shadow APIs within your clusters, reducing operational risks and improving governance.

How it works?

Escape will read the services and ingresses defined in your cluster, determine if they are APIs, and will make them visible in the Escape Inventory.

Getting started

Step 1: Set Up a Private Location

You need to configure a Private Location as a Kubernetes deployment for Escape to interact with your cluster.

Step 2: Create Service Account and ClusterRoleBinding

To allow this deployment to access resources in your Kubernetes cluster, you need to create a Service Account and a ClusterRoleBinding.

You can use the sample YAML from the Escape documentation to create these authorizations (replace default with the right namespace if needed).

Step 3: Bind the Service Account

Add the following line to the spec section of your deployment YAML to bind the Service Account to the pod: serviceAccountName: escape-repeater

Step 4: Monitor Discovered APIs

Once the integration is enabled, Escape will automatically identify and display APIs in the All Services section of your inventory, allowing you to take further actions like securing, auditing, or analyzing them.

Not sure if your Kubernetes clusters have APIs? Now's the perfect time to find out! Integrate your Kubernetes with Escape and enrich your API inventory.

#61 · Escape SPA DAST Now in Beta

Modern web applications demand modern security solutions. That’s why we’re excited to announce Escape’s security platform expansion into single-page application (SPA) security testing.

We're now in closed beta. We're looking for additional users to test it out and provide feedback.

🔗 Sign up here for the closed beta

What we built

In addition to its unique, feedback-driven DAST for APIs, Escape now offers Dynamic Application Security Testing (DAST) for SPAs. This is more than just an incremental feature—it’s a powerful extension of our API security platform. Our new front-end DAST is specifically designed to detect vulnerabilities in single page applications and highlight business logic errors.

With Escape’s DAST, you'll be able to identify common static vulnerabilities, CVEs, secret leaks, and outdated or vulnerable dependencies while automatically detecting the APIs consumed by your applications (both internal and third-party) and seamlessly syncing with your existing API security workflows. The tool reinforces our API DAST capabilities by accessing more context and user stories.

What makes Escape's DAST for SPAs stand out

  • Automated Authentication: Simply enter your credentials, and the front end handles the rest. Custom manual authentication is still available.
  • Schema-Driven Precision: Your application schema can be programmatically updated to keep Escape synced with your endpoint’s evolving structure. No manual maintenance required.
  • Tailored for Front-End: While still evolving, Escape leverages our proprietary business logic algorithm, initially designed for APIs, to gain a deeper understanding of single-page applications. This allows us to detect vulnerabilities where traditional tools often struggle, with continuous improvements as we learn more about the unique challenges of front-end security.
  • Automatic API Detection, Mapping, and Security: Escape automatically detects and maps the APIs consumed by your front-end application, including both internal and third-party APIs. We generate specifications for each API and test them for vulnerabilities immediately.
  • Unified Security Insights: Vulnerability data is linked to API insights, giving you a comprehensive view of your attack surface.

Next step - Remediations: As with our DAST for APIs, we plan to customize each remediation code snippet to align with specific frameworks in the near future.

Want to help us make Escape DAST better?

🔗 Sign up here for the closed beta

With this new front-end testing feature, we’re delivering a solution that doesn’t just work but works smarter, helping teams focus on fixing vulnerabilities rather than fighting with tools.

#60 · New updates to Escape's Public API

We’re excited to announce two powerful updates to Escape's Public API, designed to enhance your workflow and make application management even more efficient:

  1. Search Endpoint /organization/{id}/applications/search​: Effortlessly locate and filter your applications with this new endpoint. Save time and streamline your workflows by quickly accessing the information you need.
  2. Scheduling via /create-application:

  3. Custom Scanning Schedules: Use cron in the request body to specify the exact frequency of your scans.

  4. Disable Scheduling: Flexibly manage scans by disabling the schedule through disable scheduling in the same endpoint.

Getting started

Ready to explore these new features? Check out the documentation for details:

🔗 Search Applications Endpoint

🔗 Scheduling Features

#59 · Private Locations: Securely scan your internal applications

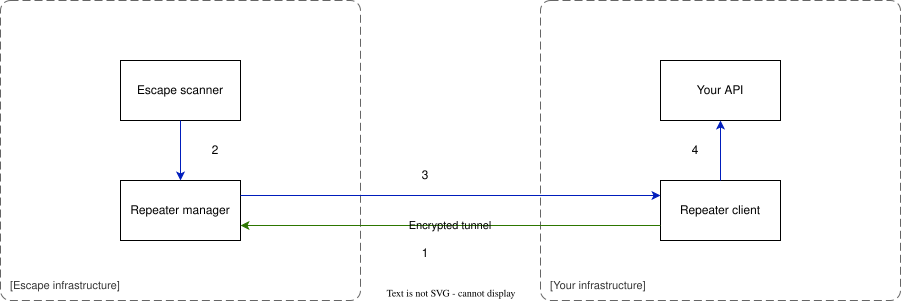
Private Locations let you detect, fingerprint, and scan your internal applications securely—no matter if they’re behind a firewall, VPN, or in a private network. Using the Escape Repeater, you can establish a reverse tunnel between Escape and your internal network. This setup provides a secure channel for performing scans and retrieving results.

Why?

Many organizations operate internal applications that are not exposed to the public internet, making them challenging to assess for security vulnerabilities. Private Locations address this challenge by enabling comprehensive security scanning of these internal apps without compromising your network's security perimeter.

Infrastructure Workflow

  • The locally deployed Repeater connects to the Repeater manager.
  • When a scan is initiated, Escape sends requests to the Repeater manager rather than directly to your servers.
  • The Repeater manager forwards the requests to the local Repeater, which relays them to your internal applications.
  • Scan results are then returned to Escape for reporting and analysis.

Diagram of Private Location Infrastructure:

repeater.drawio-fe5325e7951a6119eca68f733c11cdb7.svg

Getting started

  1. Configure your Private Location:

    • Head over to the Private Location Configuration page located under Organization -> Network
    • Create a new Repeater by assigning the desired name. Keep your ESCAPE-REPEATER_ID
  2. Configure Firewall Settings: Allow outgoing traffic to repeater.escape.tech on TCP port 443. Need the specific IPs? Run nslookup repeater.escape.tech to get the latest ones.

  3. Deploy the Escape Repeater\ Use the ESCAPE_REPEATER_ID environment variable to configure the repeater in your environment. You can deploy it using any of the following methods:

    • Docker CLI: Pull the Escape Repeater image and run it using Docker commands.
    • Docker Compose: Use a simple YAML file to manage the deployment process.
    • Kubernetes: Deploy in your Kubernetes cluster for scalable and integrated management.

For more details and step-by-step guidance, check out our Private Locations documentation.

If you're among our DAST alpha testers, you can also set up private locations with Escape's DAST.

With Private Locations, you can bring the power of Escape to your entire application landscape—no application left behind! 🚀

#58 · Improved Pagination - Compliance page

We’re thrilled to announce the addition of pagination to the Compliance page, designed to enhance usability, improve performance, and ensure a more efficient navigation experience for users dealing with large datasets.

Pages Affected

Compliance Page: Navigate and manage compliance records more efficiently, regardless of the dataset size.

What’s New?

  1. Enhanced Pagination Structure: A re-engineered pagination system ensures smoother transitions between pages and reduces load times, especially for extensive datasets.
  2. Optimized Page Loading: Improved backend logic significantly accelerates data retrieval and rendering.

#57 · Improved Pagination

We’re excited to announce an update to pagination across key areas of our platform! This improvement is designed to deliver faster loading times and a more seamless experience when navigating large datasets.

What’s New?

  1. Enhanced Pagination Structure: A re-engineered pagination system ensures smoother transitions between pages and reduces load times, especially for extensive datasets.
  2. Optimized Page Loading: Improved backend logic significantly accelerates data retrieval and rendering.

Pages Affected

  • Inventory - All Services & Schemas: Quickly access and scroll through large inventories with reduced delays.
  • Security Scan - Tested Applications: Enjoy a smoother experience when browsing through your tested application records.
  • All Risks - Issues: View and manage your issues more efficiently, even with high volumes of data.

#56 · Jira Integration - Send Remediation Info to Your Developers

Bridging the gap between security and development has never been easier. Security teams can now automatically share actionable vulnerability information with pre-filled remediation steps, saving time and ensuring faster resolution. No more back-and-forth—your developers can hit the ground running with the fix already in hand.

Getting started

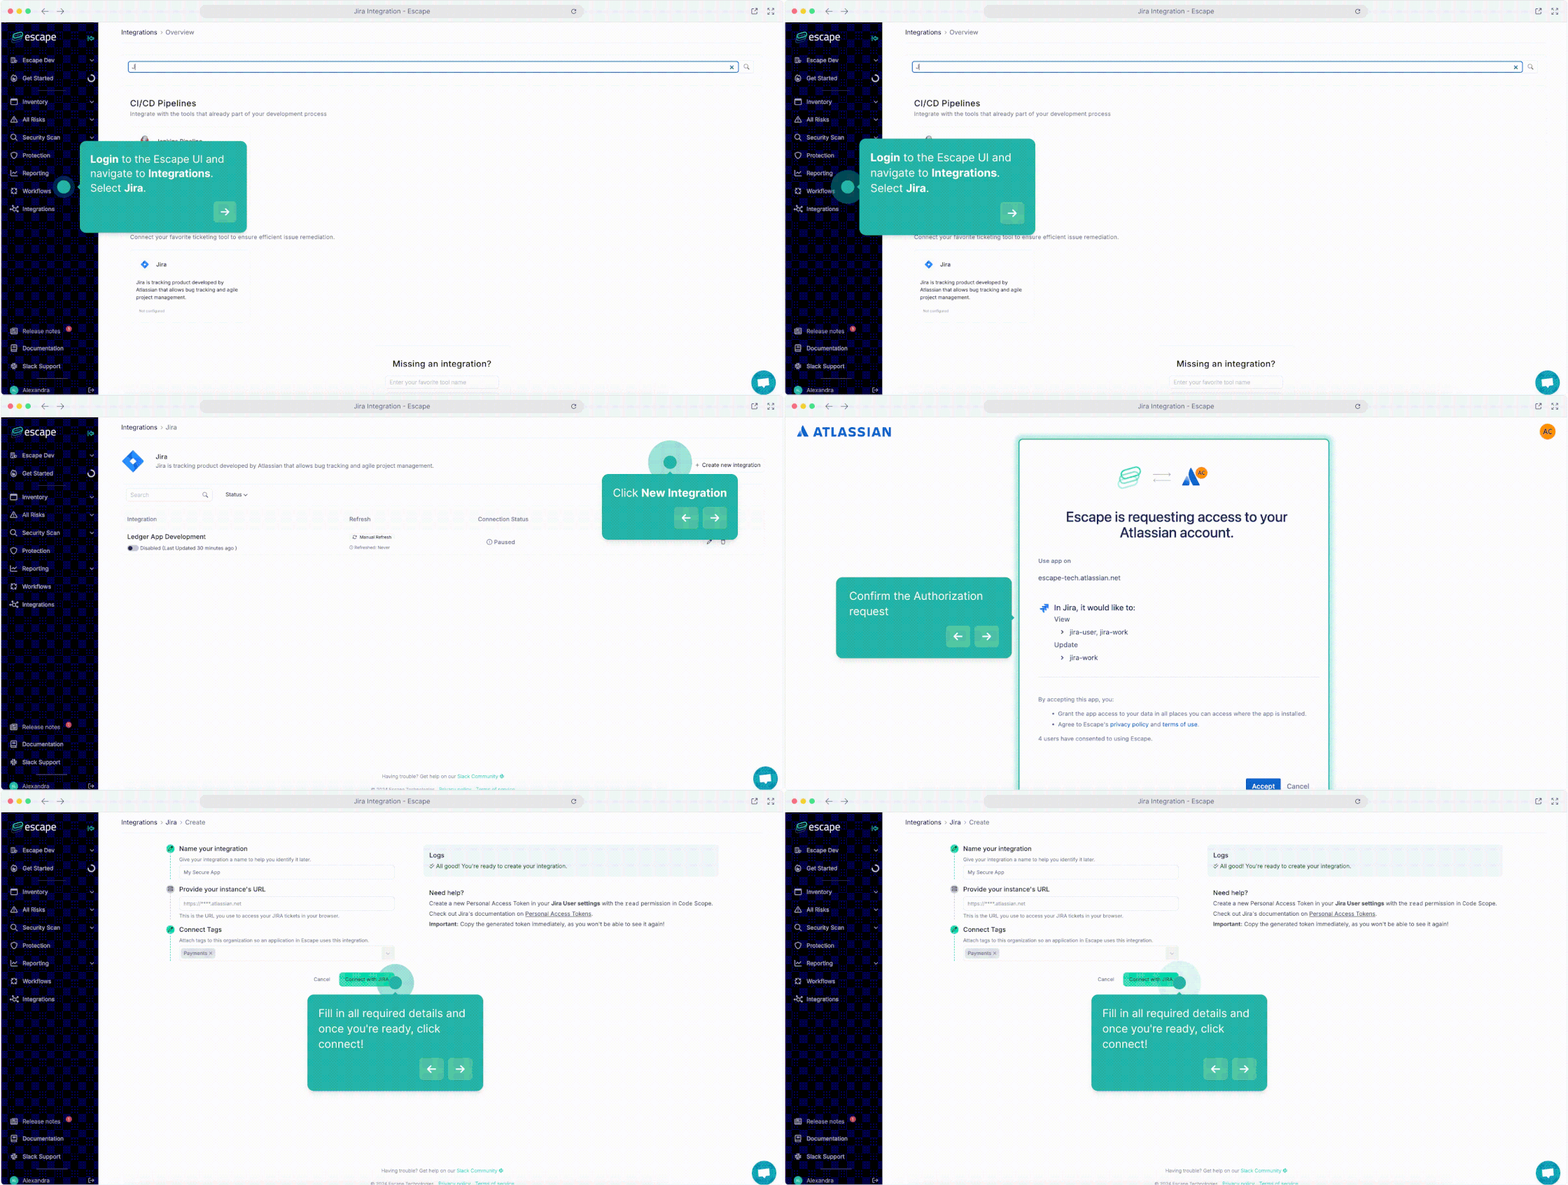
  1. Login to the Escape UI and navigate to Integrations.
  2. Select Jira.
  3. Click New Integration and confirm the Authorization request.
  4. Give your integration a name for easy identification.
  5. Enter your Jira instance URL (e.g., https://escape.atlassian.net/).
  6. Attach relevant Tags to ensure proper linkage with applications in Escape.

2024-09-19-Jira_Integration___Escape.gif

You can create as many integrations as you wish for each application label.

How to Create a New Jira Ticket:

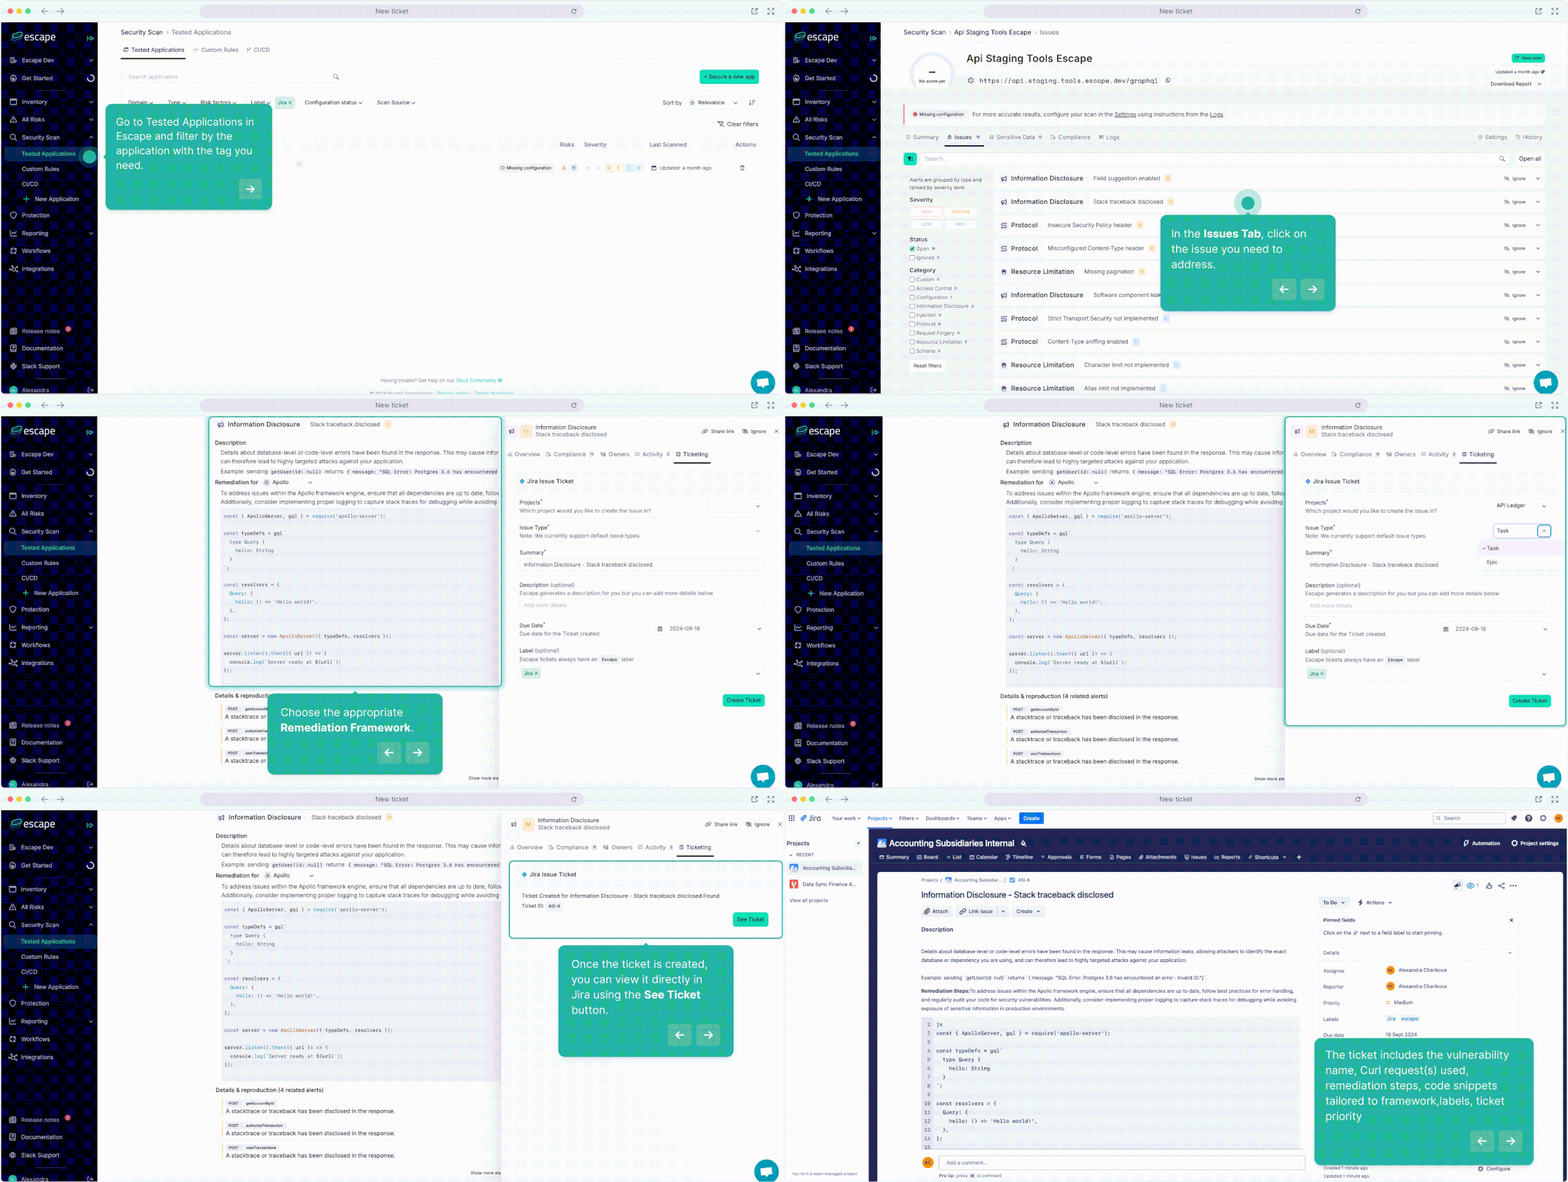
  1. Go to Tested Applications in Escape.
  2. Select the application with the relevant vulnerability.
  3. In the Issues Tab, click on the issue you need to address.
  4. Choose the appropriate Remediation Framework.
  5. Click More, then go to the Ticketing Tab.
  6. Select the Project and Issue Type (Task or Asset).
  7. Add additional information to the auto-generated Summary. & Description (if necessary)
  8. Set a Due Date
  9. Click on Create Ticket. and that's it!

2024-09-19-New_ticket.gif

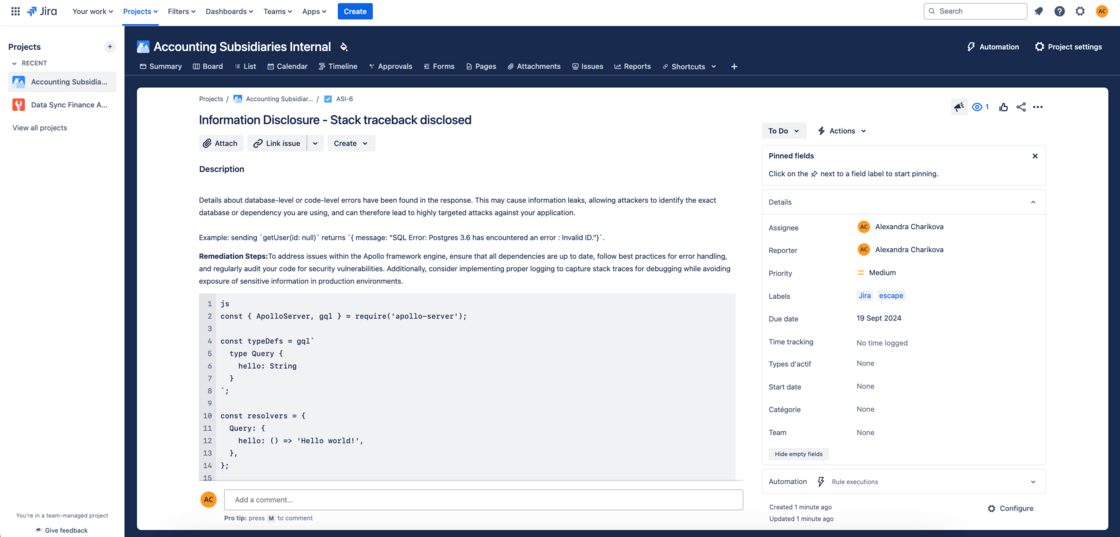
Once the ticket is created, you can view it directly in Jira using the See Ticket button. The ticket includes:

  • Vulnerability name (e.g., Broken Object Level Authorization (BOLA)).
  • Curl Request(s) used
  • Remediation steps
  • Relevant code snippets tailored to framework
  • Associated application labels
  • Adjustable ticket priority

Escape Ticket on Jira side.png

With this new integration, you should be able to accelerate your remediation process and keep your developers focused on what matters most—delivering secure applications faster.

#55 · [Expert users] Persisted GraphQL Query Support

You can now test the security of Persisted GraphQL Queries with Escape's API security platform. This new capability enhances our GraphQL API security testing, offering deeper insights into vulnerabilities specific to persisted queries, allowing your team to protect APIs from targeted attacks better.

We support the following formats:

  • Apollo
  • Yoga
  • Custom implementations

Why

  • Optimized Testing for Persisted Queries: Persisted queries are often used for performance and security optimization in GraphQL, but they can introduce unique vulnerabilities if not properly secured. With our new feature, you can now detect security flaws in these pre-saved queries.
  • Prevention of API Misuse: Attackers can exploit persisted queries to bypass query validation and inject malicious content. Escape ensures that your queries are thoroughly tested for such risks.
  • Enhanced Coverage for GraphQL APIs: Persisted queries are a common practice in modern applications. This feature ensures that your GraphQL API testing is comprehensive, covering both dynamic and persisted queries.
  • Seamless Integration with Your CI/CD Pipeline: As with other Escape features, testing persisted GraphQL queries integrates smoothly into your existing CI/CD workflows, keeping security at the forefront of your development process.

Getting started

  1. Go to the Security Scan tab, click on Tested applications, and select the application you want to test.
  2. Once you're on the scan result page, click on Settings and select Expert mode
  3. Configure your YAML file by adding the .json file for your persisted queries:

graphql_persisted_queries_url: https://example.com/persisted_queries_manifest.json

  1. Save the changes and restart the scan.

And that's it!

With these new updates, you should be able to tackle even the most advanced API risks with confidence. `

#54 · New notificaton rules for scans

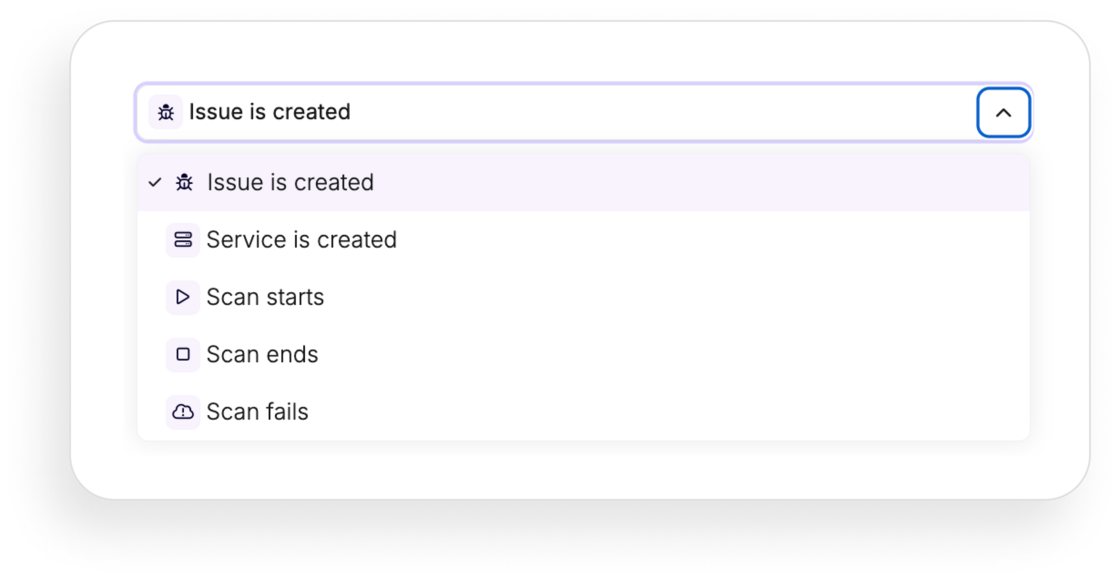
We're excited to introduce three new event triggers that enhance your notification rules, giving you greater control and visibility over your scan processes. You can now get notified when a scan starts, ends, or fails—right when it matters most.

You can now receive notifications for the following events:

  • Scan Starts: Trigger a workflow as soon as a scan begins.
  • Scan Ends: Get alerted when a scan completes.
  • Scan Fails: Be notified immediately if a scan fails.

These triggers allow you to filter notifications based on specific scan labels or relevant applications, ensuring you only receive the alerts that matter to you.

expanded-workflows.png

Why

Stay on top of your scanning activities and respond quickly to important events. Whether it's a successful completion or a failure that needs immediate attention, these notifications ensure you're always in the loop.

Getting started

  1. In the left-hand sidebar, click Notifications.
  2. Click Create a new rule
  3. Choose when your workflow should be triggered:

  4. When a new vulnerability has appeared in your application(s)

  5. When a new APi service is created
  6. When a scan starts
  7. When a scan ends
  8. When a scan fails

  9. Specify the conditions for your workflow. You can filter by scan label or application to refine your notifications.

  10. Select among actions that you want your rule to perform:

  11. Send an email to specific people

  12. Send an email to a group of people
  13. Send an email to all related owners
  14. Send a Slack message
  15. Send a Discord message
  16. Send a Teams message
  17. Send a Webhook

  18. Schedule how often the action should run

  19. Name your rule and click on Create rule to save your workflow

And that's it! You can create as many notifications as your organization needs.