Skip to content

2026

#149 · Redesigned Web Application Coverage with Screenshots and Pentesting Summaries (Beta)

We reworked how Escape represents dynamic security testing coverage across web applications, with one goal:

Make every executed action observable, verifiable, and explainable. We strongly believe every app is different, and just showing visited URLs is not enough.

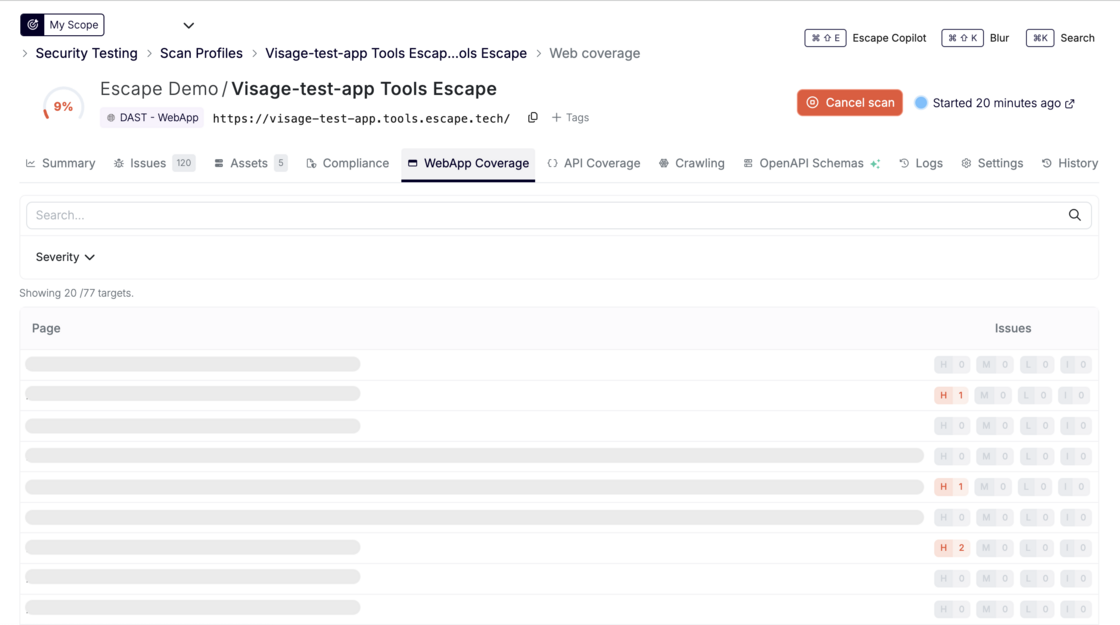
Screenshot 2026-01-16 at 17.22.52.png

What’s New for Web Applications (At Glance)

  • Web Application Coverage showing all tested pages and states
  • Screenshots captured during exploration, including dynamic SPA states
  • Search and filtering to validate that specific routes were tested
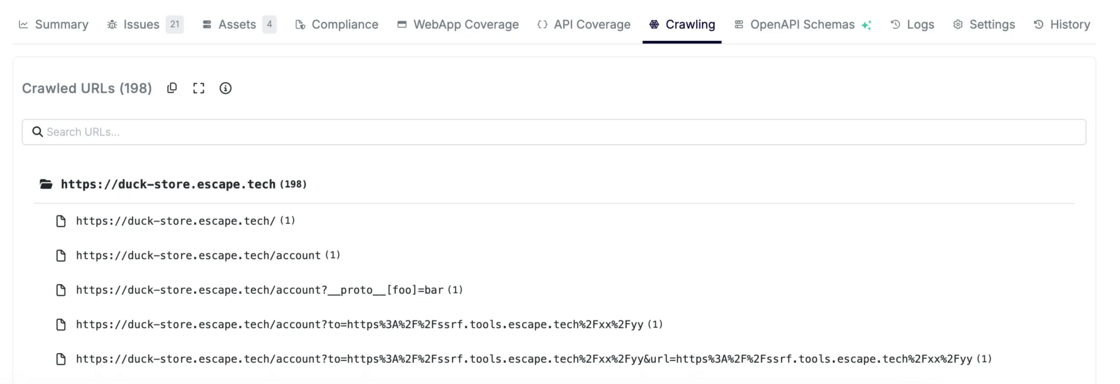
  • Dedicated Crawling view listing all discovered pages in a folder-based structure
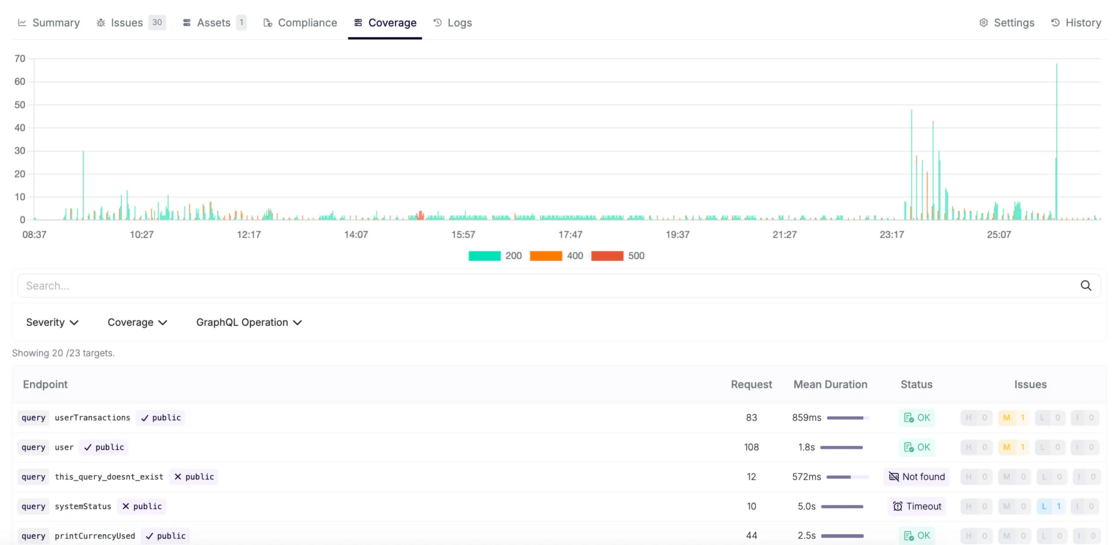
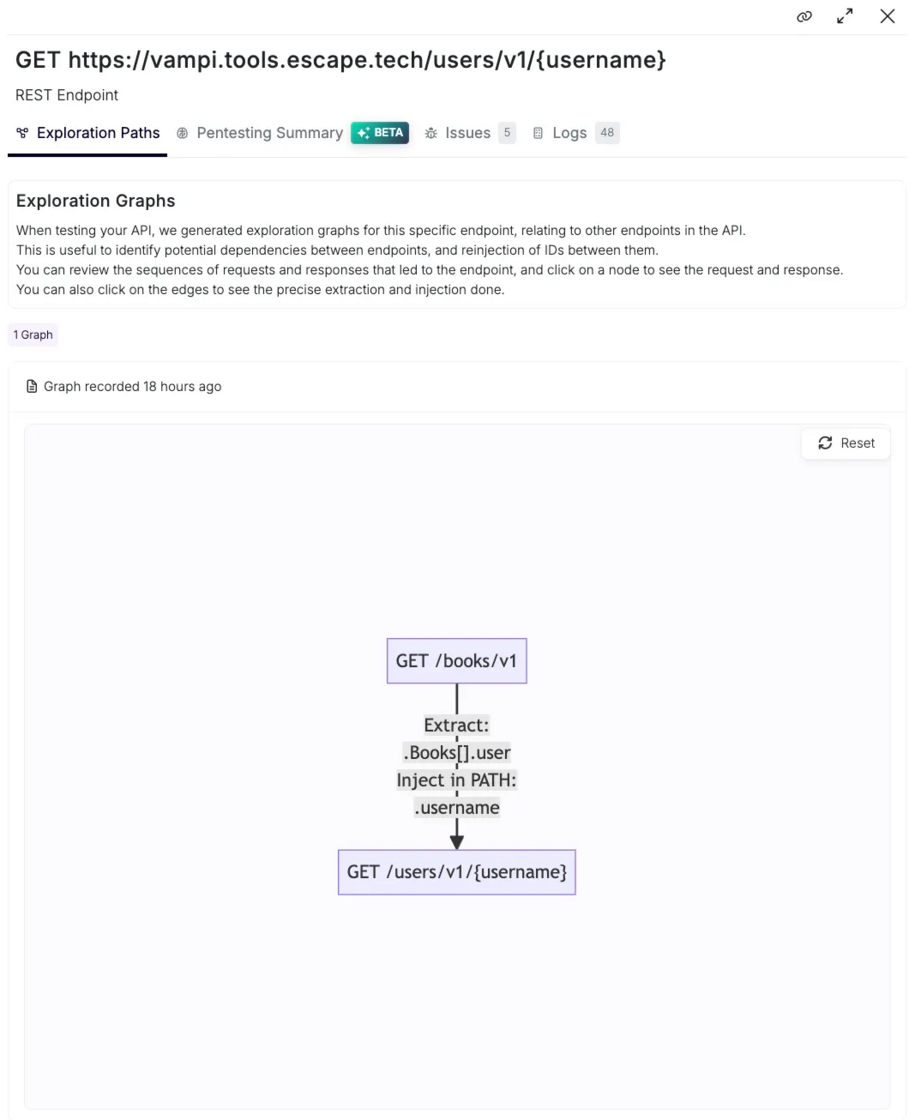
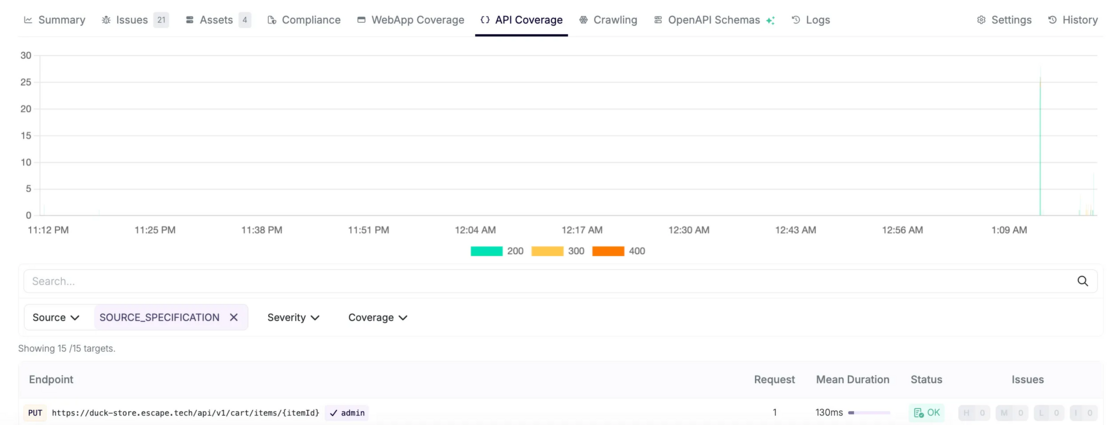
  • API Coverage for web-triggered API calls, with the same attack path exploration graphs and visibility as API-first scans
  • Unified Logs page shared across web and API testing for full end-to-end traceability

Screenshot 2026-01-16 at 17.21.48.png

Now, we help your team to answer the following questions:

  • Is the scanner getting good broad coverage?
  • Did authentication succeed, and where did it fail?
  • Which attack paths succeeded or weren’t tested?

This update makes Escape’s exploration and testing fully transparent, end-to-end. You can prove what was tested, troubleshoot gaps instantly, and stop defending your security tooling.

Web Application Coverage Page

Escape now shows:

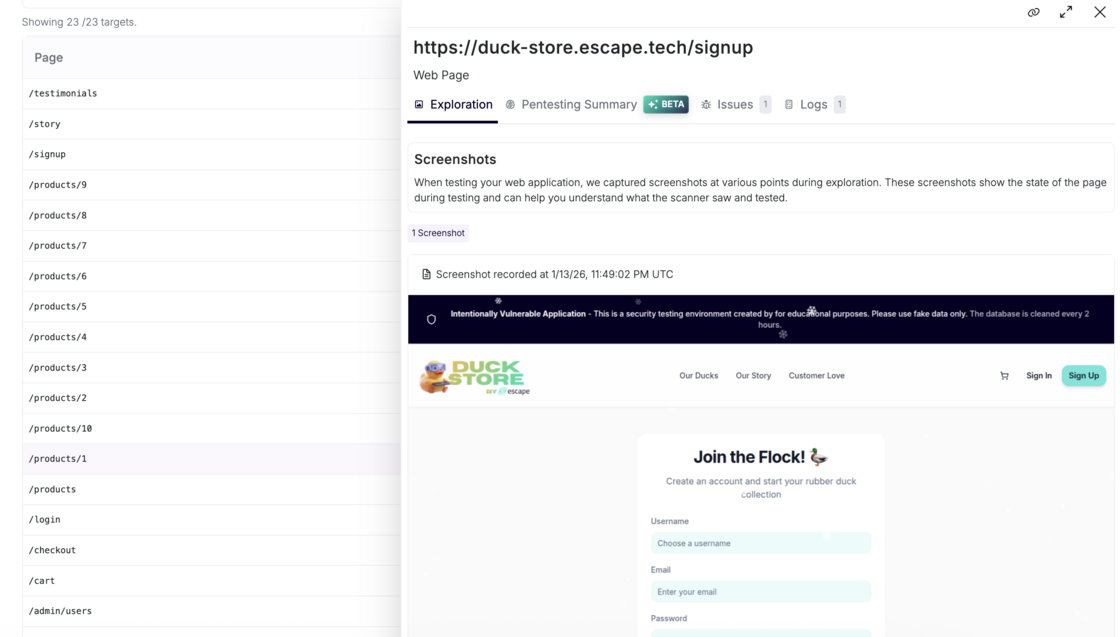
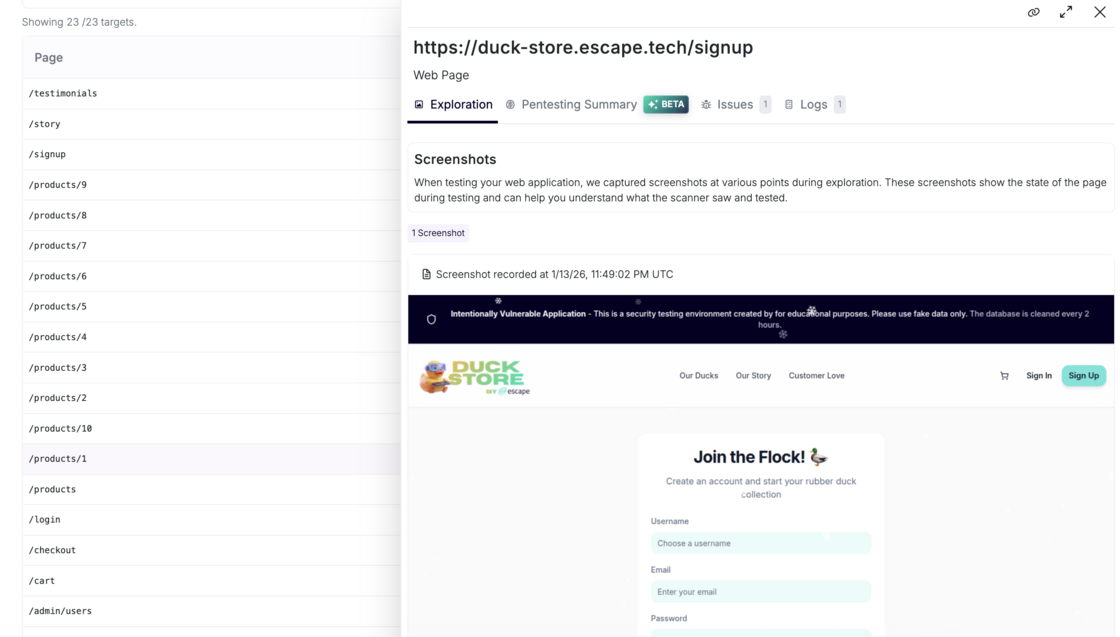
1. Coverage with Screenshots

Every unique application state reached during the crawl is:

  • Captured as a screenshot

Screenshot 2026-01-16 at 17.22.52.png

  • Associated with a logical route
  • Searchable and filterable by severity
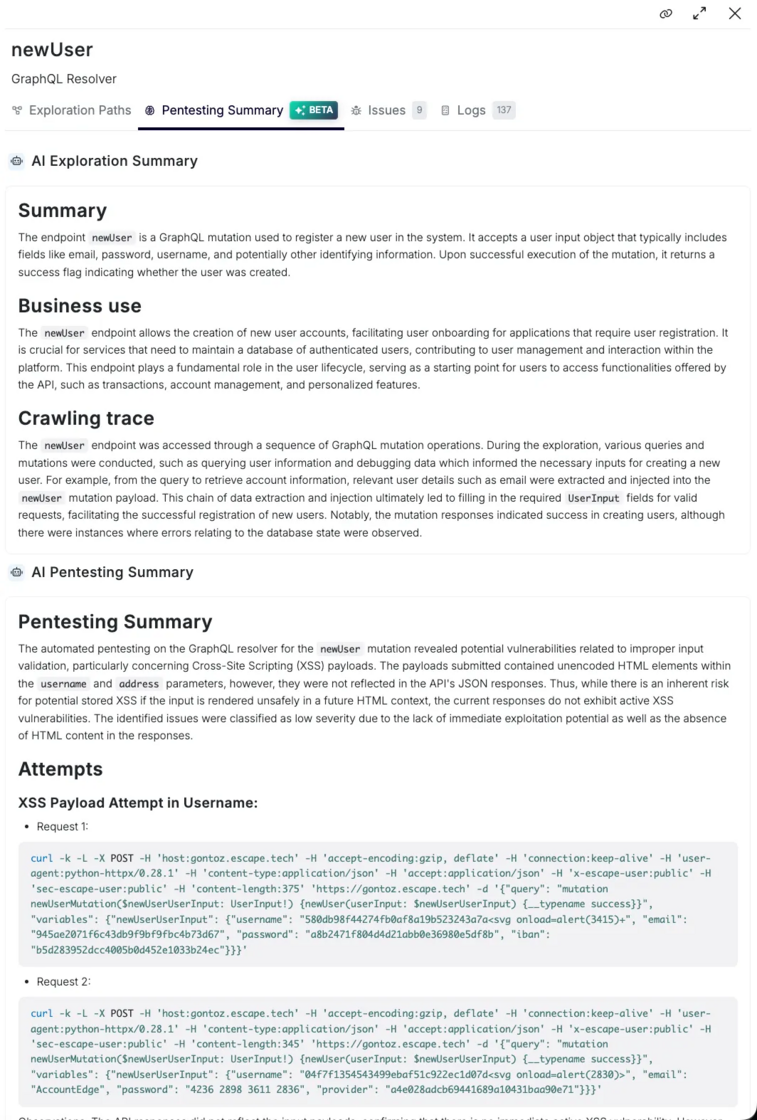
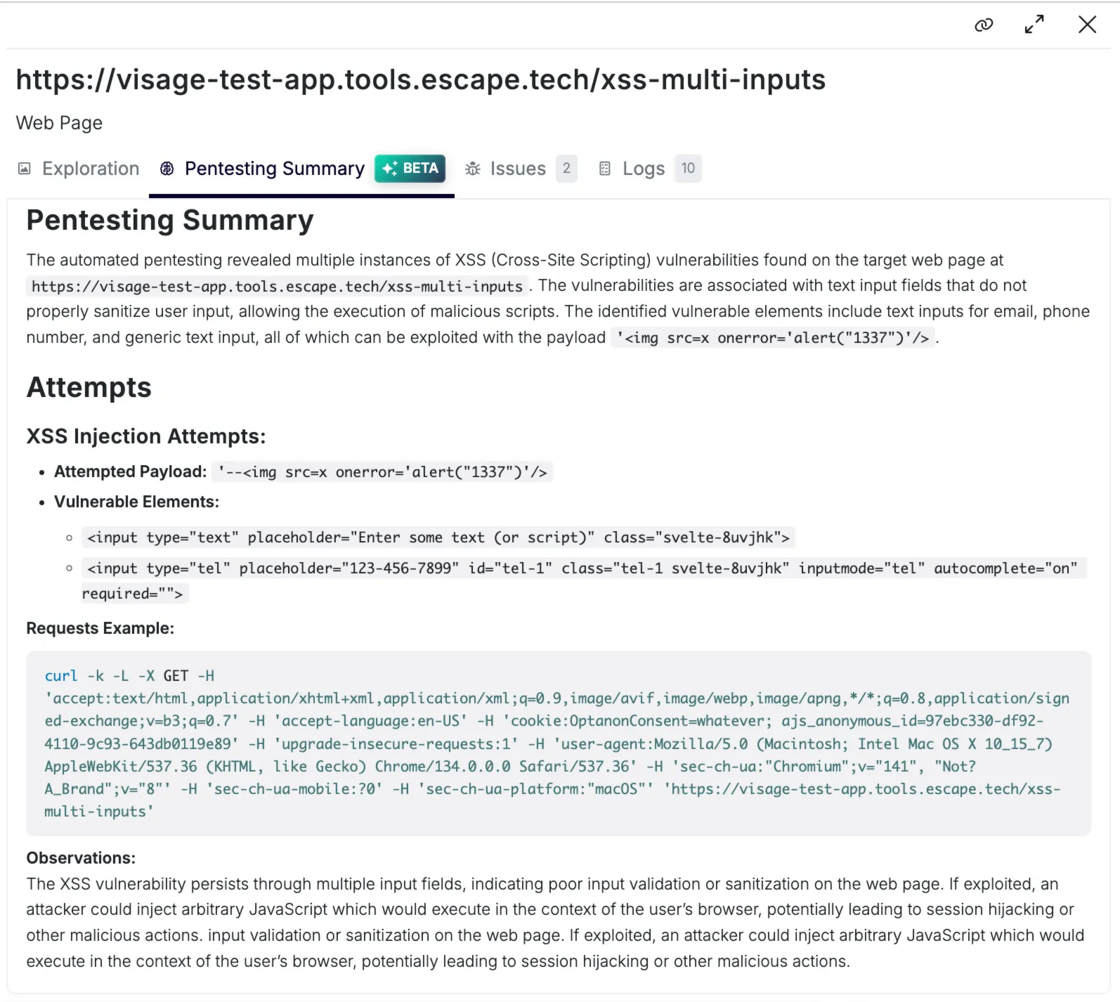
2. Pentesting summary (Beta)

Beyond screenshot validation, Escape delivers AI-generated summaries that break down how vulnerabilities associated with a specific page were uncovered and precisely which attack attempts led to its discovery:

image.png

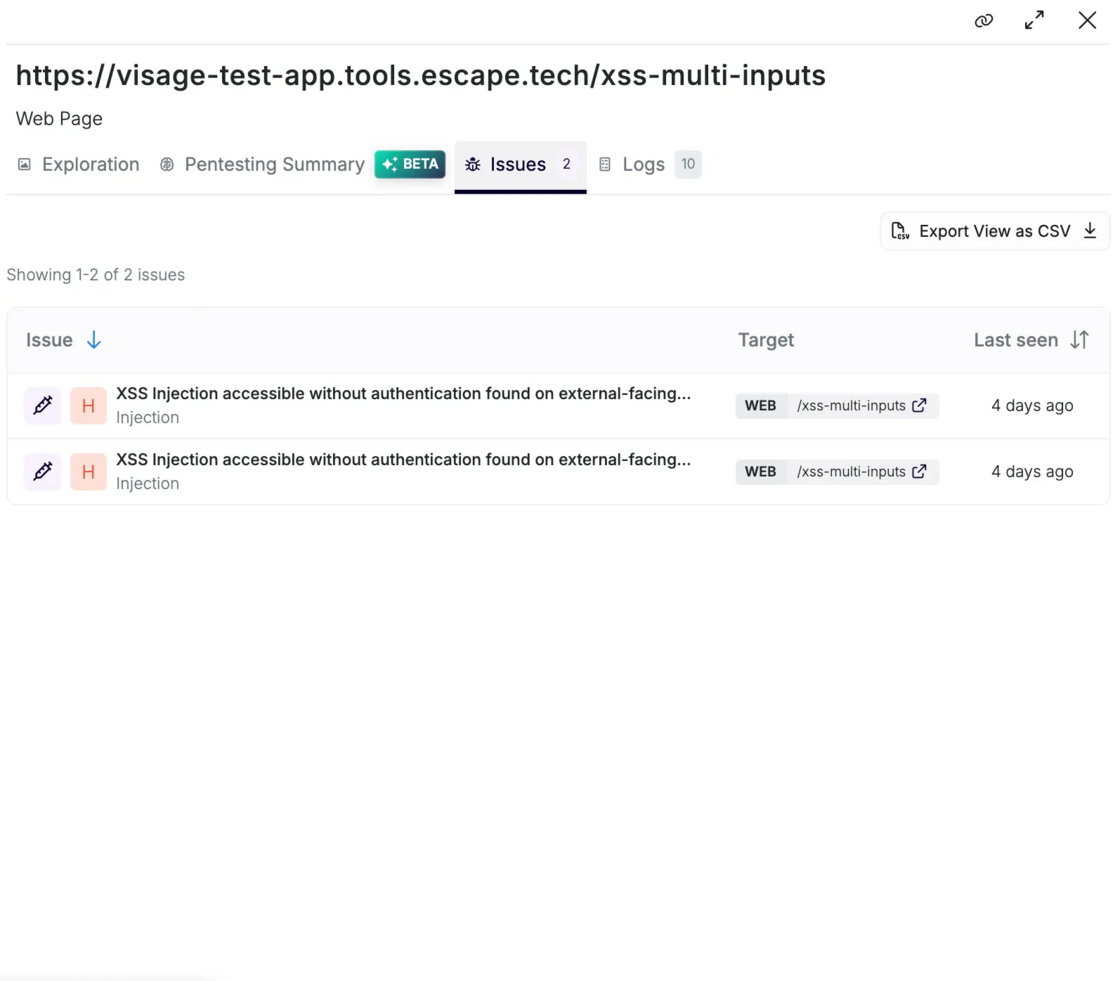
3. Associated Issues

In a dedicated tab, you can view all issues linked to this specific web page, giving you immediate visibility into what was found and where.

image.png

No more guessing whether a given page was touched during scanning.

Behind the scenes: Escape’s RL-driven web crawler identifies similar page states and avoids redundant visits — now you can see exactly which unique states were tested and why.

Crawling View

image.png

A structured list of all discovered pages organized by folder and hierarchy. This makes it easy to:

  • Validate that important areas of the site were exercised
  • Cross-reference against your sitemap
  • Spot blind spots in discovery

API Coverage Within Web Testing

When web crawling triggers API calls (XHR/Fetch), those same coverage and attack path visualisation capabilities apply — giving you:

  • Unified API visibility
  • Integration into Attack Path Validation graphs
  • Proven evidence of how frontend and backend interactions were exercised

This gives you end-to-end visibility, from UI action → API call → vulnerability.

image.png

With this release, Escape shifts dynamic testing from a black box to a glass box.

You don’t just see results of the scan, you see:

  • How coverage was achieved
  • Why authentication might have failed
  • And where your real attack surface lies

Whether you’re validating that a critical part of a web app was tested, debugging a failed scan, preparing for an audit, or reviewing a production incident, Escape gives you the right evidence.
#148 · New: Network Monitoring via IPv4 Ranges in Escape Attack Surface Management

Escape ASM now supports Network Monitoring through IPv4 (CIDR) ranges. This allows you to continuously scan an entire network range and automatically detect exposed assets based on their corresponding IP ranges - something that wasn’t possible before.

Modern infrastructure doesn’t always expose services via domains. Developers may deploy services directly over IPs—intentionally or accidentally—creating blind spots in asset discovery and security monitoring. With this capability, if a developer deploys a service directly over an IP address, Escape ASM will now detect it and alert you, even if it’s not tied to a known domain or hostname.

This feature will be in general availability for current ASM users and is included in your current ASM pricing plan. If you wish to learn more, feel free to reach out to your dedicated Escape contact.

How it works

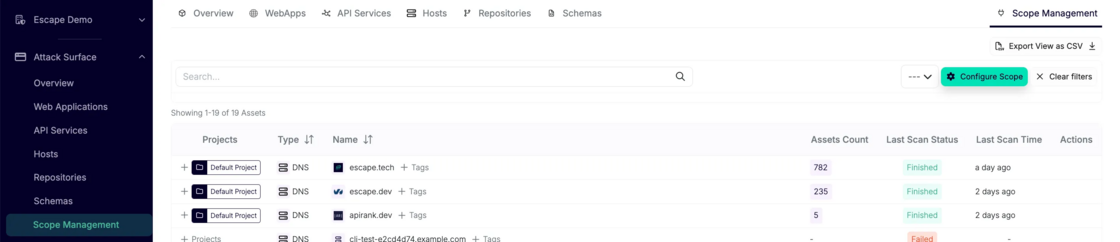
  1. Go to ASM → Scope Management → Configure scope

Screenshot 2026-01-15 at 11.07.10.png

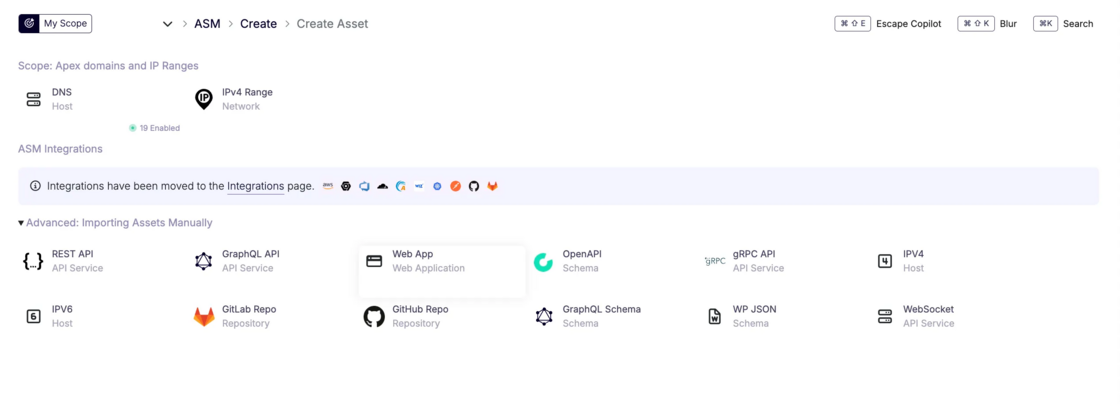
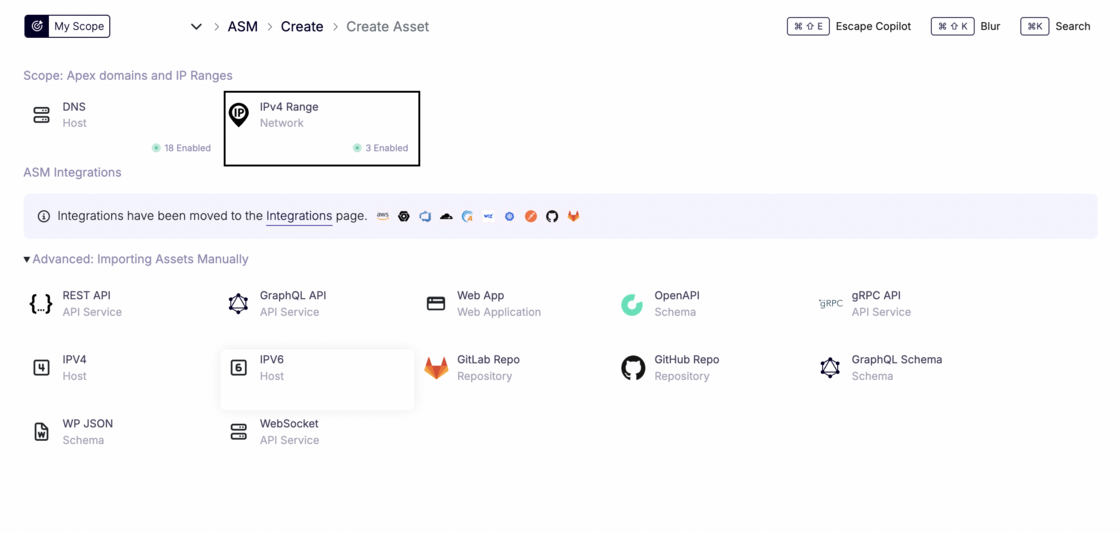
  1. Select IPv4 Range to set IPV4 range up Screenshot 2026-01-15 at 11.08.27.png
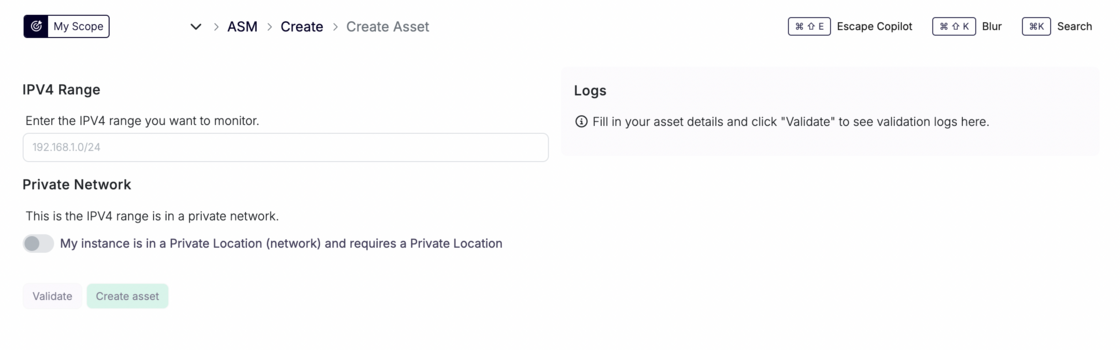
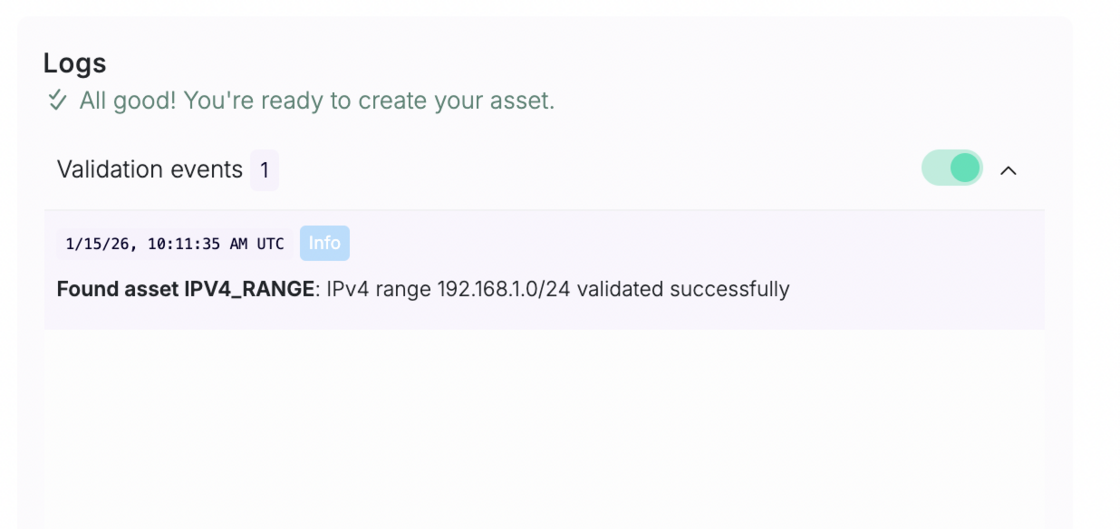
  2. Create a Network asset: Add an IPv4 CIDR range (e.g., 192.168.1.0/24) as a new asset in Escape ASM.

Screenshot 2026-01-15 at 11.10.09.png

  1. Private network support (optional)

    • If the IPV4 belongs to a private network, enable the Private Network option.
    • Select a Private Location so the scan is executed from within your infrastructure.
  2. Click on Validate to view whether the corresponding asset can be found

Screenshot 2026-01-15 at 11.12.00.png

  1. Network scanning & asset discovery
    • Escape scans all IPs in the range.
    • For each IP with at least one open port (based on your configuration), a new asset is automatically created.
  2. Full ASM coverage
    • Discovered IP assets are added to your ASM inventory.
    • They are scanned like any other asset, allowing ASM to:
      • Discover web applications, APIs, and services
      • Perform vulnerability scanning
      • Run security and exposure checks and set up alerting workflows based on a specific asset, a tag or a project they’re associated with

Important notes & limitations

  • ⚠️ CIDR size limit
    • Currently, Escape ASM supports network ranges up to /24 (256 IPs).
    • Larger networks can be scanned by splitting them into multiple /24 ranges.
  • If scanning larger ranges becomes a recurring need, reach out, this is something we can discuss.
  • Looking ahead: Scanning entire Autonomous Systems (AS) will be supported easily in the future.

Why this matters

With Network Monitoring, Escape ASM now covers one of the most common blind spots in asset discovery: IP-based deployments. This ensures that anything exposed on your network—whether intentional or accidental—is detected, inventoried, and continuously secured.

#147 · Improved Scan Logs Page: Stop Debugging Scans Blind and Improve Your Scan Performance

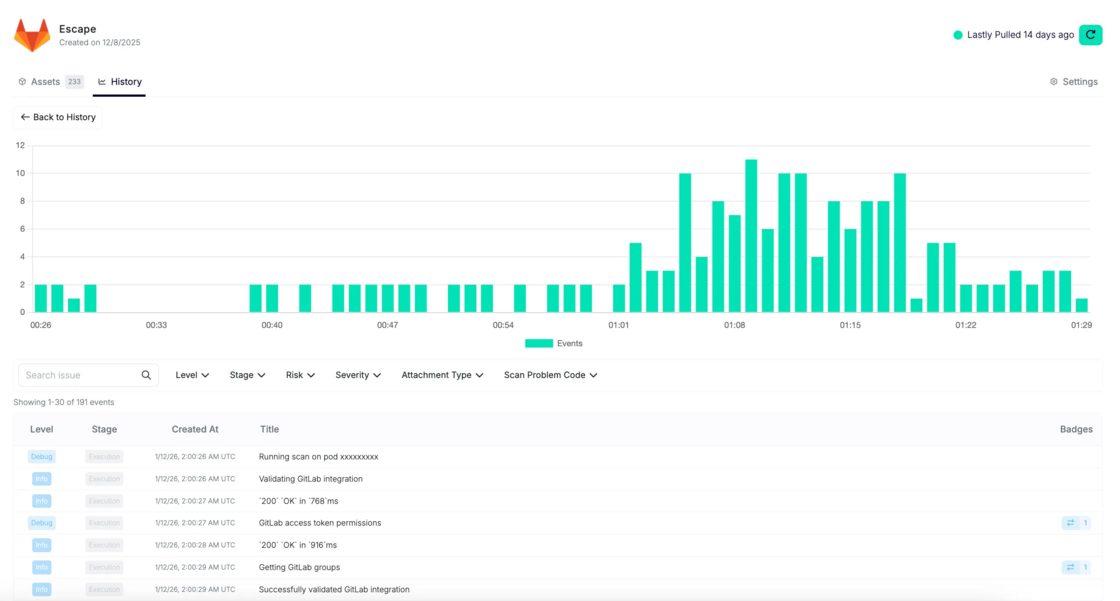
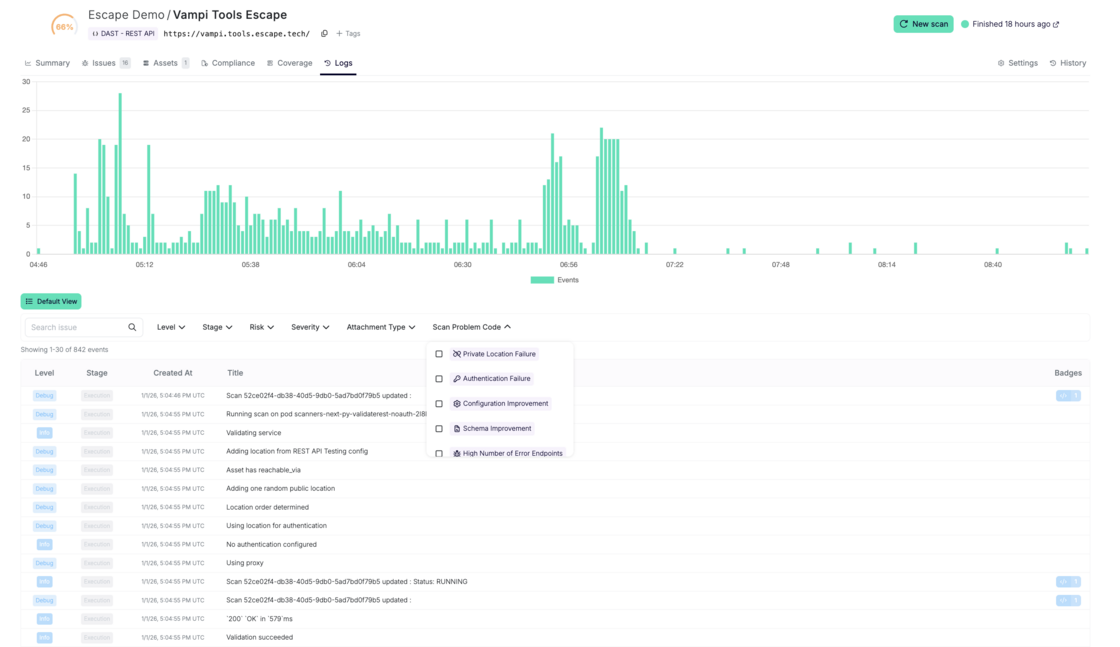
Escape’s improved Logs page gives you a complete, chronological view of everything that happens during a scan — and, crucially, why it happens.

By making every scanner decision, skip, and failure fully visible, Logs help you quickly diagnose issues, fine-tune configurations, and continuously improve scan coverage and reliability.

The result: less guesswork, faster debugging, and better scans over time.


What you’ll see in the Logs page

The Logs page shows every event associated with a scan, including:

  • Configuration steps (schema download, auth detection, proxy usage)
  • Execution steps (requests, responses, mutations)
  • Issues found
  • Agentic LLM reasoning and decisions (when enabled)

vampi-logs.png

It helps to answer the following questions like

  • "Why didn't the scanner find anything?" → It was blocked by your WAF, but you didn't know
  • "Why is coverage so low?" → Authentication failed during the scan

You can search and filter logs by:

  • Log level (debug, info, warning, error)
  • Scan stage (configuration, execution, agent actions)
  • Risk type (unauth access, sensitive data, external exposure…)
  • Escape severity
  • Scan problem codes (auth failure, WAF block, unreachable asset, timeout…)

to help you troubleshoot scan problems instantly:

  • Filter by "Scan Problems" → see "Authentication Failure" logged at 8:04:26 AM → fix auth config → rescan
  • Filter by "Blocked by WAF" → see exactly which requests triggered blocking → whitelist scanner IP
  • Filter by "Rate Limit Exceeded" → adjust scan before next run

Each log entry is evidence-backed:

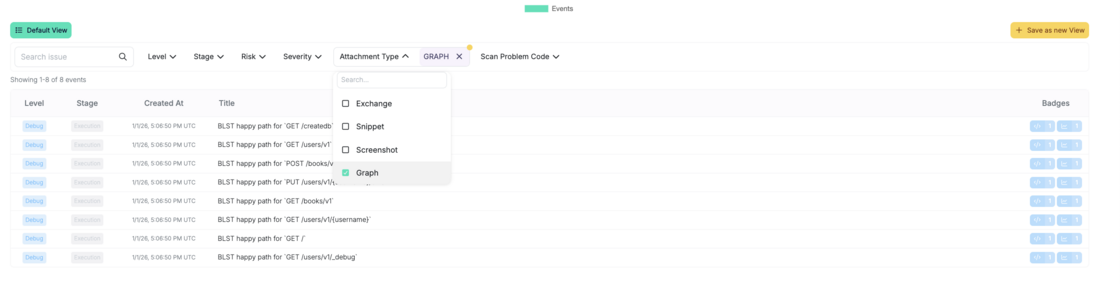
  • Full request and response
  • Attachments (exchange, snippet, attack validation path graph - to highlight when the execution path from the Escape business logic security testing engine was generated:

Screenshot 2026-01-02 at 12.28.05.png

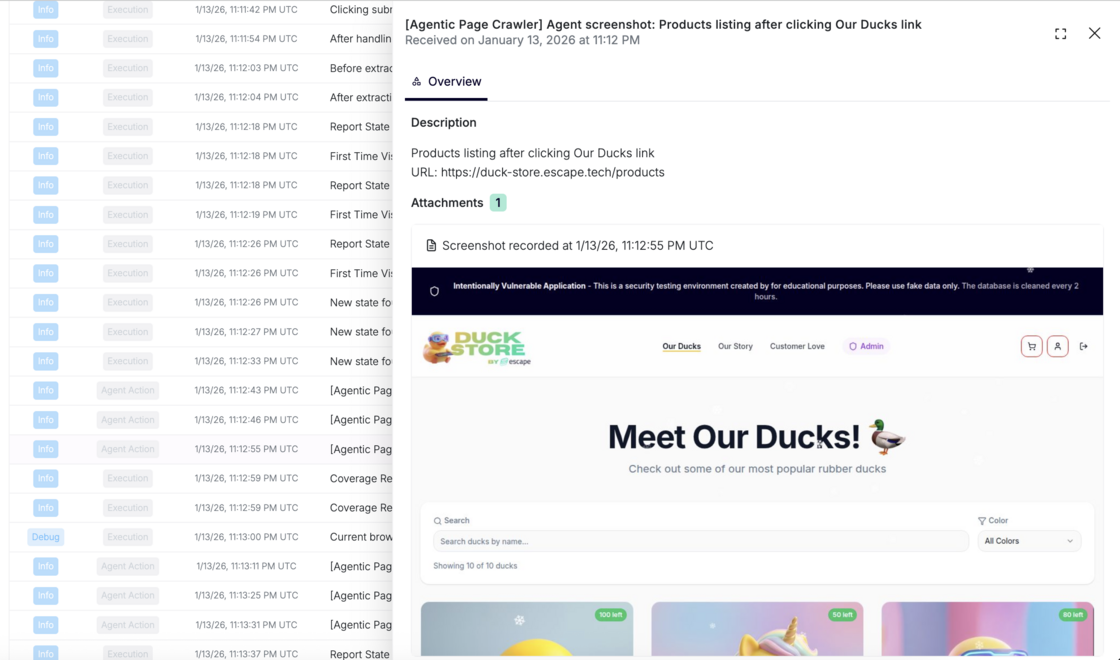
or screenshots captured via Agentic crawling:

Screenshot 2026-01-16 at 17.04.13.png

  • Clear explanation of why an issue was raised

You can even save filtered views to reuse during reviews or audits.

Feel free to explore!

Want to improve your current coverage? Check out our documentation.

#146 · New Visualizations in Escape Attack Surface Management

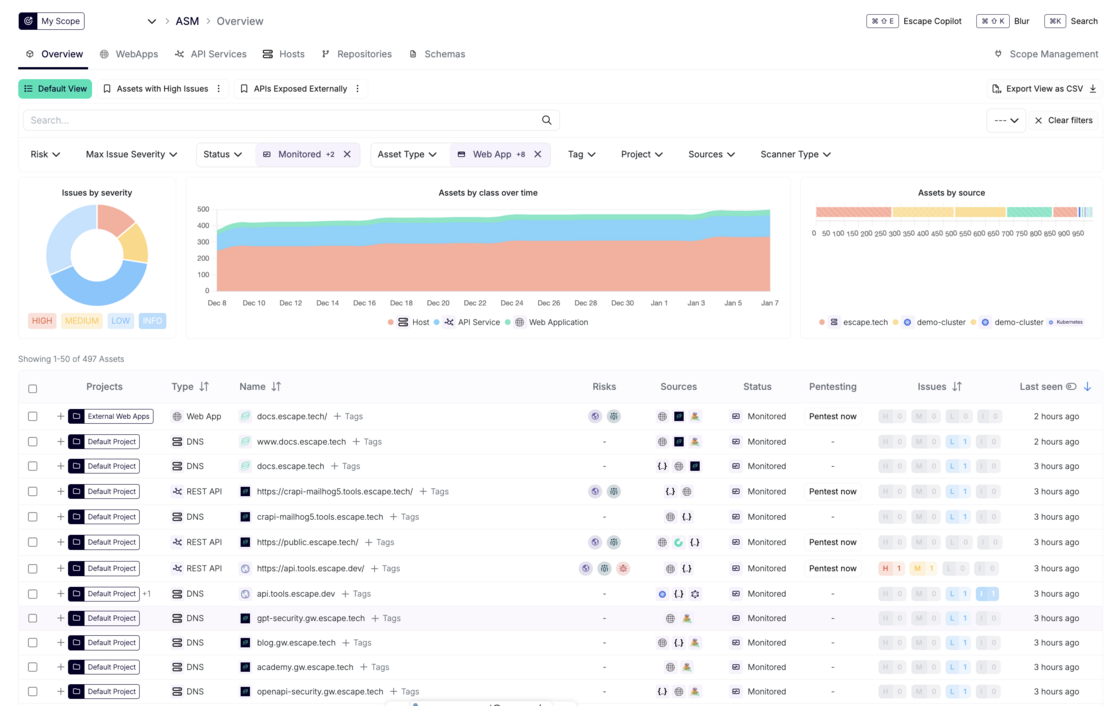
We’ve introduced new visualizations in Escape Attack Surface Management that provide structured visibility into discovered assets and identified issues.

new-asm-graphs.png

The new visualizations include:

  • Issues by Severity – A breakdown of identified issues across all discovered assets by severity level (High, Medium, Low, Informational).
  • Assets by Class Over Time – A time-based view showing changes in asset inventory over time, grouped by asset class (Host, API Service, Web Application).
  • Assets by Source – A breakdown of asset volumes by discovery source, such as domains, Kubernetes clusters, and other integrated sources.

These visualizations help teams quickly assess risk distribution, track how the attack surface evolves over time, and understand where assets are being discovered from, supporting more accurate risk prioritization.

#145 · Escape Projects Now Generally Available

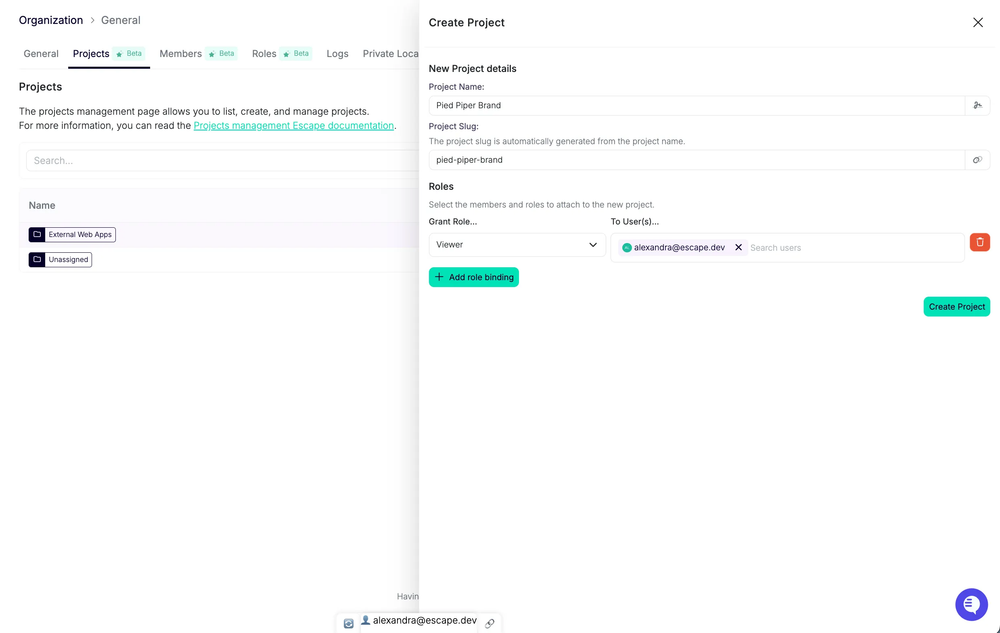
Escape Projects, our feature for organizing assets and assigning clear ownership so teams can act on the findings that matter to them, is now generally available for all customers.

image.png

Projects let you map assets to logical ownership boundaries, scope access to the right users, reduce noise by filtering out unrelated findings, and accelerate remediation loops by giving teams the context they need to fix issues efficiently.

You can learn more about the feature in our documentation and how to use it efficiently in this article.

Want to set it up?

Go to Organization Settings → Projects: This is where you create, edit, and manage Escape Projects.

Happy organizing!

#144 · Multi-user authentication fallback

With Escape, you can now configure multiple authentication users and enable fallback mode.

Why this matters

At scale, teams may maintain several test users with identical permissions. All of them are valid on paper, but at scan time:

  • One user may already have an active session
  • Some users may be temporarily disabled or locked
  • A user’s password may have been rotated

In those cases, authenticated DAST scans can fail simply because the selected user wasn’t valid when the scan ran, even though another equivalent user would have worked.

When scans are automated and run unattended, this leads to failed scans, retries, and manual intervention, wasting precious time of already quite stretched security teams.

Escape now takes care of selecting the working user for you.

With fallback enabled, Escape will attempt authentication using each configured user and proceed with the first one that succeeds. The scan then runs normally using that user.

This removes the need to decide in advance which specific user a scan should rely on.

How to set it up

  • Go to a dedicated scan profile

    Create or open the scan profile where you want to enable authenticated scanning.

  • Open Settings → Authentication

    This is where authentication behavior is configured for the scan.

  • Enable multi-user fallback

    Turn on fallback mode by setting: multi_user_is_fallback: true

  • Configure multiple users using a Browser Agent preset

In your Browser Agent authentication preset, define all users that can be used interchangeably for the scan.

Here is a full setup example:

presets:
  - type: browser_agent
    users:
      - password: user1
        username: user1@test.com
      - password: user2
        username: user2@test.com
      - password: user3
        username: user3@test.com
      - password: user4
        username: user4@test.com
    login_url: https://example.com/login
    auto_extraction_urls: []
    logged_in_detector_text: Login successful
multi_user_is_fallback: true

If only user3@test.com is active and valid, Escape will attempt authentication with user1@test.com (fails), then user2@test.com (fails), and finally user3@test.com (succeeds). The scan will then proceed using user3@test.com credentials.

Important limitation

Multi-user fallback cannot be used with tenant isolation testing.

Fallback mode runs the scan using a single authenticated user. If you need to test access boundaries between users, run separate scans per user and disable fallback.


This feature is designed to improve reliability of your DAST scans.

Use it when:

  • You have multiple users with the same role
  • Authentication failures occasionally block scans
  • Scans run automatically (CI/CD, scheduled scans)
  • You want scans to complete without manual retries

For more information on enabling fallback mode for multiple users, please refer to our documentation.

#143 · New: MCP Endpoint Discovery & External Scanning in Escape ASM

Escape ASM now natively supports the discovery and external scanning of unauthenticated MCP (Model Context Protocol) endpoints, extending coverage to a new generation of AI-native APIs.

Why this matters

As teams adopt MCP to connect LLMs with tools, data sources, and internal services, new externally exposed attack surfaces are emerging.

Security teams need to:

  • Know where MCP endpoints are exposed
  • Detect unauthenticated or misconfigured MCP servers
  • Reduce blind spots in AI-native infrastructure

This update brings MCP endpoints into Escape ASM’s continuous discovery and monitoring pipeline.

What’s included today

For this initial release, we focused on the ASM layer, fully integrated into existing scans.

Escape ASM now provides:

  • Automatic MCP discovery: MCP endpoints are detected automatically, just like any other internet-facing asset.

  • External surface scanning: Escape analyzes exposed MCP servers and configurations, including:

    • Detection of unauthenticated MCP endpoints
    • Identification of externally reachable MCP services that may present security risks

This helps teams quickly identify high-risk MCP exposures before attackers do.

MCP-discovery-smaller.png

Setup

No setup required. MCP discovery and scanning are enabled by default as part of Escape ASM.

If you’re already running ASM, MCP endpoints are automatically included.

Looking for design partners for next steps in security testing

This release marks the first step toward full ASM + Automated Security Testing coverage for MCP-based architectures. We’re actively looking for design partners using MCP in real-world environments to help shape the next phase of Escape’s security testing for MCPs.

Design partners will get:

  • Early access to authenticated MCP testing
  • Influence over attack scenarios and coverage
  • Direct collaboration with the Escape product team

Reach out to your dedicated Escape contact if you’d like to participate! 🙏