Skip to content

Release Notes

#109 · New Security Test: Alert on High Volume of Exposed PII

We’ve introduced a new security test in the Escape scanner for GraphQL and REST APIs to identify excessive exposure of Personally Identifiable Information (PII) - a common sign of broken or missing access controls.

When multiple PII elements are returned in a single response, it often indicates that sensitive data is accessible without proper authentication or authorization, increasing the risk of:

  • Data breaches
  • Compliance violations (e.g., GDPR, CCPA)
  • Reputational and financial damage

By default, the test raises an alert when 4 or more PII fields are detected (pii_threshold: 4). This threshold can be customized to match your organization’s risk tolerance.

Learn more about how this test works and how to customize it in Escape’s documentation.

#108 · Improved API Graph for Better Visibility and Clarity

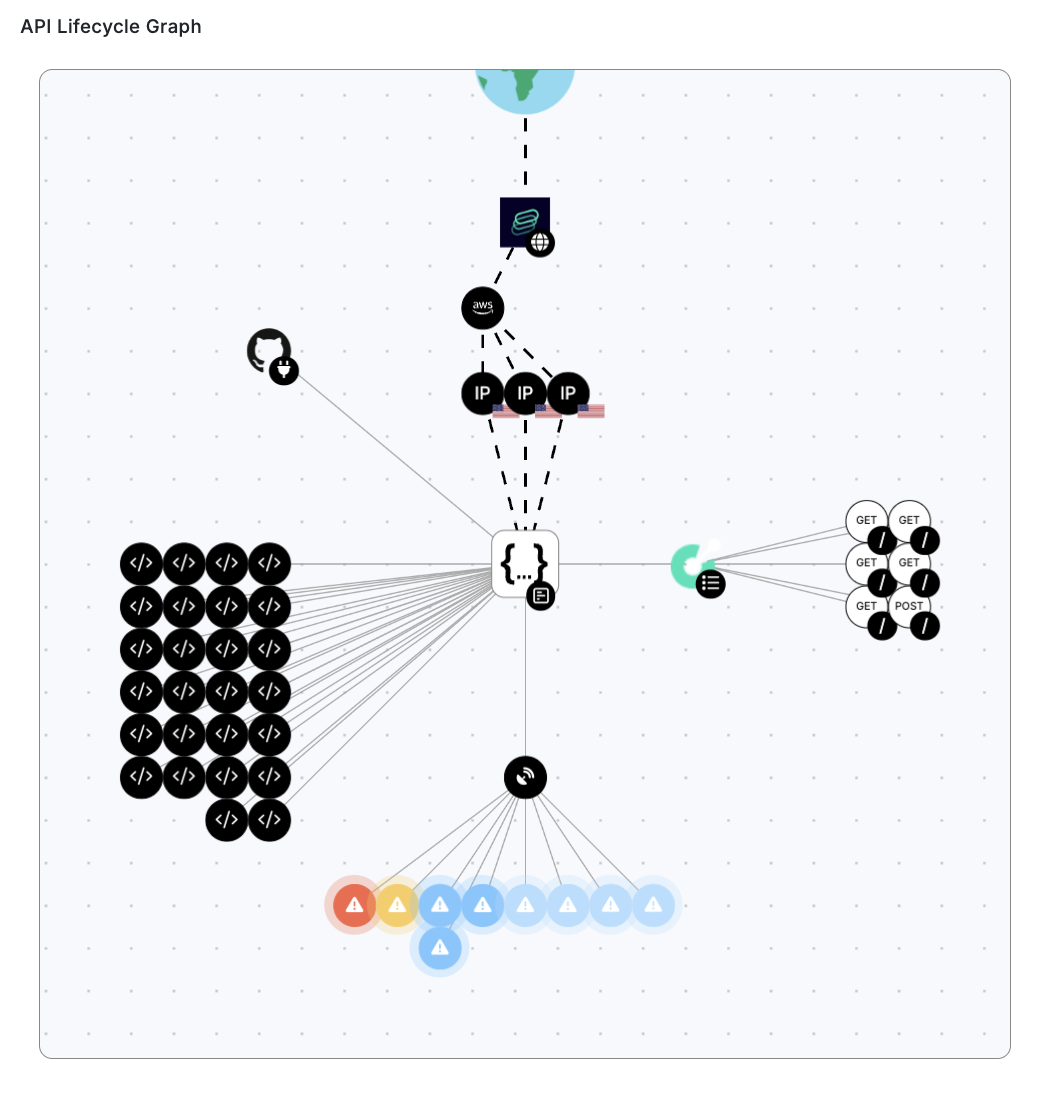
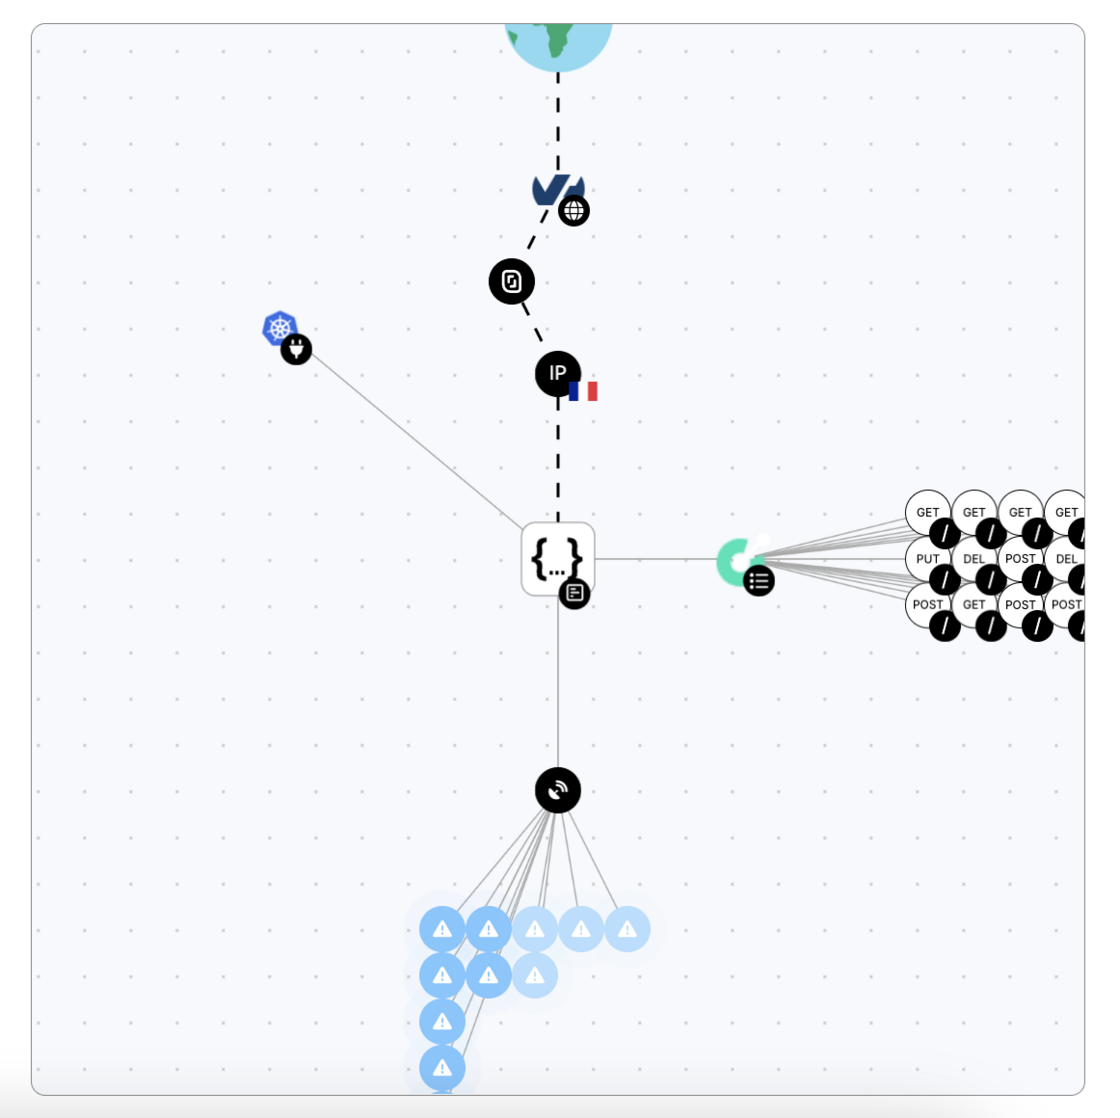
We’ve made several updates to the API Graph to improve readability and help teams assess their API landscape more efficiently:

  • HTTP methods are now displayed per endpoint, making it easier to distinguish between operations like GET, POST, PUT, and DELETE.
  • Security alerts are presented more clearly, allowing for faster identification and prioritization of issues.
  • Improved visibility into public exposure, so you can quickly determine whether an endpoint is accessible from the internet.

These enhancements make the API Graph more informative and actionable for everyday use. You can find a couple of examples below:

new-api-lifecycle-graph.png

new-api-lifecycle-graph2.png

For context on the original release of the API lifecycle graph, see this post.

#107 · Improved RBAC with Role- and Label-Based Permissions

We’ve expanded Escape’s Role-Based Access Control to give teams more precise control over who can access which applications and findings.

What’s new:

  1. New “Permissions” sub-panel within each role groupe

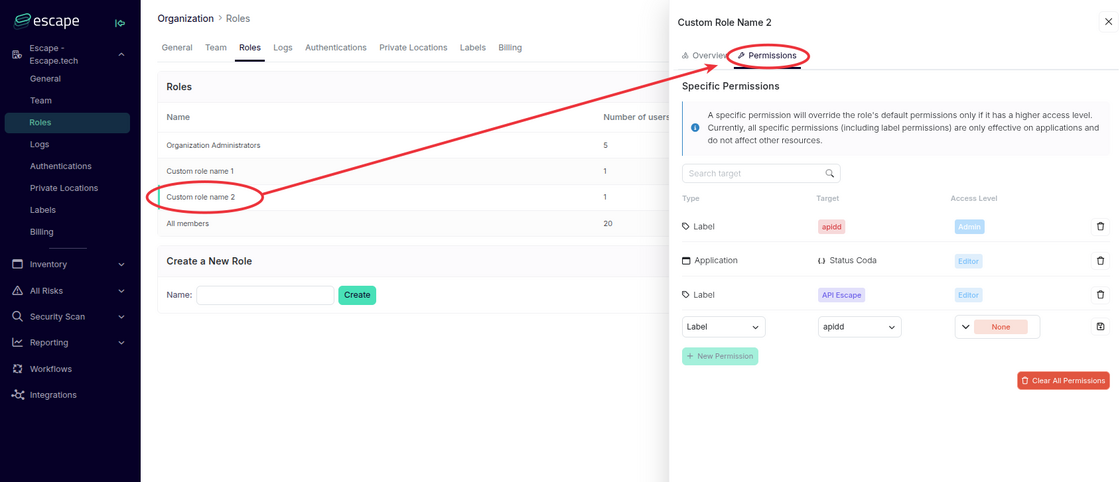
A new Permissions sub-panel is now available for each custom role group you’ve created (Accessible via Organization - Roles):

how-to-find-permissions.png

  • Previously, managing permissions was only possible from the global Permissions settings.
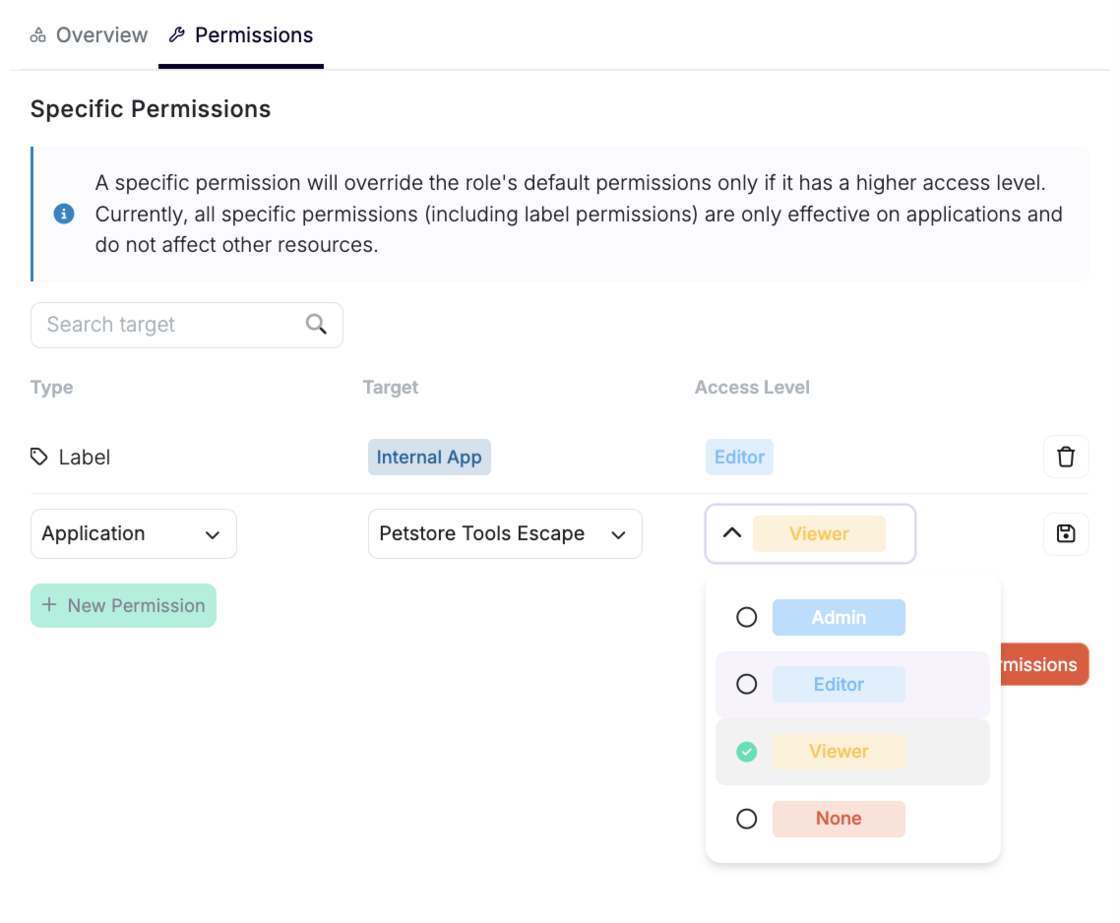
  • You can now define application-specific or label-specific permissions directly within each role type. permissions-new-escape.png

Note that a specific permission will override the role's default permissions only if it has a higher access level.

2. Label-Based Permissions

You can now assign access to groups of applications using shared labels - without giving full access to everything in those apps to the users of your choice.

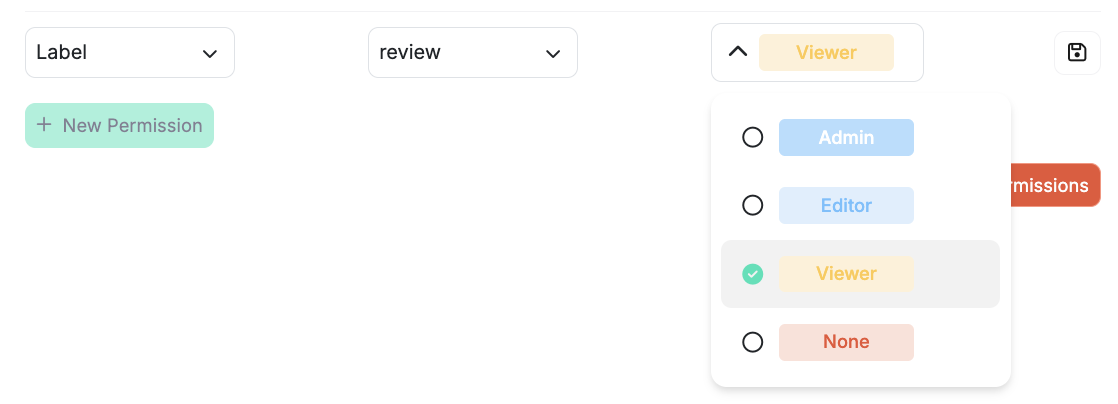
  • To create a label-based permission: click New Permission, select "label," choose a label name, and assign an access level (Admin, Editor, Viewer, None).

labels-permissions.png

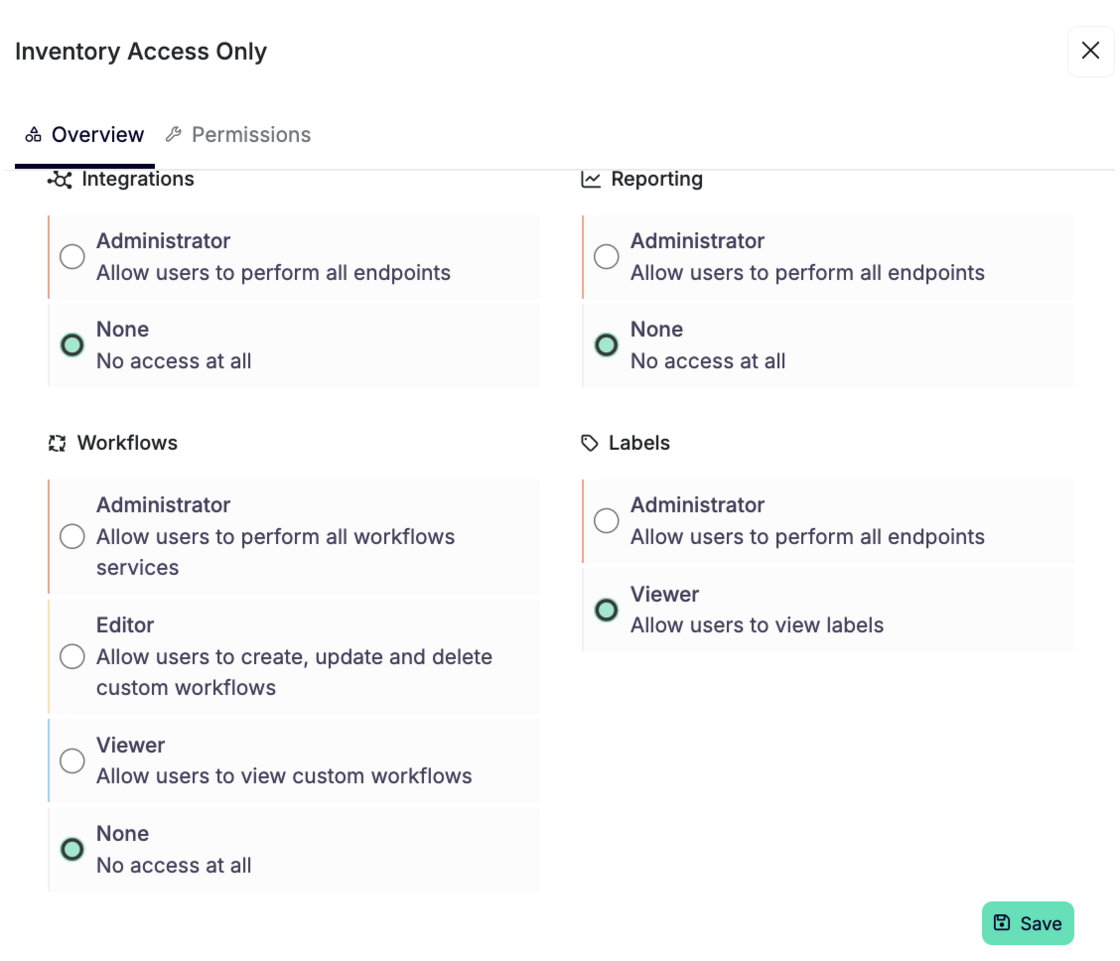
A new "labels" right has also been added to the existing Overview tab for each role type:

permissions-2.png

  • It allows you to define whether users can view or manage labels.
  • Set to Viewer by default.

How Permissions Work

  • Start by defining a base role type, then configure global permissions (e.g. Inventory, Integrations, Workflows). You can optionally add specific permissions tied to individual applications or labels.
  • Assign users to the appropriate role types based on their responsibilities.

Key Notes:

  • A specific permission will override the default role permissions only if it grants a higher access level.
  • Specific permissions, including label-based ones, only apply to applications—they do not affect unrelated resources.

Overall, these improvements let you:

  • Confidently onboard more teams and apps without compromising data boundaries.
  • Limit access to only what's necessary - reducing both risk and complexity.
  • Keep permission management scalable across growing organizations.

Learn more about full Escape Role-Based Access Control (RBAC) capabilities in our documentation.

#106 · Improved IDOR Detection in Our DAST Scanner

We’ve made some great improvements to our DAST scanner, focusing on more accurate IDOR (Insecure Direct Object References) vulnerability detection.

Why we split the IDOR check into two categories:

We’ve separated the IDOR check into two distinct categories—IDOR and IDOR User—for several important reasons:

  • General IDOR vs. User IDOR: A general IDOR vulnerability might allow unauthorized access to various types of resources (like files or records) based on their IDs. User IDOR, however, focuses on situations where one user can access another user’s private data (e.g., viewing someone else's account details). By splitting these into two categories, we can detect and address these issues more precisely.
  • Varying Severity: The severity of IDOR vulnerabilities often depends on the type of access. User-specific vulnerabilities often pose higher security risks and need to be prioritized differently. Splitting the checks ensures that each vulnerability is better contextualized, allowing for more appropriate risk management.
  • More Accurate Detection: With separate checks, we can fine-tune the detection for each scenario. For example, IDOR refers to broader object access problems, while User IDOR is focused on user-specific security risks. This leads to more accurate identification and clearer, more actionable results.

Additional Improvements:

These changes have allowed us to enhance the detection in the following areas:

Improved User-Based IDOR Detection (User1 Accessed User2’s Data):

It’s now easier to detect when one user (e.g., User1) can access another user’s data (e.g., User2) without permission. The scanner now checks that the response fingerprint (how the data is displayed or structured) remains the same when accessed by both users. If there's a mismatch, it flags this as a potential issue.

Improved ID-Based/Email-Based IDOR Detection:

For ID- and email-based vulnerabilities, the scanner now checks that responses have distinct fingerprints for each different user or account. Specifically, it requires at least three different fingerprints to ensure that responses aren’t the same for multiple users, making it easier to spot unauthorized data access.

Improved UUID-Based Fuzzing for Unsafe Generators:

UUIDs (Unique User Identifiers) are used to uniquely identify resources or users. If they are generated in an unsafe or predictable way, attackers could exploit them. We’ve improved our fuzzing process to better test UUID generation, ensuring that weak or predictable UUIDs are detected before they can be exploited.

These updates make the scanner more precise, ensuring that vulnerabilities are identified faster and more accurately!

#105 · From Alert to Action: Improved Jira Integration

We are excited to introduce an enhanced Jira integration designed to make your vulnerability management process even more seamless and efficient.

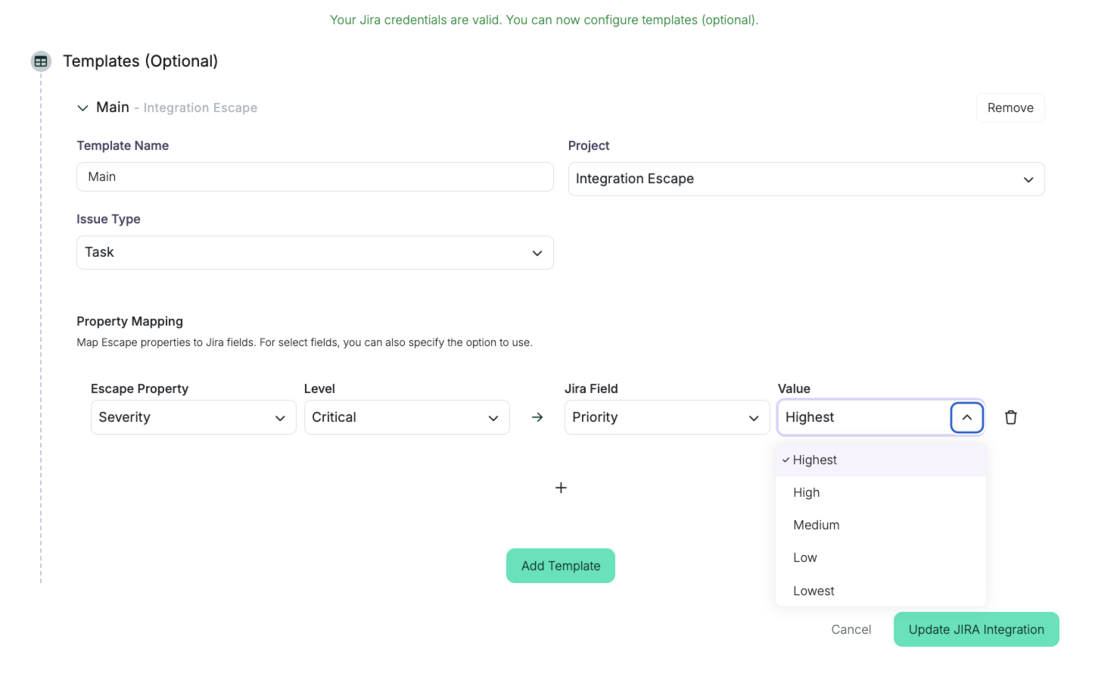
When setting up your Jira integration, you can now create multiple templates for ticket generation. Each template lets you specify the issue type, mapped to your organization's ticket types (e.g., Task, Subtask, Bug), and align Escape’s severity with your organization’s priority levels.

Screenshot 2025-04-22 at 12.09.05.png

Additionally, the templates will prefill most of the necessary information when creating a Jira issue from Escape, including

  • the issue name
  • description
  • cURL request(s) used
  • detailed remediation steps with a tailored development framework
  • a link to the scan

This ensures that every ticket is consistently created with relevant and accurate details each time.

We also hope that the ability to map Escape’s severity to your internal priorities will help you to streamline risk management, ensuring that your team can react swiftly based on your established thresholds!

How to Set Up the Integration:

If you haven’t set up the Jira integration yet, here’s how you can get started:

  1. Go to the Integrations Page: Click on Jira.
  2. Choose Add New Integration.
  3. Configure your integration:

  4. Name your integration.

  5. Add your Jira instance URL and API key.
  6. Enter the linked email associated with your Jira account (the one used to generate the API key).
  7. Validate Credentials: Click Validate Credentials to ensure your connection is working properly.

4.Once the credentials are validated, you can create and manage multiple templates.

The templates allow you to customize key fields such as:

  • Name
  • Project Name
  • Issue Type (based on the available types in your Jira instance)
  • Escape Severity Mapping to your internal priority system

Select and Associate a Template to Create and Send Jira Tickets

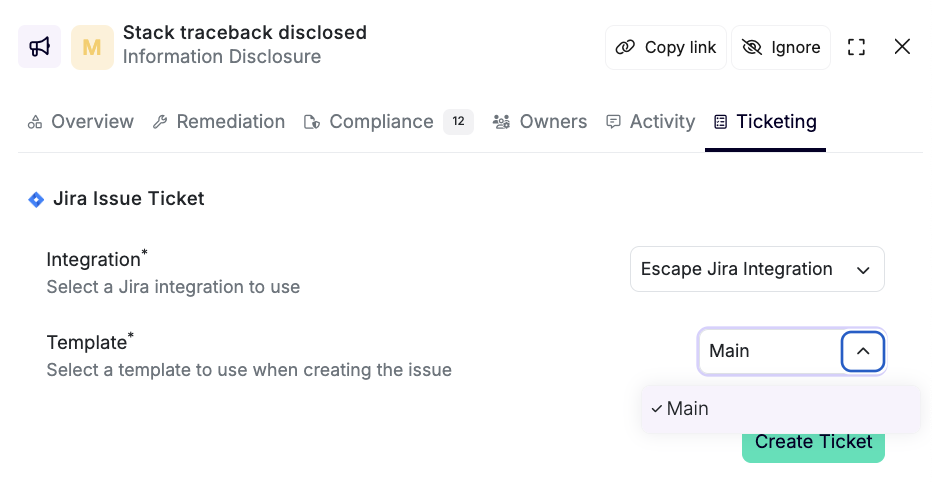
Once you've set up your templates, when you create a ticket associated with a vulnerability, you can easily select the appropriate template from the list you’ve created. This allows you to quickly send the preconfigured ticket to Jira with the correct issue type, severity, and all other relevant details.

Screenshot 2025-04-22 at 12.13.43.png

Using Templates in Workflows:

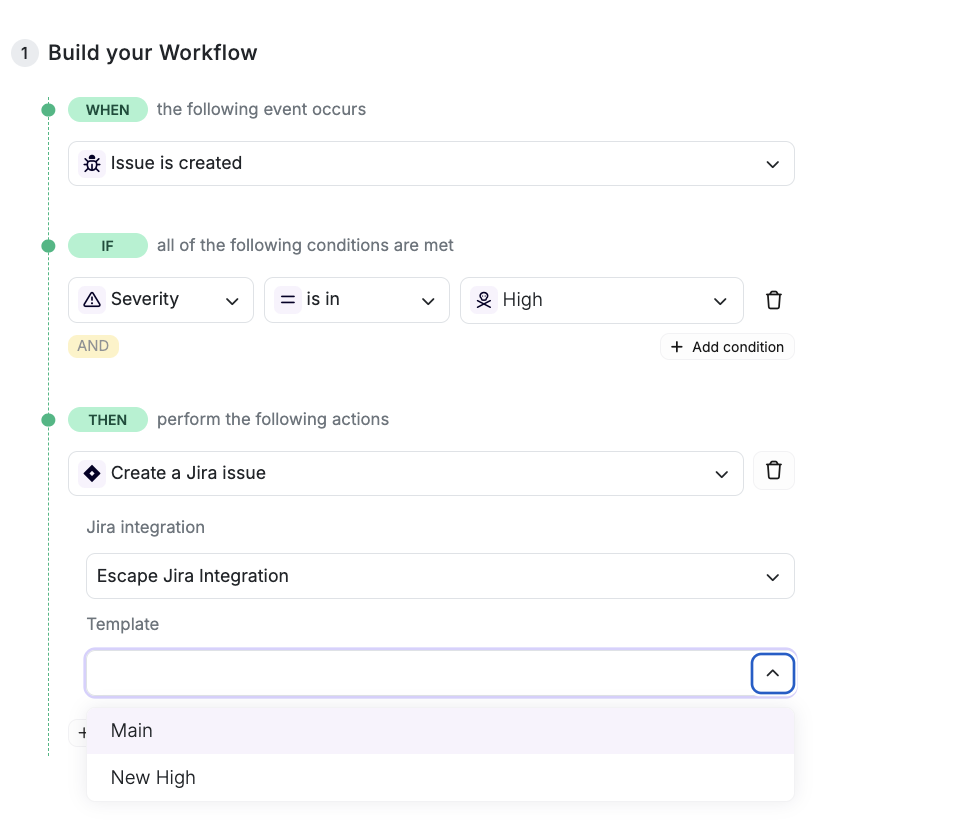
One of the best parts of this update is the ability to use your templates directly within Escape’s workflows. For example, when a critical vulnerability is detected, you can automatically create a Jira ticket with the associated template. This helps you respond to high-risk issues promptly and ensures that all the necessary details are included from the get-go.

Screenshot 2025-04-22 at 12.21.49.png

On the Jira Side:

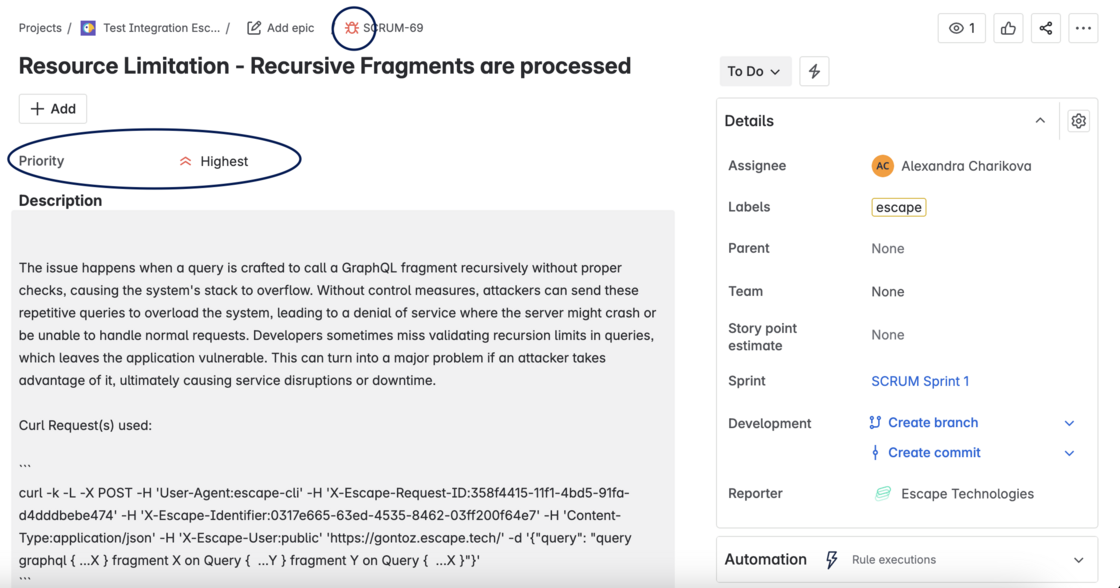
When the issue is created in Jira, you’ll see the pre-configured issue type and severity level mapped to your internal system, so everything is in place as per your organization's standards.

Screenshot 2025-04-22 at 13.08.14.png

With this update, we hope to help you make it easier than ever before to turn critical alerts into actionable Jira tickets. The next steps will provide even more flexibility when it comes to property field mapping.

Want to help improve our Jira integration? Reach out to our team via your dedicated Slack channel or email your dedicated contact!

#104 · Smarter, More Reliable Browser Authentication

We’ve just released a set of improvements that make browser-based authentication flows more powerful, more reliable, and easier to configure. Here’s what’s new:

1. Automatic API token extraction during authentication

Our browser agent authentication got even more powerful. This preset uses an AI Agent to automatically perform the actions to log you in with the provided credentials.

It is now capable of automatically extracting API tokens from API requests made during the authentication process. This means your scans can kick off with the right tokens without any extra steps.

You can learn more about Browser Agent authentication and how to set it up in Escape's documentation.

2. Smarter logged-in detection with logged_in_detector_text

You can now use the logged_in_detector_text field in both Browser Agent and Browser Actions presets.

This configuration option lets the scanner know to wait for a specific piece of visible text that only appears after a successful login, ensuring that your authentication is reliable before scanning begins.

Learn how to set it up

3. New wait text step in Browser Actions Authentication preset

We’ve added a new wait_text action to the Browser Actions Authentication preset, allowing you to explicitly wait for certain text to appear on the page before moving on to the next step.

Use it to:

  • Wait for the page to finish loading
  • Confirm that the form is ready before filling it

It's pratical if one page is slow and you want to wait before filling a field. All of these have configurable timeouts in seconds.

Here's an example for both wait text and logged_in_detector_text presets:

presets:
  - type: browser_actions
    users:
      - username: piedpiper@escape.tech
        actions:
          - action: fill
            locator: input[name='username']
            value: piedpiper@escape.tech
            auto_submit: true
          - action: wait_text
            value: Forgot password
            timeout: 15
          - action: fill
            locator: input[name='password']
            value: xxxx
            auto_submit: true
    login_url: https://app.staging.escape.tech
    logged_in_detector_text: 'Connected Integrations'
    logged_in_detector_timeout: 1
  - type: browser_agent
    users:
      - username: piedpiper@escape.tech
        password: xxxx
    login_url: https://app.staging.escape.tech
    logged_in_detector_text: 'Connected Integrations'
    logged_in_detector_timeout: 15

4. Fewer CAPTCHAs, smoother logins

We’ve improved the default user-agent used during authentication to make it more stealthy and less likely to trigger bot protection systems. That means fewer CAPTCHAs and faster, more reliable logins.

These updates make it easier than ever to build robust, reliable browser-based authentication flows in Escape DAST!

#103 · Improved Logs Page & Updated Naming Conventions

We’ve made some updates to the front-end views to improve overall clarity. While several names have been slightly changed, they won’t impact your overall experience. Additionally, the Logs page of each app now provides more detailed insights to help you monitor and optimize your app’s performance.

You can now see the Mean (Request Duration) for each endpoint (or GraphQL operation). This represents the average time it took for the scanner to send requests to the endpoint, giving you better visibility into scan execution and performance.

Screenshot 2025-04-10 at 12.05.02.png

#102 · Improved WIZ Integration

We’ve enhanced our Wiz integration to provide you with better visibility into exposed resources, making it easier to identify security risks in your environment.

We now extract more detailed information from WIZ, covering not only directly exposed resources but also those that may be exposed indirectly through services, machines, and other entry points.

What's new

Improved Visibility into Exposed Resources

We now extract more detailed information from WIZ, covering not only directly exposed resources but also those that may be exposed indirectly through services, machines, and other entry points.

Full Exposure Path Analysis

Escape also extracts information from the computed reachability path, which uncovers how resources might be exposed through services, ingresses, and other objects. This includes mappings such as Nginx ingress, Kubernetes services, and virtual machines, helping you spot indirect exposure points.

And then as before:

  • Escape has access to the code repositories and matches those Resources with code repositories (including owners)
  • Escape runs DAST at scale on those resources
  • All the vulnerabilities, exposed secrets, findings, and remediations are fed back into the Wiz using DAST & ASM Vulnerability Findings enrichment and Escape's workflows, merging both infrastructure and application-level insights into a single, unified view.

This update makes our WIZ integration more powerful, helping you spot and address exposure risks with greater confidence.

#101 · Sensitive Data Detection in Front-End Applications

We’re excited to roll out a new feature that helps you catch sensitive data leaks in your front-end applications. Now, it’s easier than ever to find and manage exposed secrets across all of your apps.

What’s New?

Detect Sensitive Data Leaks in Front-End Apps

We’ve added the ability to scan front-end applications for any sensitive data leaks. This means you can now identify if secrets or credentials are unintentionally exposed in your apps.

View Exposed Secrets in One Place

All detected leaks will appear in the Exposed Secrets table, which you can find under the All Risks menu.

Screenshot 2025-04-10 at 11.47.20.png

Please note that this menu does not contain Personally Identifiable Information (PII) data. For a detailed view of exposed secrets and PII specific to each app, head to the Sensitive Data tab in the scanned application. This provides a more granular look at what’s been exposed and where.

With this update, we aim to help you catch sensitive data leaks early, so they don’t turn into bigger issues down the road!

#100 · We've Expanded Our SQL Injection Detection to More Frameworks!

We’re rolling out an exciting update: our platform now detects SQL injection vulnerabilities in more frameworks!

You’ll now get extra coverage for:

  • Propel
  • Illuminate
  • Doctrine
  • SQLAlchemy
  • MariaDB

This update makes it easier than ever to secure your apps across a broader range of technologies.