Skip to content

2025

#92 · Added Graph Visualization in the Inventory

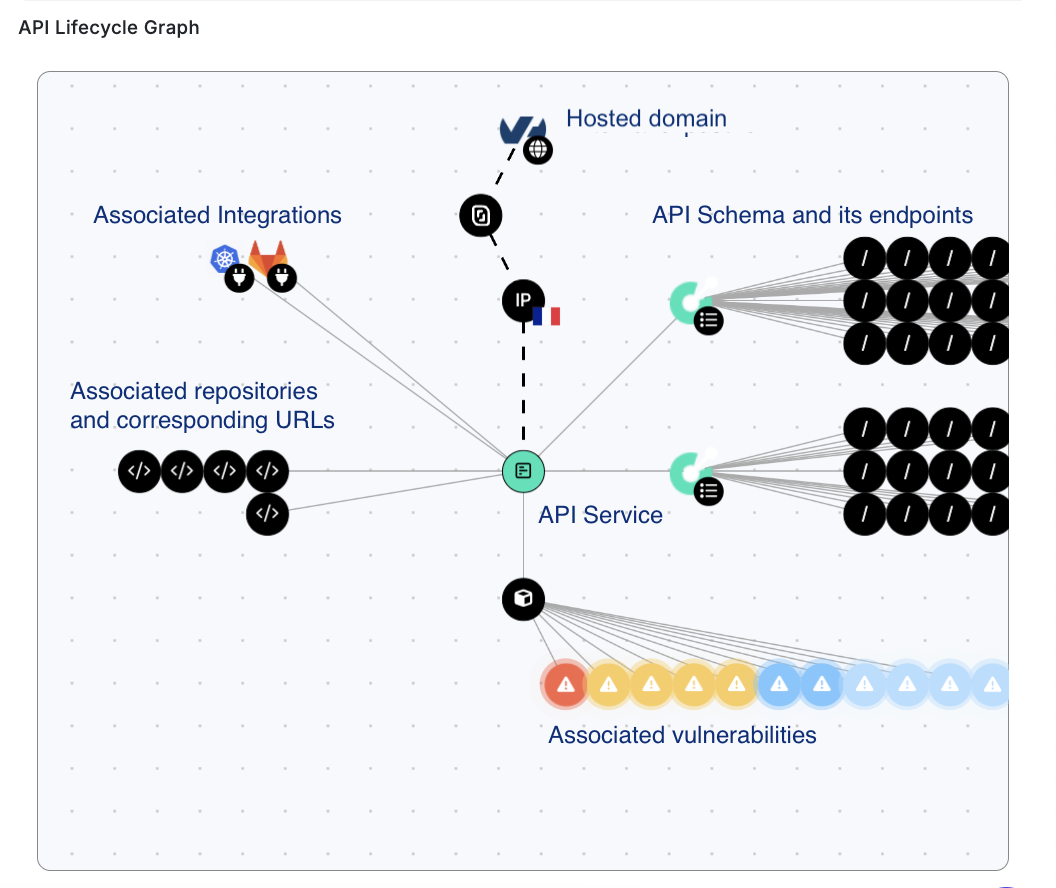
We’ve added a powerful new feature: the API Lifecycle Graph within the Inventory. This visualization allows you to see an in-depth view of your API service, including its lifecycle and key integration details.
api-lifecycle-graph.png

What you can view:

  • API Lifecycle Graph: View the full lifecycle of the API service.
  • Hosting Details: Know the domain where the API service is hosted, the cloud provider, the associated IP address, and the country where it’s hosted.
  • Service Integration: See the integration with Wiz, GitHub, GitLab, Kubernetes or others and how it was set up (e.g., via GitLab API key).
  • Repository Info: Identify the repository and associated URL where the service is hosted.
  • API Schema: View the associated API schema, how it was generated or found, and its endpoints with the methods linked to each endpoint.
  • Application Scan: See which application scan is associated with the service and view alerts linked to that application. Each alert is color-coded depending on its severity.

How to view:

  • Go to Inventory → All Services.
  • Click on the service you want to inspect.
  • You'll find the API Lifecycle Graph at the bottom of the Overview tab.

Benefits:

  • Complete Lifecycle Visibility: The API Lifecycle Graph provides a comprehensive view of your API’s entire journey, from integration to deployment.
  • Simplified Troubleshooting: By visualizing the API's integration and hosting details, you can easily identify potential points of failure or misconfigurations.
  • Better Monitoring and Tracking: Track the service repository, schema, and its endpoints efficiently in one place, making it easier to manage and secure your APIs.
  • Contextual Insights: View associated scans, vulnerabilities, and alerts in context, allowing you to quickly assess the security posture of your API services.

We hope that visually representing all relevant information helps you make informed decisions faster and improves your ability to monitor, manage, and secure your APIs effectively!
#91 · Advanced Configuration: Configure Headers in Playwright Authentication

We’ve added the PlaywrightUserPreset option to the advanced configuration settings. This allows you to inject optional headers during the authentication process and for authenticated requests, giving you more flexibility when setting up tests.

How to Set It Up:

  1. Go to the settings of the relevant app.
  2. Navigate to Scan configuration → Expert.
  3. Under presets,

use the following structure:

 presets: type: playwright
 type: playwright
 login_url: https://auth.example.com/login`
 users:
   header:

Benefits:

  • The preset feature makes it easier to configure authentication in Playwright-based testing, saving time and improving accuracy.
  • It allows you to inject custom headers, making it easier to handle complex authentication flows.
  • With the ability to configure headers, you can fine-tune authentication behavior to match your exact requirements.
  • Ensures that authenticated requests during scanning will include the necessary headers, reducing the chance of skipped or incorrect tests.

#90 · Enhanced "Visited Pages" Tab for Front-End Applications

For each tested front-end application, our "Visited Pages" tab has received an upgrade!

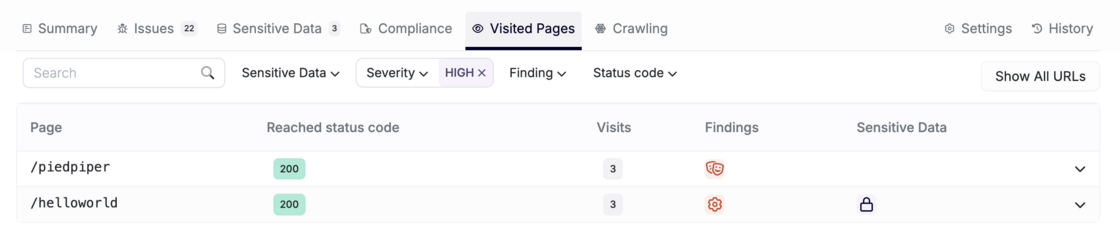
The Visited Pages tab plays a crucial role in your scan results. Unlike API scans, where there is a predefined list of endpoints, front-end scanning relies on a crawling system and security checks engine. This allows you to validate which pages were visited and the issues found on each crawl.

Screenshot 2025-03-07 at 16.41.45.png

What's New:

  • Grouping of Similar Pages: Pages are now grouped by default, helping you focus on key pages and reducing noise for more efficient analysis.

  • Improved Page Organization: Each visited group includes:

    • Page Name
    • Reached Status Code
    • Number of Visits by Scanner
    • Associated Findings (vulnerabilities in the page)
    • Sensitive Data Found
  • Filters: You can filter by:

    • Sensitive Data
    • Severity
    • Associated Vulnerability
    • Type of Finding (Vulnerability)
    • Status Code

If you prefer to see everything, you can still click on Show All for the full view.

This update brings improved efficiency and better organization, allowing you to focus on critical findings and reduce unnecessary noise!

#89 · Added Filter by Front-End in Scanned Applications Tab

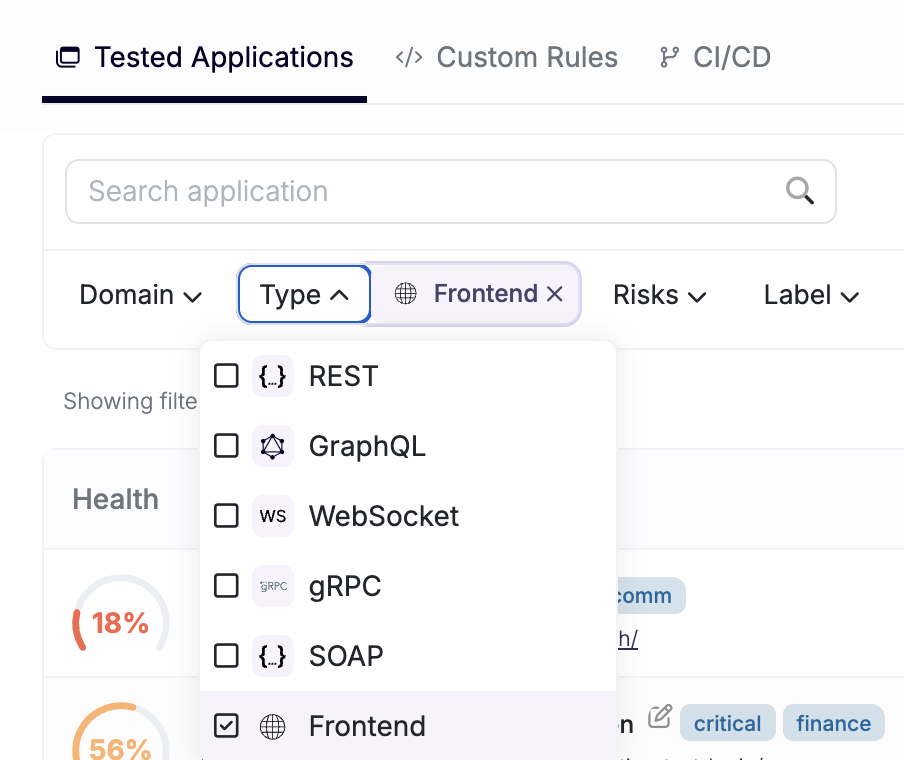
We’ve added a new filter to the Scanned Applications tab, allowing you to filter and view scanned front-end applications easily.

Screenshot 2025-03-07 at 16.30.13.png

This makes organizing and accessing relevant applications easier, improving your overall testing workflow!

#88 · Separate Scanning of APIs Associated with Front-Ends for Improved Efficiency

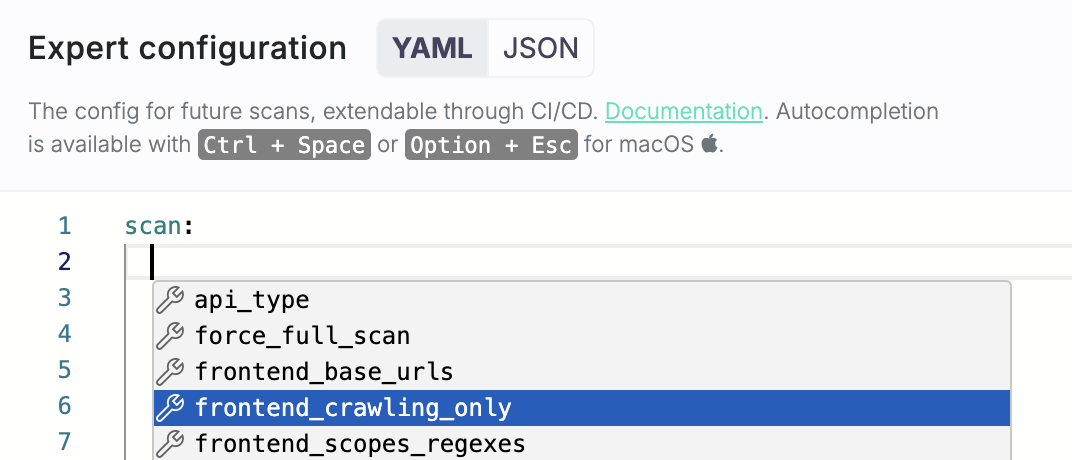
We’ve added a new option to scan APIs associated with the front-end without performing security checks on the front-end itself. If your developers update only the API without touching the front-end, you won’t want to waste time rescanning it. This new feature lets you focus on API vulnerabilities, speeding up the scanning process and avoiding unnecessary checks. To enable this, simply configure the new frontend_crawling_only boolean parameter in your advanced settings.

How to Set It Up

  1. Go to the settings of the relevant app.
  2. Navigate to Scan configuration → Expert.
  3. Under Scan

  4. Either type frontend_crawling_only: true

  5. Or use one of the shortcuts Ctrl + Space (Windows/Linux) or Option + Esc (macOS) and pick frontend_crawling_only from the list.

Screenshot 2025-03-07 at 16.17.33.png

Benefits

  • Focused Scanning: This option helps you focus on scanning APIs without the need to repeatedly check the front-end, making the scanning process more efficient.
  • Improved Efficiency: By skipping the front-end checks, the scan will be faster, allowing you to quickly analyze API behavior without unnecessary extra checks.

#87 · Visualizing Generated API Schema Components

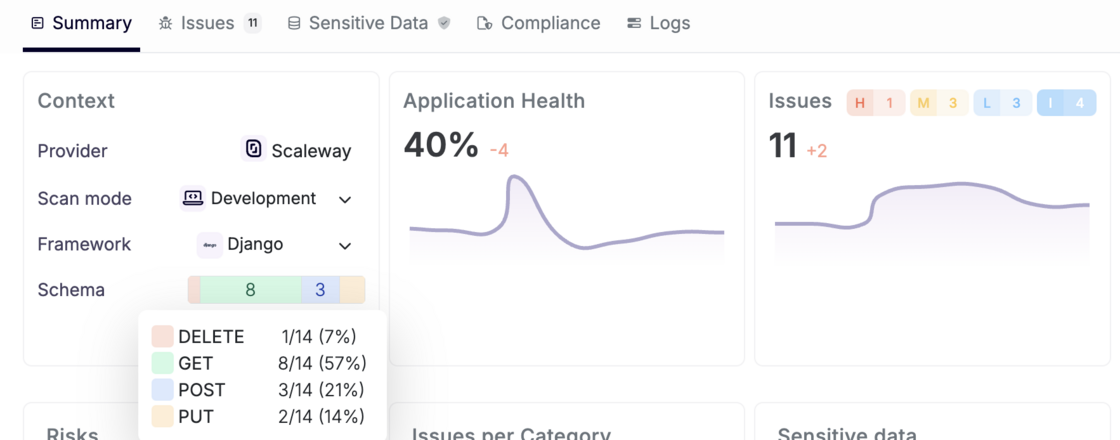
As you know, one of Escape's native capabilities is the ability to generate API schemas for APIs without an associated specification. Escape reconstructs API schemas by parsing the Abstract Syntax Tree (AST) of both frontend and backend source code. Now, we’ve added the ability to visualize the components of the generated schema directly in the Summary tab within the context window for each app.

Screenshot 2025-03-07 at 16.12.17.png

For example, you can now easily see details such as number of GET, POST, PUT, and DELETE methods for REST APIs.

This visualization provides clearer insights into how an API function and whether schema was correctly generated, making it easier for users to spot potential issues and inconsistencies, especially with complex APIs.

For more details on how the generated OpenAPI schema connects to the API service, check out our documentation.

#86 · REST APIs & Front-end Apps: Enhanced Business Logic Vulnerability Detection

We’ve improved Escape’s DAST scanner with better coverage and detection of business logic vulnerabilities.

This improvement focuses on REST APIs or front-end applications. Whether you’re scanning one or the other, our enhanced scanner now provides deeper insights and more accurate detection, helping you to identify and address even more complex vulnerabilities.

#85 · Bi-directional Integration with Wiz

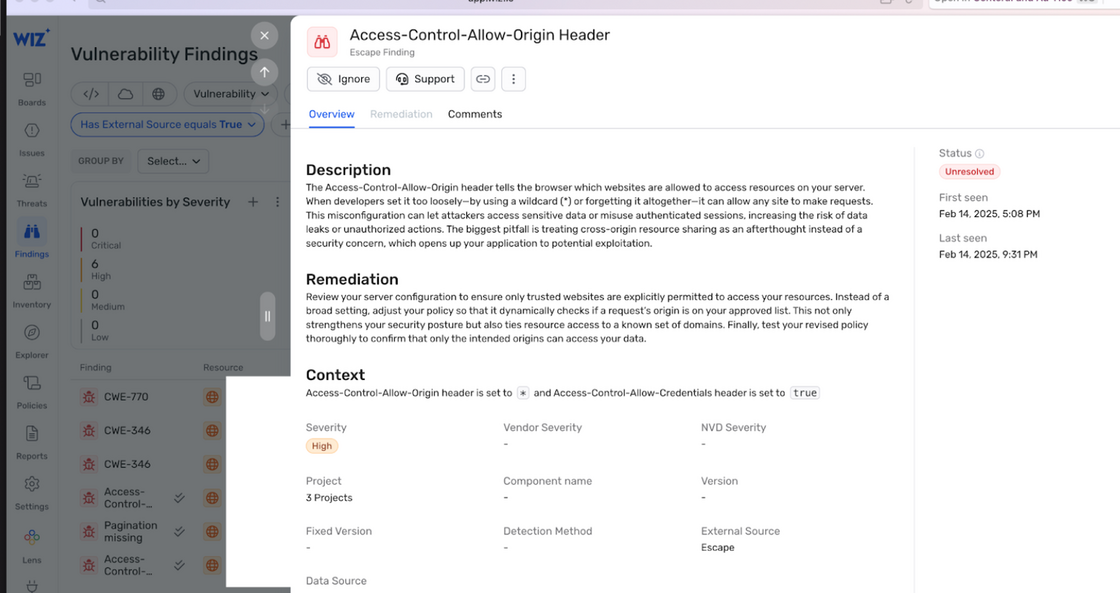
Our bi-directional integration with Wiz is now live!

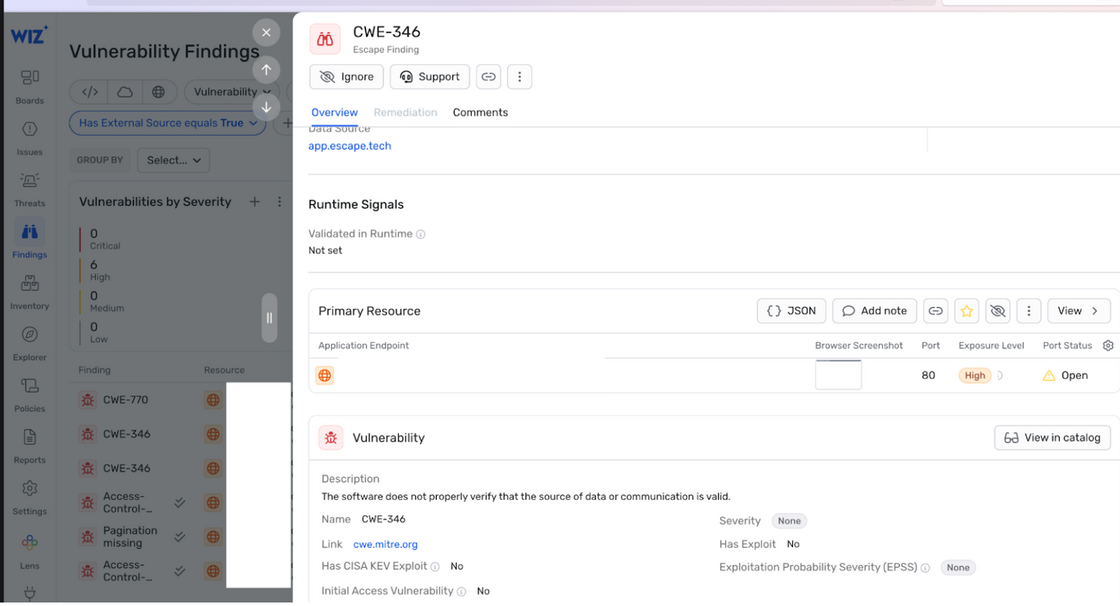
Using previously ingested and enriched Wiz resources, Escape DAST identifies business logic vulnerabilities, API misconfigurations, and sensitive data leaks, then feeds these findings—including CWE classifications and remediations—directly into Wiz.

This integration enriches security teams with valuable context and ownership data, enabling them to prioritize and remediate vulnerabilities more effectively. With this unified solution, organizations can detect risks quickly, gain clear ownership insights, and confidently embed security early in the development lifecycle.

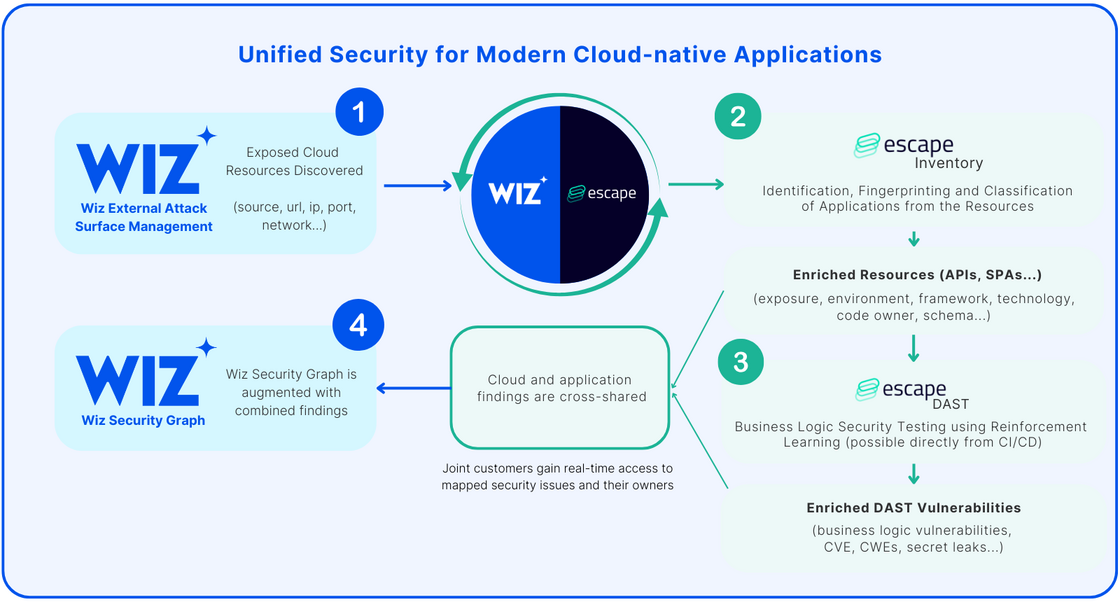
Here's how it works:

image.png

  1. Wiz's Dynamic Scanner finds exposed cloud resources and hands them over to Escape.
  2. Escape Inventory then identifies, fingerprints, and classifies these resources as specific application assets—such as APIs, Single-Page Applications (SPAs), and more.
  3. With this enriched information, Escape DAST runs at scale on the identified applications, including APIs, without needing any network interception or agent installation. If you're a joint Wiz and Escape customer, you can find step-by-step instructions on how to set up Wiz integration in Escape's official documentation
  4. All the vulnerabilities, exposed secrets, findings, and remediations are fed back into the Wiz using DAST & ASM Vulnerability Findings enrichment and Escape's workflows, merging both infrastructure and application-level insights into a single, unified view:

image.png

image.png

Want to benefit from the integration?Learn here how to set it up.

#84 · Enhanced Private Locations: WebSocket & CLI Support

We’ve released a new version of our Private Locations feature, now supporting testing of internal APIs with more protocols, including WebSocket, which was previously unsupported.

Additionally, Private Locations are now available through the Escape CLI for a smoother experience. Learn more here.

Key benefits:

1. Single Pane of Glass

All Escape tooling (CLI for API interactions and Private Location management) is now unified into one binary, reducing complexity and making deployment easier.

2. Improved Stability & Scalability

  • More stable and scalable, especially for frontend DAST
  • More reliable health checks for uninterrupted operation

3. Simplified Setup & Usage

  • No more manual repeater ID creation
  • Support for WebSocket protocols for better API testing
  • No Node.js installation required (binary format)

4. Enhanced Transparency & Monitoring

  • Open-source & auditable for security and transparency
  • Direct log access from the Escape front-end
  • New workflow indicating when a repeater is unhealthy

Migration from Legacy Repeater

If you're using the old repeater image, follow the migration guide below to switch to the new CLI-based approach.

The new escapetech/cli image simplifies setup—no need to manually create a repeater or copy-paste its ID.

Steps to migrate:

  1. Retrieve your API key from your profile page
  2. Update your configuration:
    • Remove the ESCAPE_REPEATER_ID environment variable
    • Add the ESCAPE_API_KEY environment variable
  3. Update the startup command:\ locations start -v location-name where location-name is your desired location name
  4. Switch from the escapetech/repeater image to the escapetech/cli:latest image

#83 · Advanced: Extend DAST Exploration for Deeper Security Testing

Escape's DAST exploration runs for 30 minutes by default, striking a balance between speed and depth to identify business-critical vulnerabilities quickly. However, for even more comprehensive coverage, you can extend the exploration time in the Expert Settings, allowing the algorithm to analyze your application more thoroughly.

How to extend exploration time:

Go to Scan → Expert → Set max_duration to your desired duration.

Learn more about expert settings here.