Skip to content

Release Notes

#139 · Introducing Projects: Turn Visibility Into Action With Clear Ownership

Today, we’re releasing Escape Projects, a new way to organize your assets within Escape platform and assign access so teams can quickly act on the findings that matter to them.

For companies operating across multiple brands, managing acquisitions, or running split engineering teams, the old tag-based RBAC model made it hard to know what assets belong to what team, who should have access to it, and who should fix what. Too many people had access to too many assets, saw too many findings, and not enough action followed.

Projects change that.

“We’re looking forward to this because it will be easier for us to add the right people, put the assets in the right project, and let them start reviewing findings and patching what they need to patch.”

Why This Matters (the real problem we’re solving)

Security teams can have great overall visibility — but ownership isn’t clear, which means findings linger.

Projects give you:

1. Clear ownership

Teams see the assets and findings they’re actually responsible for.

2. Less noise, more action

Engineers stop sifting through information that doesn’t belong to them.

3. Faster remediation loops

By mapping subdomains, apps, or brands to their owners, teams can act immediately and remediation progress over time.

4. Enterprise-scale flexibility

Perfect for companies with multiple brands, complex org charts, or frequent M&A activity.

In short:

You turn visibility into action. And action into real security improvements.

What’s New

1. Project-Based Access Control

Create Projects that map directly to your real-world structure (brands, business units, product teams, regions, etc.).

Assign assets to Projects and bind the right users with scoped permissions.

2. Tags Are No Longer Used for RBAC

Tags stay in the product for filtering and scanning logic—but they no longer control access.

3. Old Team Roles Have Been Removed

We’ve replaced legacy team roles with clearer, more predictable project-scoped roles.

4. Assets Drive Access, Not Profiles

Profiles themselves aren’t tied to Projects.

Their assets are — giving you flexibility as your org evolves.

5. Global Elements Stay Global

For compatibility:

  • Custom Rules remain global and need a global role binding to edit
  • Workflows also remain global
  • During scans, existing tag-based rules still apply

How It Works

  1. Go to Organization Settings → Projects: This is where you create, edit, and manage Escape Projects.
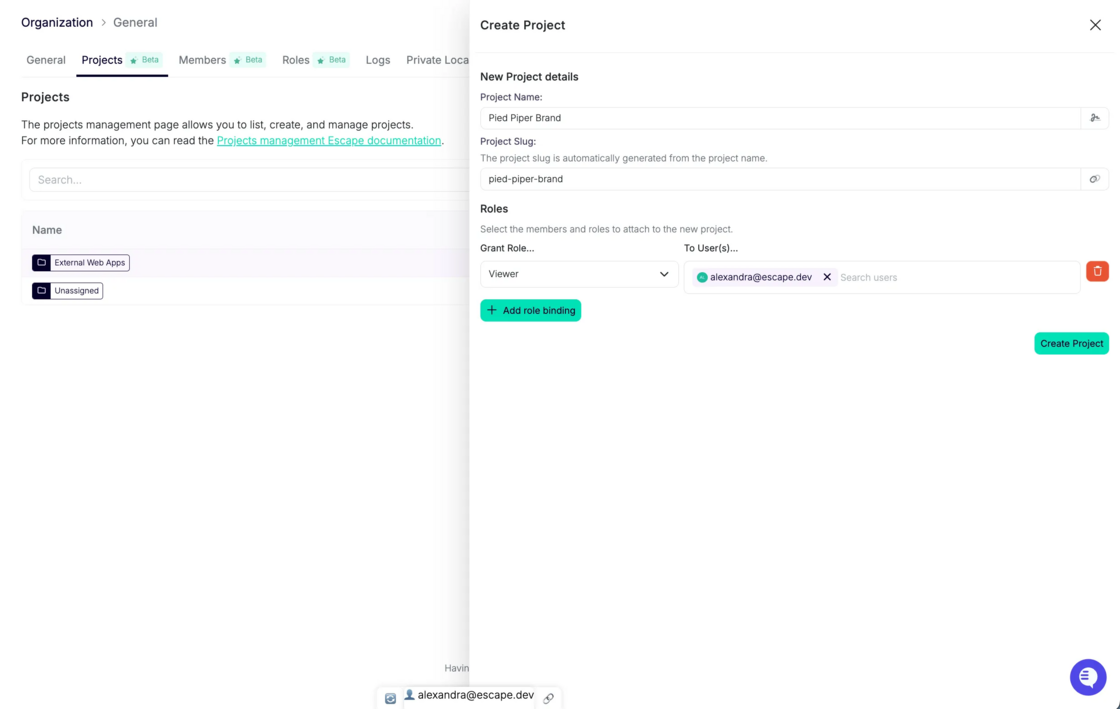
  2. Create a Project:

Projects can represent brands, teams, BU's, regions, or any logical ownership boundary. Examples: “Brand A”, “Payments”, “EU Web Team”, “Team A”.

image.png

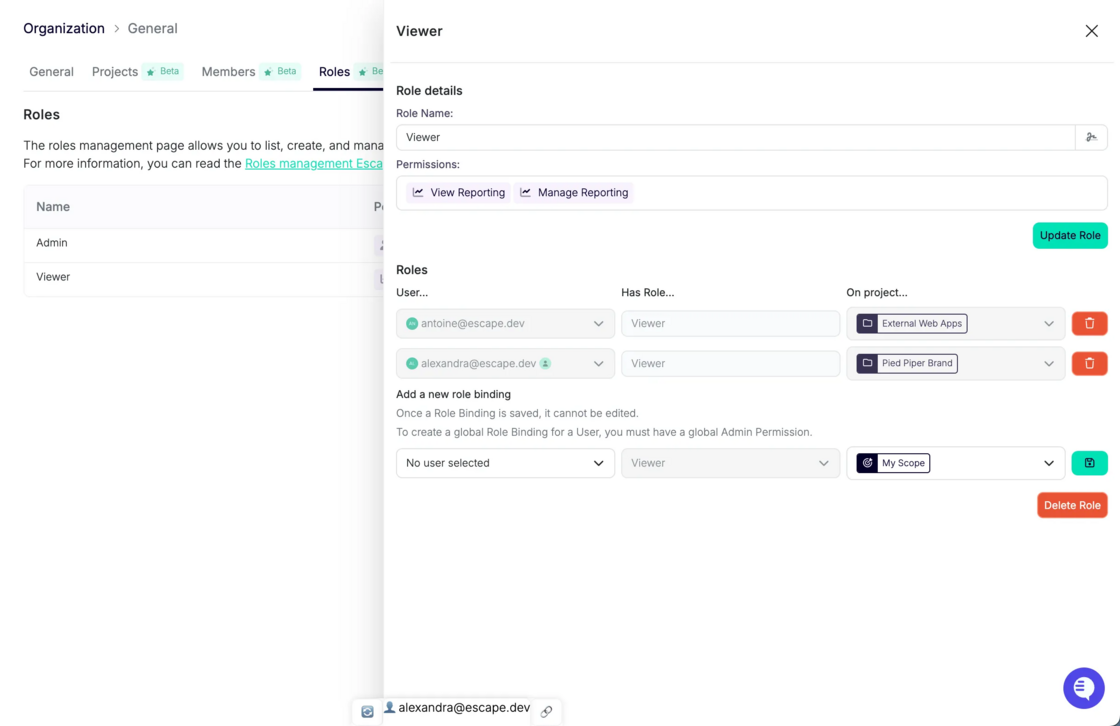
  1. Bind users to the Project with the appropriate role: Give team members the right level of access: Viewer, Editor, Admin, etc.

image.png

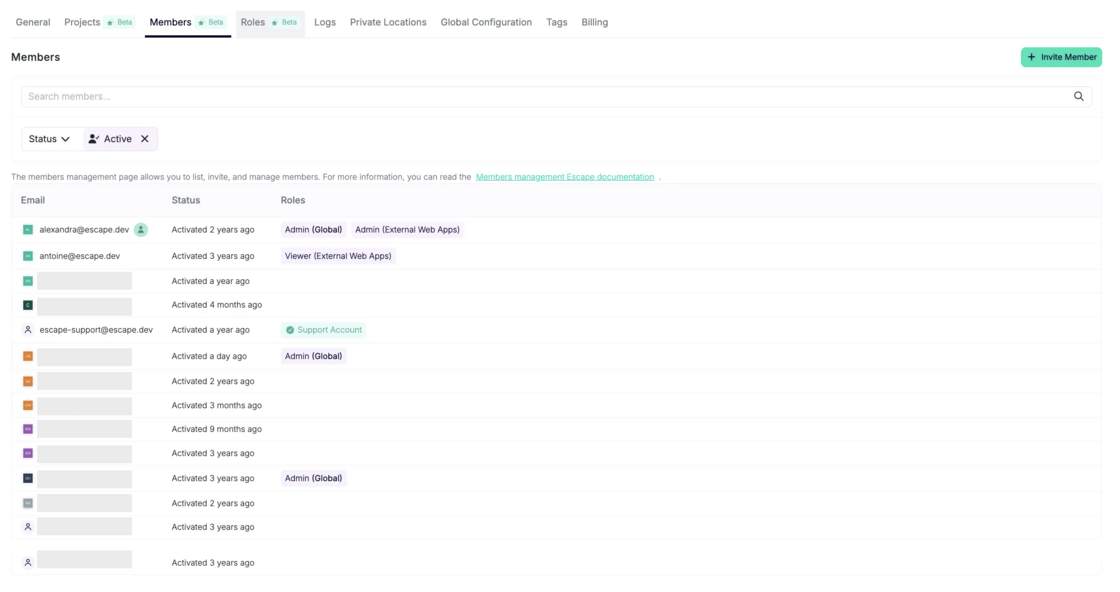
  1. View All Members of a Project: Under the Members tab, you can see who has access and with which role.

admin-users.png

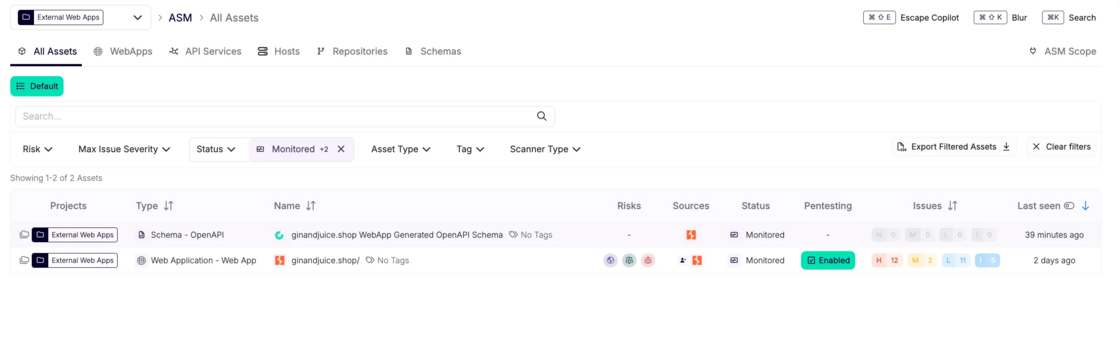
  1. Assign assets to that Project:

Projects are powered by the assets they contain. Assign domains, subdomains, schemas, and profiles to each Project. All associated scan profiles and issues will be auto-assigned as a result.

image.png It is possible to bulk assign par domain name or other filter of your preference:
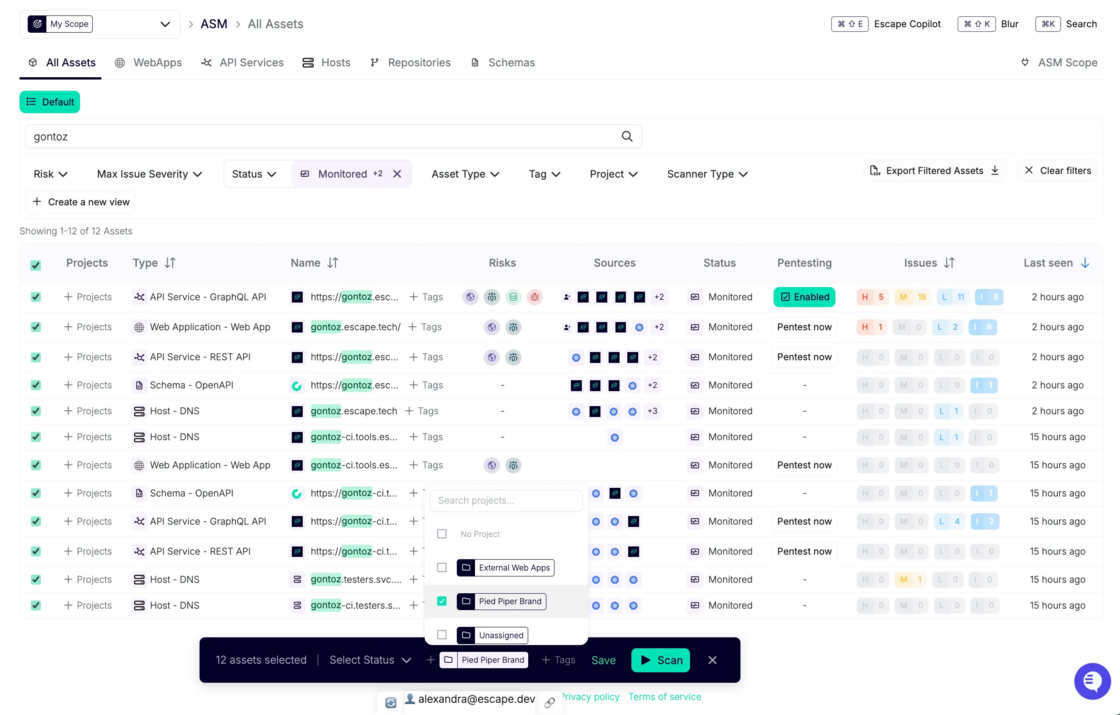
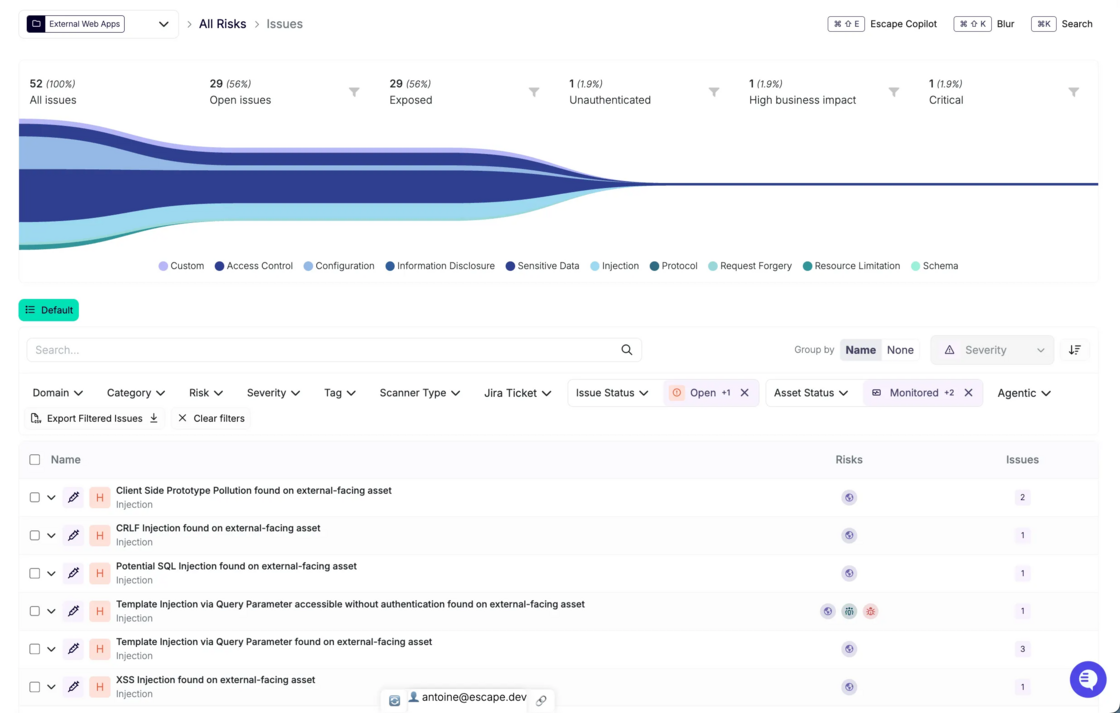
image.png

  1. Teams can now filter on the assets and findings they own:

image.png

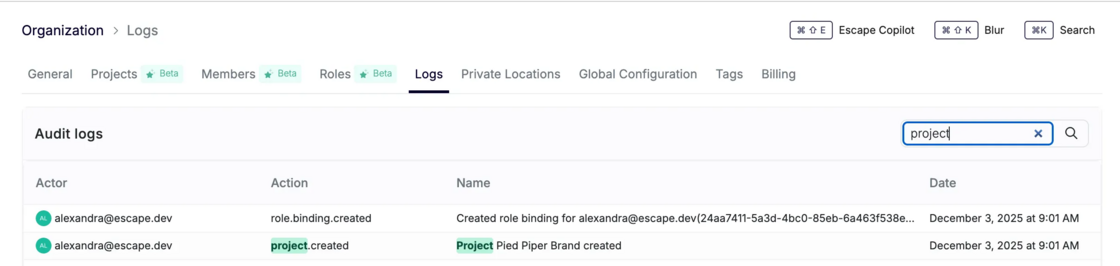
  1. Critical operations happening on projects (creating, editing, deleting) are audited and can be viewed in the audit logs page:

image.png

Assigning “Unclassified” Assets — Important

Every asset must belong to a Project.

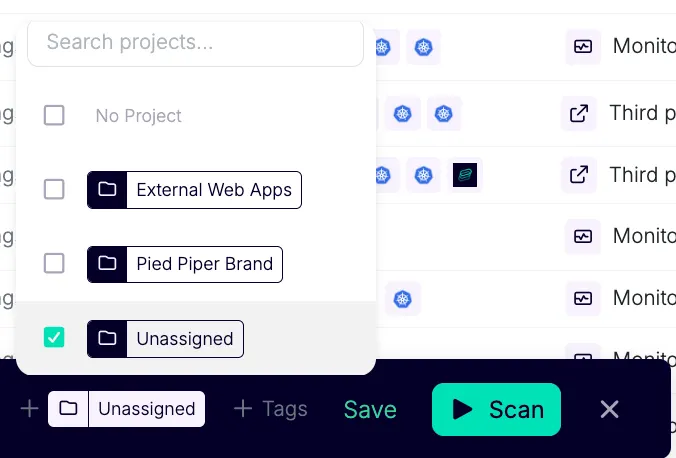
If you have assets that are not yet classified, we recommend creating a dedicated Project such as: “Not Assigned”

You can bulk-assign these assets later from the Inventory. image.png

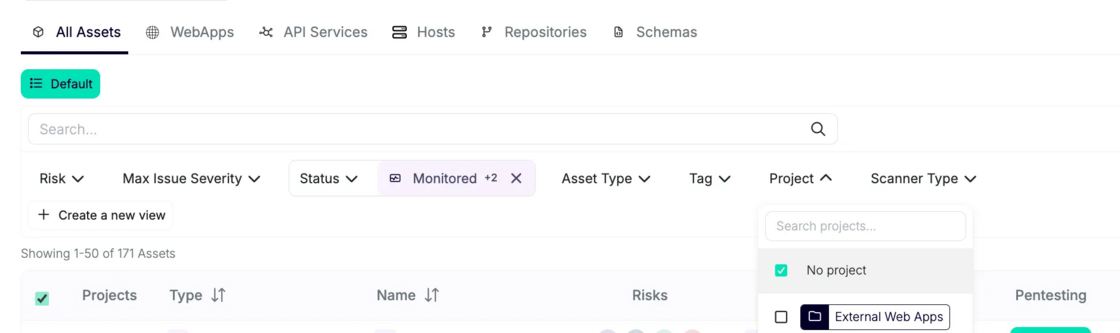
Use the Project filter and select “No project” to filter on any assets that are not yet assigned to a specific scope.

image.png

Why this matters:

Assets not assigned to any Project are visible org-wide, which breaks scoped visibility.

If you want clean, project-based access, everything must be assigned.

Concrete Example of How Projects Can Fit into Your Workflows

Let’s say you want a specific software engineer to only view vulnerabilities for the assets they work on — nothing else.

You would:

  1. Create a Project called “Team A”
  2. Assign the relevant assets to that Project
  3. Bind the engineer to the Project with
    • View Reporting
    • Manage Reporting
  4. When they log in, they will only see
    • The assets they own
    • The vulnerabilities and findings related to those assets
    • Their filtered list inside the All Issues tab

If the engineer works across multiple projects, their scope will simply be the union of those Projects, and they can still filter down to a single Project when needed.

⚠️ Important Note About Deleting Projects

Deleting a Project currently deletes all assets it contains.

This will change in an upcoming update.

For now, please unlink assets before deleting a Project.

What’s Coming Next

We're already working on scoping more functionality to Projects, so teams can operate independently end-to-end.

Coming soon:

  • Workflows scoped to Projects
  • Integrations scoped to Projects (Slack, Jira, etc.)
  • Project-scoped reporting
  • Automated alerts for each team, routed only to the relevant Project
  • More granular API support

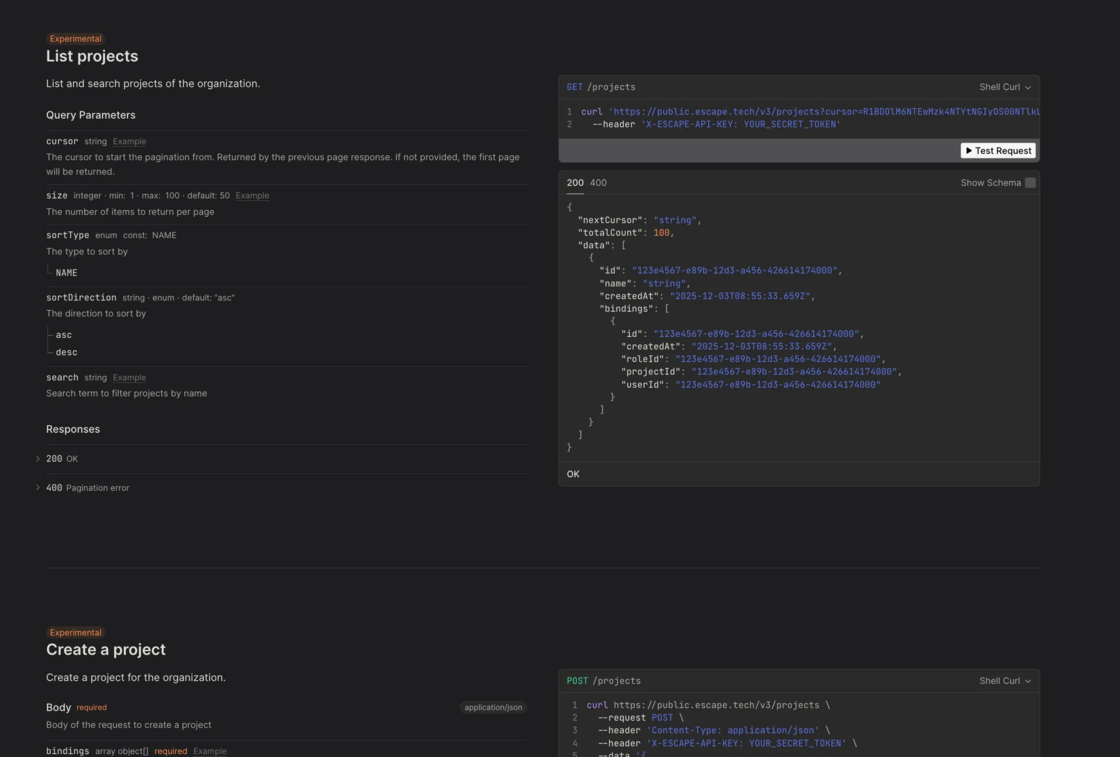
For now, automated workflows can be built through the Escape API (Beta): https://public.escape.tech/v3/#tag/beta/post/projects

image.png

To sum up, with Projects in place, your organization gains:

  • Deeper visibility into ownership
  • Clearer accountability across teams and brands
  • Actual action on findings — not just reporting
  • A scalable RBAC model that grows with your environment

It’s a practical step toward helping teams move from simply seeing issues to actually addressing them — with the right people looking at the right assets from day one.

Want to make sure Escape Projects are available on your account? Reach out to your dedicated Escape representative.

#138 · Verify and Filter API Scans for Method-Specific Coverage (GET, PUT, POST, DELETE)

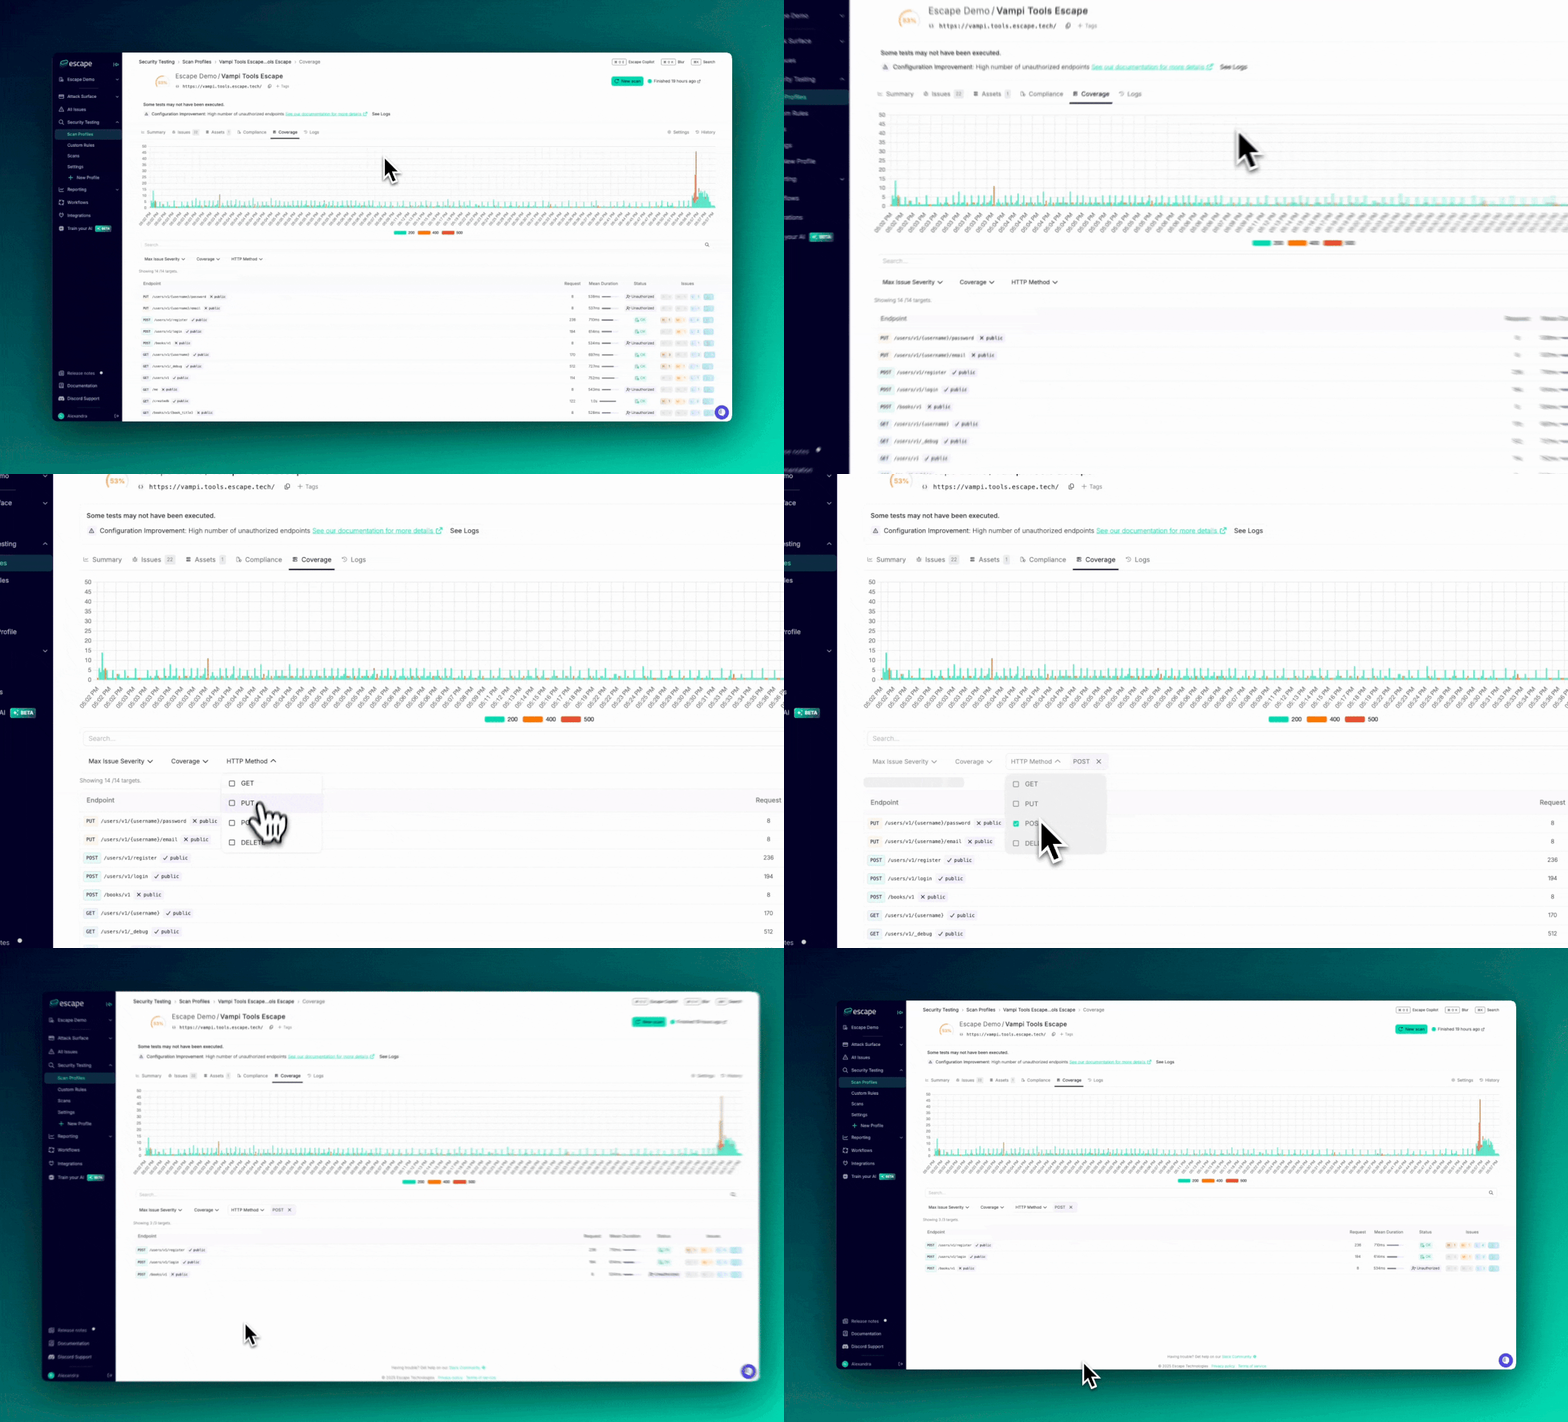
As a security engineer, you need to ensure thorough testing of all API request methods. With our new HTTP Method filter, you can now easily focus on verifying whether specific request methods (GET, PUT, POST, DELETE) were tested when reviewing your scan coverage.

Why This Matters :

Different HTTP methods can introduce different types of vulnerabilities. For example:

  • PUT requests might enable file uploads or modifications, increasing the risk of improper access control.
  • POST requests often involve sensitive data, making them prime targets for attacks.
  • GET requests could expose information, putting data security at risk.
  • DELETE requests introduce the potential for data loss or accidental deletions.

By filtering targets by HTTP method, you can ensure that each method was thoroughly tested for vulnerabilities. This also provides a clear view of your scan coverage, making it easier to demonstrate to leadership that all critical methods have been properly tested.

filter.gif

Key Benefits:

  • Focused Vulnerability Testing: Easily check that the most sensitive request methods (PUT, POST, DELETE) have been adequately tested.
  • Improved Efficiency: Filter out unnecessary data and concentrate on the most relevant request methods to save time.
  • Comprehensive Coverage: Make sure no high-risk request methods are overlooked in your security reviews.

How to Use:

  1. Go to your Scan Profiles.
  2. Navigate to the Coverage tab for a specific scan.
  3. Apply the HTTP Method filter and choose GET, PUT, POST, or DELETE to refine your targets.

This update helps you stay focused and ensures that your API security testing is comprehensive and efficient.

#137 · Reproduce Complex Exploits in Escape: Multi-Step Custom Rules Are Here

Until now, custom rules in Escape were limited to single-request vulnerabilities. You could only define and test one request at a time.

This meant that more complex vulnerabilities, such as those requiring multiple chained steps (e.g., creating a user, then editing that user to escalate privileges), couldn’t be implemented.

That changes today.

Introducing Multi-Step Custom Rules

You can now chain multiple requests together in a single custom rule, allowing you to simulate complex attack flows, just like a pentester would.

With multi-step rules, you can:

  • Extract data from one request (e.g., a token, user ID, or session key)
  • Modify and reinject it into subsequent requests
  • Recreate full exploitation chains that were previously impossible to model in Escape

Plus, you can now learn from bug-bounty and external reports: when a report (for example, a HackerOne finding) describes a multi-step exploit, you can implement it directly in Escape to validate, triage, and create reproducible test cases.

This unlocks the ability to implement virtually **any vulnerability scenario (**even the most advanced ones) directly inside Escape.

Get started: this is available now in our API scanner. See the docs and specific examples here.

#136 · New Escape's Public Locations available

We’ve added three new Escape Public locations to the platform, located on West Coast, USA, along with their associated IPs. If you want to allow incoming traffic from these locations, you'll need to enable them.

Previously, Escape locations were available only in Europe and Canada. You can find the complete list of public Escape locations and their corresponding regions in our available on our documentation.

To enable these locations, go to Settings → Private Locations and activate the "United States" locations. While these locations are accessible to all organizations, they are disabled by default.

#135 · Quickly Validate and Streamline Scan Profile Configuration Before Launch

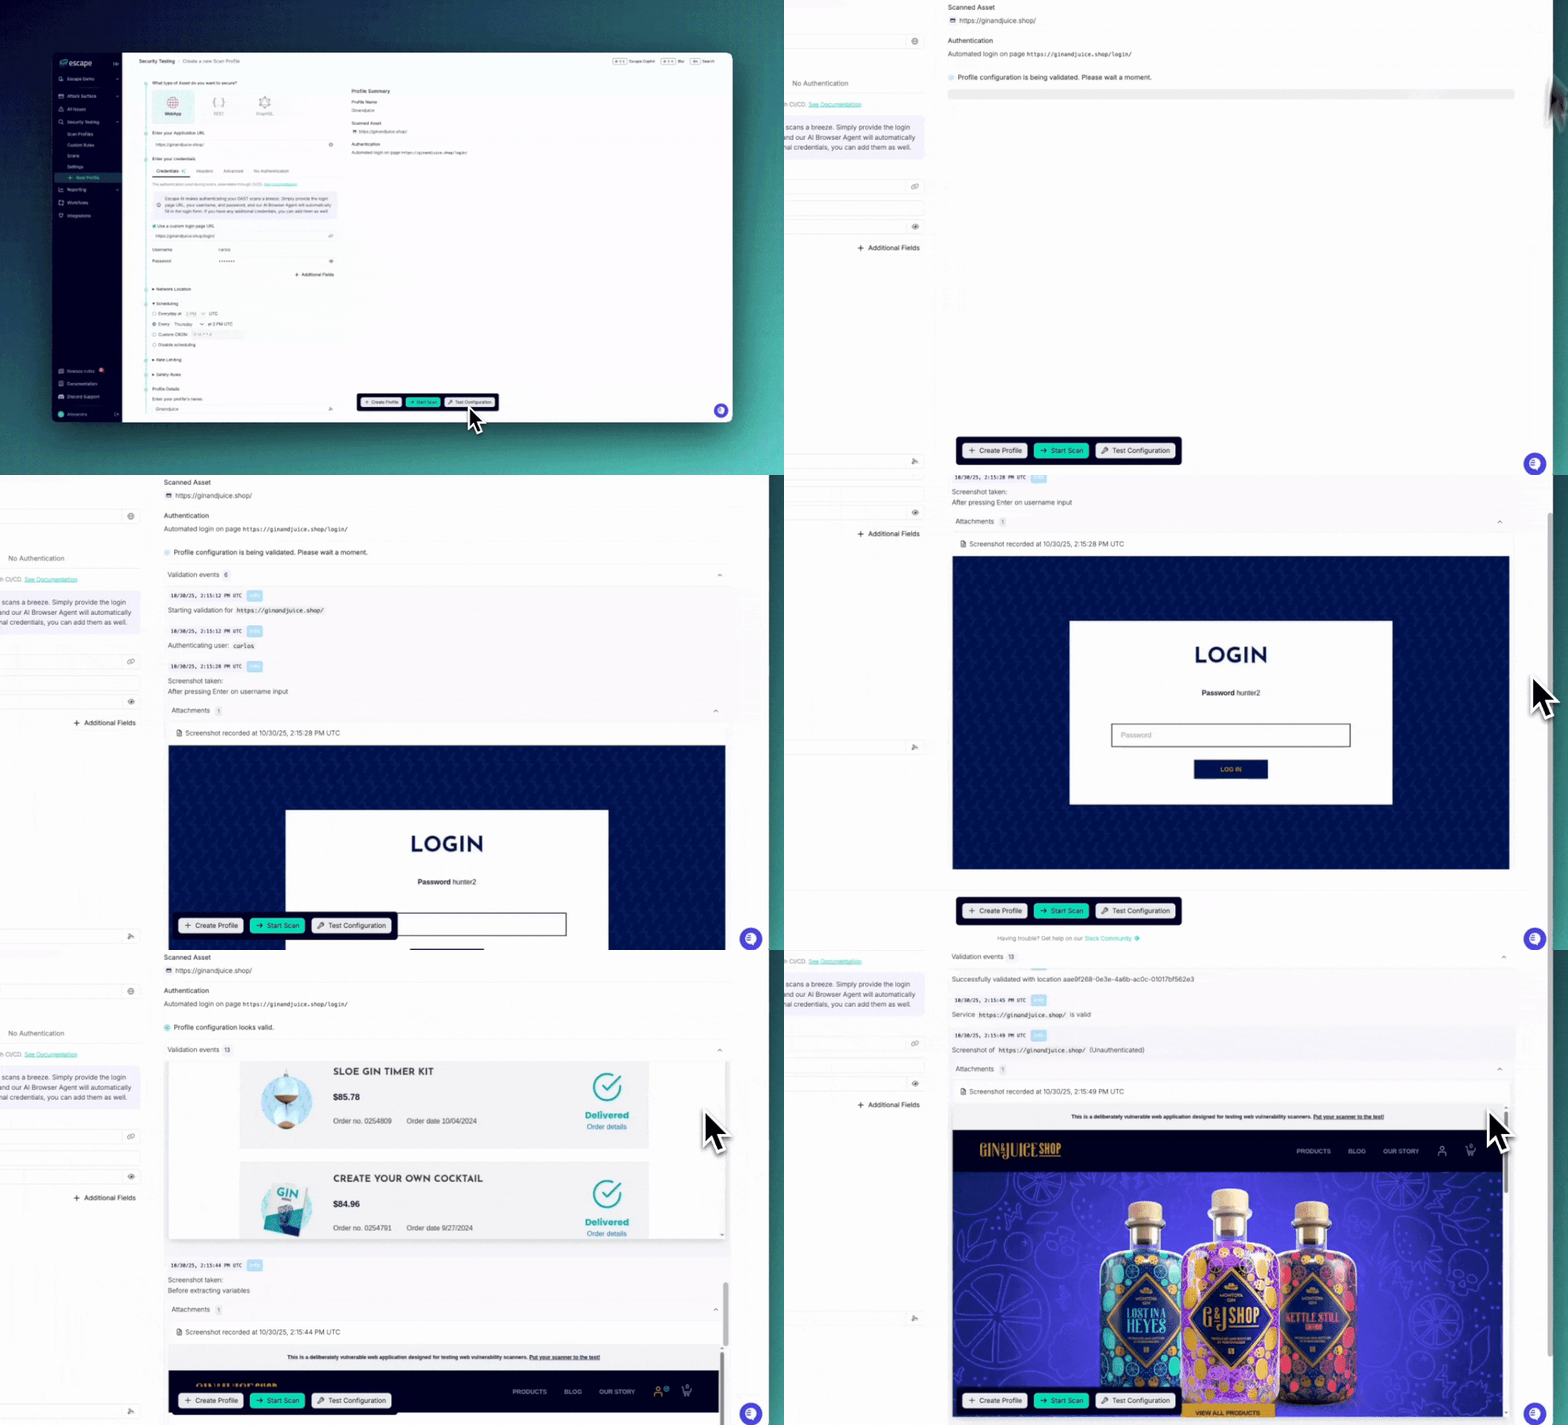
We’ve improved our Test Configuration feature in the scan profile creation form that allows you to quickly validate your settings and ensure your scan profile is correctly set up before launching. This enhancement helps you save time and avoid potential errors by allowing you to review all your settings in real-time. Clipboard-20251030-145314-667.gif

What’s New:

  • Streamed Validation: When validating configurations, such as Browser Authentication, screenshots and results are now streamed progressively. This means you can see feedback in real-time, rather than waiting for the entire process to finish, giving you quicker insights and enabling adjustments on the fly.
  • Validate Before Profile Creation: You can now validate your settings before creating a scan profile or integrating it with other systems. This ensures that everything is properly configured, reducing the likelihood of issues when the scan starts.

How to Use:

Once you’ve set up your new scan profile, simply click on the Test Configuration button. This will trigger the validation process, allowing you to review and adjust key settings such as authentication, scheduling, rate limits, and more before finalizing your scan setup.

image.png

#134 · New "Create New Scan Profile" Form

We’re excited to introduce an improved "Create New Scan Profile" form that addresses several key customer pain points. Users previously had to navigate through settings after creating an app to configure their scans, but now, this process is simplified, allowing for a much more in-depth setup right from the start.

image.png

Addressing Your Pain Points

Many of our users requested a more comprehensive way to set up their scans when creating a new scan profile, instead of configuring them separately through the settings later on. Here are the key features that were previously lacking but are now included in the new workflow:

  • Configure Advanced Authentication: Set up advanced authentication configurations during profile creation, including custom login page URLs, usernames, and passwords.
  • Create Profiles Without Starting the Scan: Scan profiles can be created without automatically starting the scan.
  • Configure Safety Rules: Check the box during scan profile setup to only perform read-only and safe operations during scans
  • Rate Limiting and Scheduling During Profile Creation: Configure scan rate limiting and set scheduling preferences directly while creating the profile, saving time and making setup smoother.
  • Fetch API Schema from Different Locations: Fetch API schemas from locations other than the app’s schema—useful if the API schema is stored separately.

All of these new creation steps are available via Escape API.

image.png

This new form simplifies and streamlines the process of creating and configuring scan profiles, ensuring that you can set up your scans with all necessary parameters from the start.

#133 · Scan Visualization by Time Period

We’ve introduced a new improvement that allows you to visualize scans finished within a selected time period. You can now filter and view scans run within specific timeframes, such as 24 hours, 7 days, 30 days, or all time. By default, the scan data will be displayed for the last 24 hours.

This improvement gives full transparency and audit capabilities of all ASM and DAST scans and makes it easy to track scan activity over different time periods.

image.png

#132 · Enhanced Scan Failure Visibility

We are excited to introduce a new feature that brings instant visibility into scan failures. This feature allows you to easily identify which scans have failed and understand the reasons behind these failures.

Historically, when a scan failed, it was often unclear why, forcing users to dive deep into logs for answers. This new feature provides clear, actionable insights directly from the scan results, saving time and reducing frustration.

image.png

Key Benefits:

  1. Instant Visibility on Failures: Immediately see which scan profiles have failed, enabling you to prioritize troubleshooting efforts and reduce downtime.
  2. Actionable Insights for Faster Investigation: View detailed failure information, including direct links to event logs, to help you investigate the root causes quickly and efficiently.
  3. Accessible Through API or within the Escape Platform: All failure feedback is available via our public API, making it easy to integrate into your existing tools and workflows. You can also view failure details either on a summary page or as alerts on a list of scan profiles.

image.png

image.png

  1. Smarter Configuration Management: Detect misconfigurations or incomplete scan setups early, saving time for both users and support teams in preventing recurring issues.

Types of Issues Flagged

With the new scan failure visibility, users will now see failures categorized by key areas, including:

  • Private Location Failures (e.g., unreachable proxies or locations)
  • Authentication Failures (e.g., configuration errors, invalid credentials)
  • Configuration Issues (e.g., rate limits, invalid patterns, permission errors)
  • Schema and Service Unreachability (e.g., invalid GraphQL/OpenAPI schemas, unreachable assets)
  • Timeout and Integration Errors (e.g., scan duration limits, CAPTCHA or security blocks)

These categories will help you quickly identify the nature of the problem, so you can act swiftly to resolve the issue.

Next Steps

  1. Provide Feedback

    We encourage all Escape users to provide feedback on the errors being reported to help us refine and improve the feedback mechanism. This ensures that the issues flagged are helpful and relevant! Feel free to reach out to your dedicated Escape contact via in-app chat, email, or on Slack/Teams channels.

  2. Upcoming Feature - Automated Notifications

    In November, we’ll be introducing automated outbound notifications for specific scan failures. This will allow users to receive immediate alerts when a scan encounters an issue, streamlining the debugging process.

    Stay tuned for more updates! And for now, stay secure! Your Escape team

#131 · Support for Pre-Login Actions in Browser Agent

Web apps with cookie consent popups or buttons to access the login page often require manual intervention or can break the testing process.

Now, the Escape scanner can automatically handle these pre-login actions when configured in the Browser Agent settings, just like it does with post-login actions. Say goodbye to pre-login hurdles—the scanner takes care of it for you, ensuring a smoother testing experience.

Here is an example of how you can set this up:

presets:
  - type: browser_agent
    users:
      - username: test@test.test
        password: testtest
        pre_login_actions: 
          - action: click
            locator: Dismiss
    login_url: https://shop.escape.tech/#/login

For more information, check out the Browser Agent documentation.

#130 · Multi-user testing is now available for Web Apps

We’re thrilled to announce the availability of multi-user testing for Web Apps, enabling you to run symmetric and asymmetric permission testing to ensure your multi-tenant environments are properly isolated and secure.

These new capabilities extend our previous update, including the ability to configure tenant isolation rules with natural language and implement custom detection rules for precision targeting of vulnerabilities. Together, these features provide a more tailored and effective solution for securing your system.

Why is Multi-User Testing Important?

For multi-tenant SaaS applications, ensuring proper tenant isolation and access control is essential. Vulnerabilities like Broken Access Control (BAC) or Cross-User Data Breaches can arise when tenants or users with the same or different permissions inadvertently access unauthorized data. Our new multi-user testing capabilities are designed to help you detect these vulnerabilities before they become security risks.

What’s New?

We’ve introduced two powerful multi-user testing approaches to Web Apps that ensure both symmetric and asymmetric permission scenarios are tested and validated for tenant isolation:

1. Symmetric Permission Tenant Isolation Testing

With symmetric permission testing, you can validate that users with identical roles or permission levels across tenants cannot access each other’s data. This approach is critical for applications where users across different tenants have the same privileges but should still be properly isolated.

When This Applies:

  • Multi-Tenant SaaS Applications: Ensure that, for example, Company A’s sales reps can’t access Company B’s customer data, even though both have identical "Sales Rep" permissions.
  • Financial Services Platforms: Prevent standard account holders from accessing each other’s transaction histories.
  • Educational Platforms: Ensure students in different courses cannot view each other’s grades, submissions, or personal information.

How It Works:

A single scan profile is configured with a primary user for exploration and secondary users as exploitation targets. Escape tests for Broken Access Control, Tenant Isolation, and Cross-User Data Breaches by attempting to replay the primary user’s requests using secondary users’ credentials. Since permission levels are symmetric, this approach ensures violations are automatically detected in both directions.

2. Asymmetric Permission Bidirectional Testing

Asymmetric permission testing is designed for scenarios where users have different privilege levels, such as admins, standard users, or privileged roles in different domains. This type of testing validates that unauthorized access is prevented in both directions between users of different permission levels.

When This Applies:

  • Enterprise Applications with RBAC: Ensure that standard users cannot access admin endpoints, while admins cannot access standard user data.
  • Healthcare Systems: Ensure that physicians cannot access admin records, while admins cannot view sensitive clinical data.
  • Financial Platforms: Verify that portfolio managers can’t access compliance officer audit trails and vice versa.

How It Works:

This testing requires two separate scan profiles to test both directions of authorization:

  • Scan Profile A: Primary user is configured for exploration, secondary user as the target.
  • Scan Profile B: Secondary user becomes the primary user, with the first user as the target.

This bidirectional approach captures vulnerabilities from both perspectives, ensuring all potential weaknesses are identified.

Integration with Natural Language Processing (NLP) Queries and Custom Detection Rules

We’ve made it simpler than ever to configure tenant isolation rules with Escape’s agentic system. Now, whether you are configuring symmetric or asymmetric permission tests, you can define tenant isolation rules using natural language as mentioned in the previous note—without needing to write complex code.

For complex scenarios where user-specific variations (e.g., timestamps, metadata, or localized data) need to remain tenant-isolated, custom detection rules allow you to precisely target authorization boundaries. This ensures that even complex, nuanced data—such as user-specific metadata—remains securely isolated across tenants.

More Information

For a detailed guide on configuring multi-user testing, tenant isolation with natural language rule generation, and custom detection rules, visit our full documentation:

This update gives you greater control, flexibility, and the ability to proactively enforce tenant isolation and authorization boundaries across your web applications and APIs.

And as always, stay secure! :)