Skip to content

2025

#132 · Enhanced Scan Failure Visibility

We are excited to introduce a new feature that brings instant visibility into scan failures. This feature allows you to easily identify which scans have failed and understand the reasons behind these failures.

Historically, when a scan failed, it was often unclear why, forcing users to dive deep into logs for answers. This new feature provides clear, actionable insights directly from the scan results, saving time and reducing frustration.
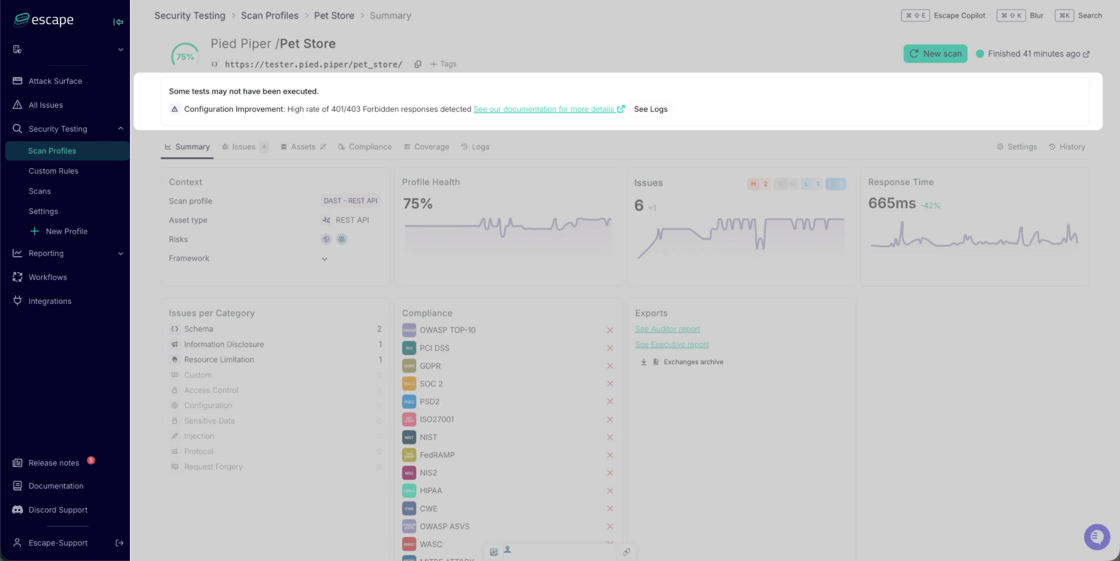
image.png

Key Benefits:

  1. Instant Visibility on Failures: Immediately see which scan profiles have failed, enabling you to prioritize troubleshooting efforts and reduce downtime.
  2. Actionable Insights for Faster Investigation: View detailed failure information, including direct links to event logs, to help you investigate the root causes quickly and efficiently.
  3. Accessible Through API or within the Escape Platform: All failure feedback is available via our public API, making it easy to integrate into your existing tools and workflows. You can also view failure details either on a summary page or as alerts on a list of scan profiles.
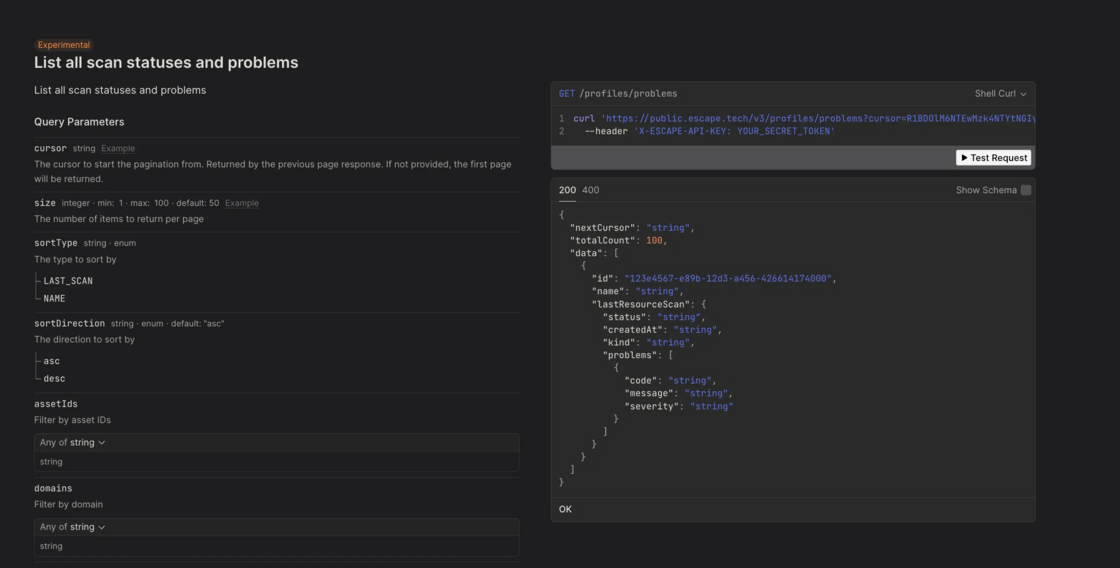
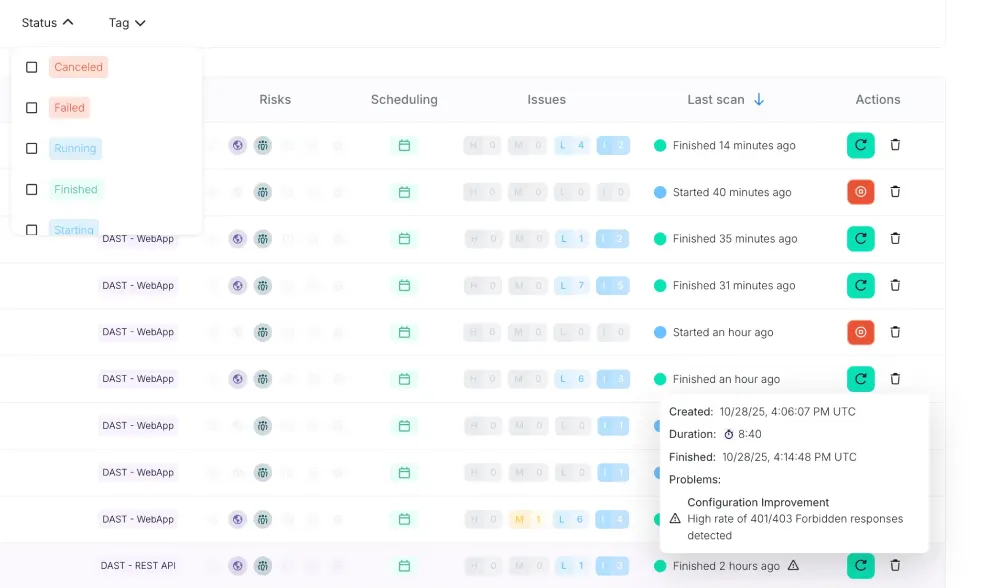
image.png

image.png

  1. Smarter Configuration Management: Detect misconfigurations or incomplete scan setups early, saving time for both users and support teams in preventing recurring issues.

Types of Issues Flagged

With the new scan failure visibility, users will now see failures categorized by key areas, including:

  • Private Location Failures (e.g., unreachable proxies or locations)
  • Authentication Failures (e.g., configuration errors, invalid credentials)
  • Configuration Issues (e.g., rate limits, invalid patterns, permission errors)
  • Schema and Service Unreachability (e.g., invalid GraphQL/OpenAPI schemas, unreachable assets)
  • Timeout and Integration Errors (e.g., scan duration limits, CAPTCHA or security blocks)

These categories will help you quickly identify the nature of the problem, so you can act swiftly to resolve the issue.

Next Steps

  1. Provide Feedback

    We encourage all Escape users to provide feedback on the errors being reported to help us refine and improve the feedback mechanism. This ensures that the issues flagged are helpful and relevant! Feel free to reach out to your dedicated Escape contact via in-app chat, email, or on Slack/Teams channels.

  2. Upcoming Feature - Automated Notifications

    In November, we’ll be introducing automated outbound notifications for specific scan failures. This will allow users to receive immediate alerts when a scan encounters an issue, streamlining the debugging process.

    Stay tuned for more updates! And for now, stay secure! Your Escape team
#131 · Support for Pre-Login Actions in Browser Agent

Web apps with cookie consent popups or buttons to access the login page often require manual intervention or can break the testing process.

Now, the Escape scanner can automatically handle these pre-login actions when configured in the Browser Agent settings, just like it does with post-login actions. Say goodbye to pre-login hurdles—the scanner takes care of it for you, ensuring a smoother testing experience.

Here is an example of how you can set this up:

presets:
  - type: browser_agent
    users:
      - username: test@test.test
        password: testtest
        pre_login_actions: 
          - action: click
            locator: Dismiss
    login_url: https://shop.escape.tech/#/login

For more information, check out the Browser Agent documentation.

#130 · Multi-user testing is now available for Web Apps

We’re thrilled to announce the availability of multi-user testing for Web Apps, enabling you to run symmetric and asymmetric permission testing to ensure your multi-tenant environments are properly isolated and secure.

These new capabilities extend our previous update, including the ability to configure tenant isolation rules with natural language and implement custom detection rules for precision targeting of vulnerabilities. Together, these features provide a more tailored and effective solution for securing your system.

Why is Multi-User Testing Important?

For multi-tenant SaaS applications, ensuring proper tenant isolation and access control is essential. Vulnerabilities like Broken Access Control (BAC) or Cross-User Data Breaches can arise when tenants or users with the same or different permissions inadvertently access unauthorized data. Our new multi-user testing capabilities are designed to help you detect these vulnerabilities before they become security risks.

What’s New?

We’ve introduced two powerful multi-user testing approaches to Web Apps that ensure both symmetric and asymmetric permission scenarios are tested and validated for tenant isolation:

1. Symmetric Permission Tenant Isolation Testing

With symmetric permission testing, you can validate that users with identical roles or permission levels across tenants cannot access each other’s data. This approach is critical for applications where users across different tenants have the same privileges but should still be properly isolated.

When This Applies:

  • Multi-Tenant SaaS Applications: Ensure that, for example, Company A’s sales reps can’t access Company B’s customer data, even though both have identical "Sales Rep" permissions.
  • Financial Services Platforms: Prevent standard account holders from accessing each other’s transaction histories.
  • Educational Platforms: Ensure students in different courses cannot view each other’s grades, submissions, or personal information.

How It Works:

A single scan profile is configured with a primary user for exploration and secondary users as exploitation targets. Escape tests for Broken Access Control, Tenant Isolation, and Cross-User Data Breaches by attempting to replay the primary user’s requests using secondary users’ credentials. Since permission levels are symmetric, this approach ensures violations are automatically detected in both directions.

2. Asymmetric Permission Bidirectional Testing

Asymmetric permission testing is designed for scenarios where users have different privilege levels, such as admins, standard users, or privileged roles in different domains. This type of testing validates that unauthorized access is prevented in both directions between users of different permission levels.

When This Applies:

  • Enterprise Applications with RBAC: Ensure that standard users cannot access admin endpoints, while admins cannot access standard user data.
  • Healthcare Systems: Ensure that physicians cannot access admin records, while admins cannot view sensitive clinical data.
  • Financial Platforms: Verify that portfolio managers can’t access compliance officer audit trails and vice versa.

How It Works:

This testing requires two separate scan profiles to test both directions of authorization:

  • Scan Profile A: Primary user is configured for exploration, secondary user as the target.
  • Scan Profile B: Secondary user becomes the primary user, with the first user as the target.

This bidirectional approach captures vulnerabilities from both perspectives, ensuring all potential weaknesses are identified.

Integration with Natural Language Processing (NLP) Queries and Custom Detection Rules

We’ve made it simpler than ever to configure tenant isolation rules with Escape’s agentic system. Now, whether you are configuring symmetric or asymmetric permission tests, you can define tenant isolation rules using natural language as mentioned in the previous note—without needing to write complex code.

For complex scenarios where user-specific variations (e.g., timestamps, metadata, or localized data) need to remain tenant-isolated, custom detection rules allow you to precisely target authorization boundaries. This ensures that even complex, nuanced data—such as user-specific metadata—remains securely isolated across tenants.

More Information

For a detailed guide on configuring multi-user testing, tenant isolation with natural language rule generation, and custom detection rules, visit our full documentation:

This update gives you greater control, flexibility, and the ability to proactively enforce tenant isolation and authorization boundaries across your web applications and APIs.

And as always, stay secure! :)

#129 · Enhancing Tenant Isolation Testing: Generate Rules with Natural Language in Escape DAST

We’re excited to announce a new improvement to tenant isolation testing: configuration of tenant isolation testing is now available for both APIs and Web Apps and you get the ability to generate tenant isolation detection rules using natural language!

We’ve been working hard to give our customers more precise control over their configurations, making it easier to manage and enforce tenant isolation in your environment.

Why is Tenant Isolation Testing Important?

Most of today’s SaaS structures are multi-tenant environments. Making sure that each tenant’s data and resources are securely isolated from others is critical. Weaknesses or misconfigurations in tenant isolation can lead to unauthorized access or data leaks between tenants, compromising the security of the entire system. That’s why we’ve focused on providing you with the tools to maintain strict isolation and prevent any potential risks.

What’s New?

We’ve extended the ability for tenant isolation checks to both APis and web apps, allowing you to perform more granular inspections. With these improvements, you can be confident that your environment is fully isolated and secure.

Natural Language Rule Generation

One of the standout features we’re introducing is the ability to use natural language to generate tenant isolation detection rules. With the integration of LLMs, Escape customers can now write detection rules in plain language, without needing to know complex syntax or code. This makes creating custom detection rules more accessible and intuitive than ever before.

How does it work?

  1. Write a natural language query describing the tenant isolation rule you want to create. Here is a configuration example (Identification issue):
security_tests:
tenant_isolation:
main_user: 'user1' # Primary user for exploration and baseline establishment
natural_language_rule: |
Ensure that a user's notes cannot be accessed by other users.
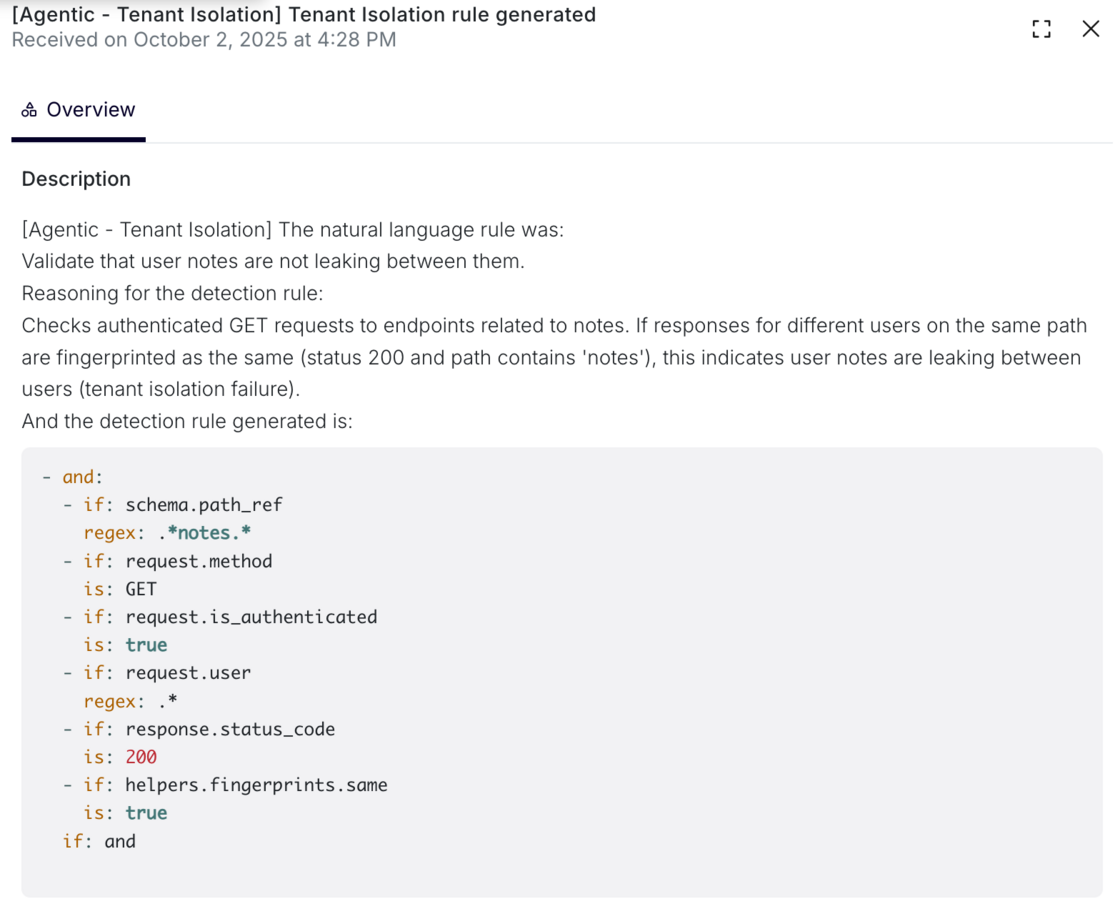
  1. The natural language description is then processed by Escape's agentic system, which generates a set of detection rules that validate the specified authorization boundary. The AI-generated detection logic is transparently displayed during scan execution:

nlp-scan.png

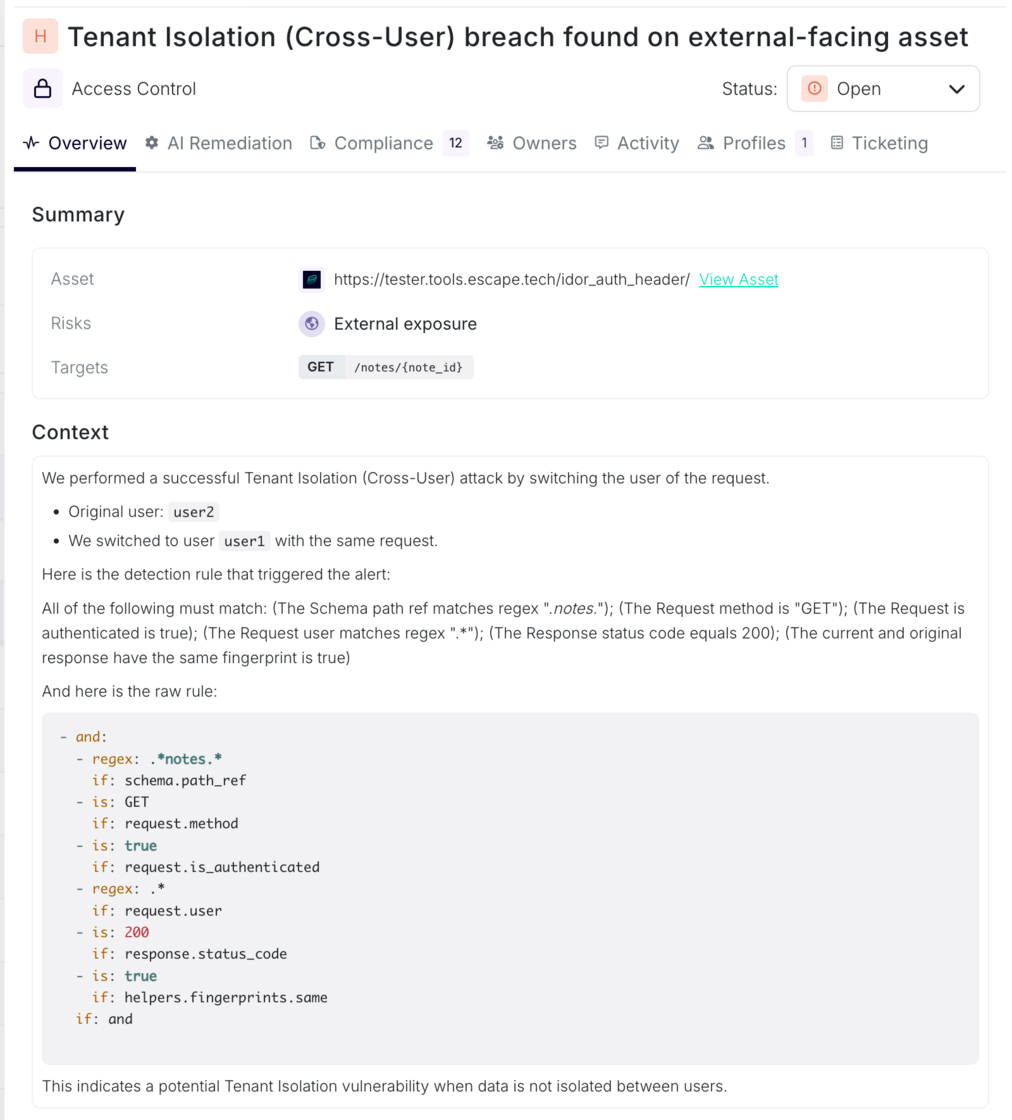
  1. When a tenant isolation violation is detected, the specific rule that triggered the finding is displayed alongside the vulnerability details: nlp-2.png

Log Search and Rule Alerts

Once the detection rule is generated, you can easily track its activity through the logs. To monitor the generated detection rule:

  1. Search the logs for: [Agentic - Tenant Isolation]

agentic-search.png

  1. You’ll find the logs detailing the generation of the tenant isolation rule.

Additionally, any relevant alerts will now contain the generated rule, making it even easier to manage and respond to potential isolation violations in your environment.

When to Use This Approach:

This method is recommended when authorization boundaries can be clearly articulated in business logic terms, and when rapid configuration without deep technical rule definition is desired. It is particularly effective for domain-specific isolation requirements that would be cumbersome to express in low-level detection predicates.

More Information

For a detailed overview and step-by-step guide on configuring and using the tenant isolation detection rules, check out our documentation:

Multi-User Testing and Tenant Isolation Documentation

This update brings greater control and flexibility to our customers, enabling you to take proactive steps in ensuring that tenant isolation is properly enforced across your systems.

#128 · Save and Share Your Favorite Scan Profile Filters as Views

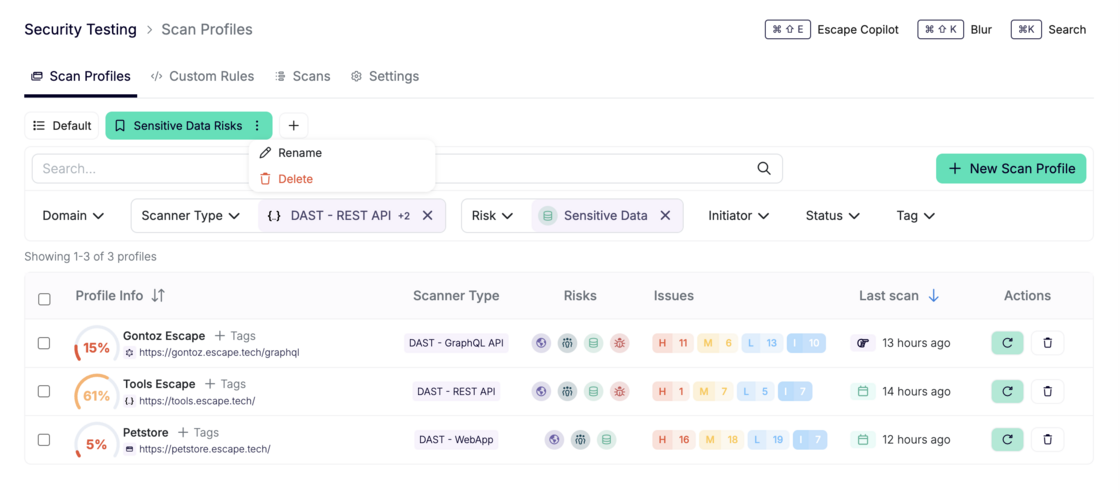
We’ve just rolled out a new feature that lets you save your favorite scan profile filter combinations as custom views for quick access and easy sharing! Now, you can tailor your workflow to fit your needs and interact with your scan data more efficiently. Screenshot 2025-10-21 at 10.16.58.png

Key Features:

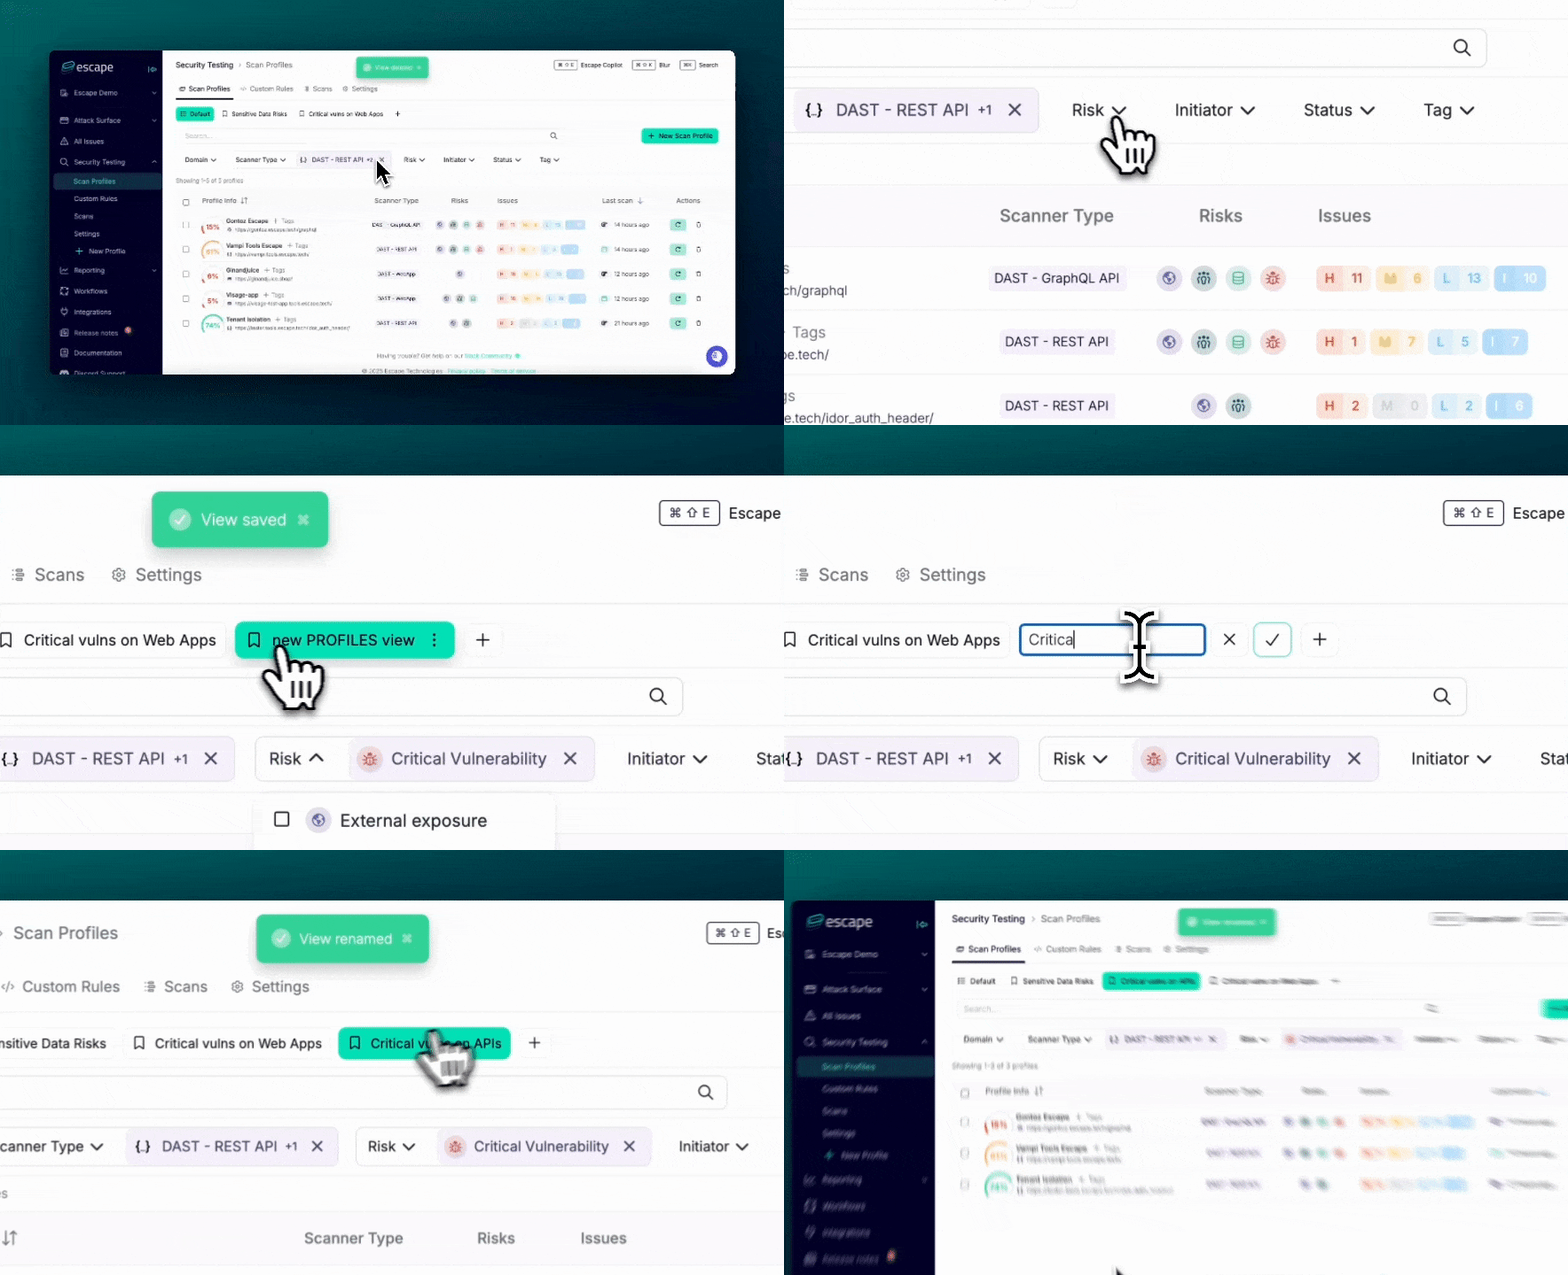
  • Save Your Favorite Filters: You can now save filter combinations (e.g., scanner type, risk level, initiator, status, tag, etc.) as views, making it easy to access your personalized scan tables at any time.
  • Share Links with Pre-filled Filters: Want to share your specific view with others? Simply build a filter and copy your link, and it will include all your filter settings as URL parameters—allowing others to see exactly what you see, no setup required.
  • Reorder Views: Organize your saved views with drag-and-drop functionality. Rearrange them to match your preferred order and keep your workflow seamless.

How to Access:

  1. Go to: app.escape.tech/profiles
  2. Create and save your custom views based on the filter combinations you use most.
  3. Share the link with your team or stakeholders, and drag-and-drop your views for easy customization!

Clipboard-20251021-084204-155.gif

We hope that this update will help you and your team work faster and more collaboratively by streamlining access to your favorite scan profiles.

What’s next?

And this is just the beginning! In the future, these saved views will be integrated into workflows and reporting, allowing you to apply them in even more areas of your process for enhanced efficiency and consistency.

#127 · New Compliance Frameworks, Standards, and Resources Support

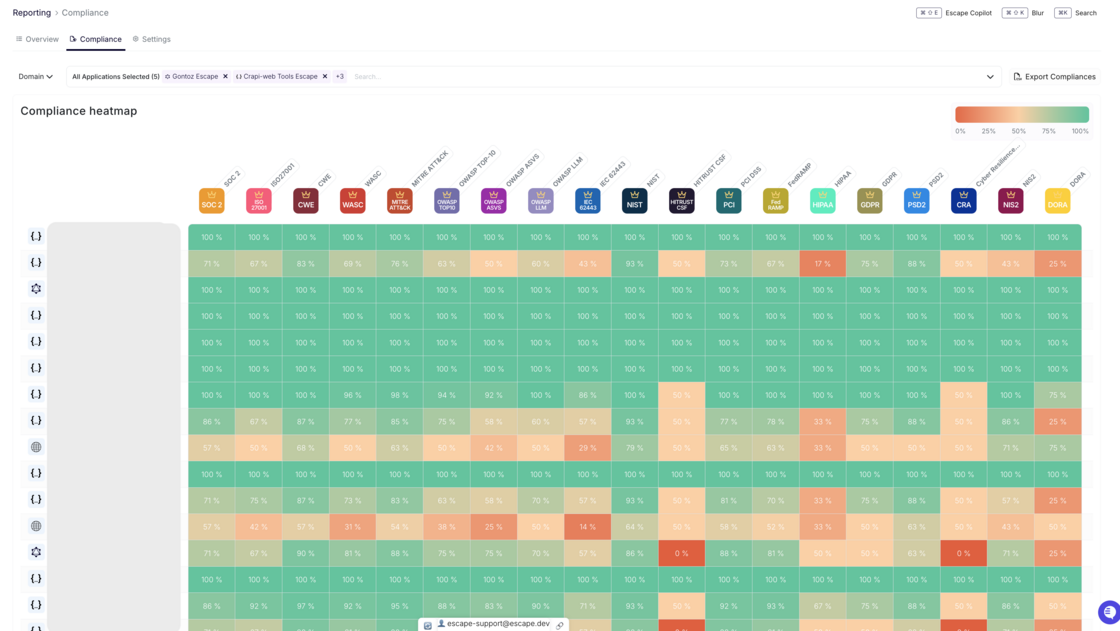
We are excited to announce the addition of 7 new compliance frameworks, standards and resources to our platform! This update helps ensure you have even more options to meet various regulatory and security requirements - whether you’re based in the US or the EU or working internationally.

What's New?

We’ve added support for the following compliance frameworks and resources:

  1. OWASP ASVS - Application Security Verification Standard with requirements for secure development.
  2. WASC - Best-practice security standards for web application security.
  3. MITRE ATT&CK - A knowledge base of adversary tactics, techniques, and procedures (TTPs), helping you understand and defend against cyber threats.
  4. IEC 62443 - Industrial automation and control systems security standards.
  5. HITRUST CSF - A framework for regulatory compliance and risk management in healthcare and beyond.
  6. CRA - EU Cyber Resilience Act, establishing cybersecurity requirements for products with digital elements.
  7. DORA - Digital Operational Resilience Act, ensuring that financial entities can withstand ICT-related disruptions.

7 new compliance.png

Important Notes:

Some of these frameworks are OFF by default to keep your matrix manageable. You can enable them manually from the Reporting Settings page.

A full list of supported compliance standards can be found here.

We hope this update helps streamline your compliance and security efforts. Happy securing!

#126 · Improved Asset Scoping and Monitoring

We’ve introduced an important update to the way we control which assets belong to an organization and, consequently, which assets are scanned and monitored.

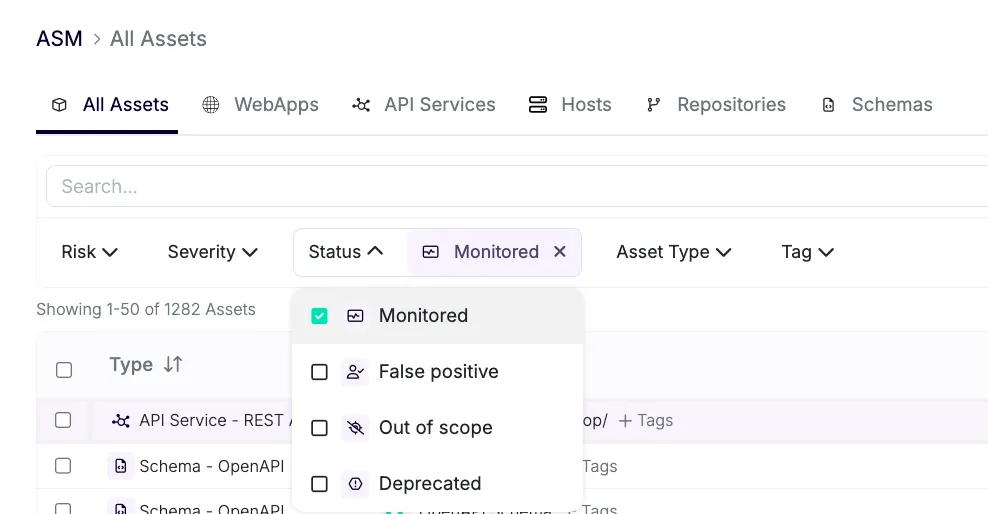
Now, with the new update, the scope leverages the “Status” field of Assets to improve asset tracking and monitoring.

Available Asset Statuses

This field reflects the status of the asset's relationship with your organization and allows you to review and determine whether an asset must be included in the Attack Surface Management (ASM).

You can modify the status of the asset using the drop-down menu in the Filters section.

The following four statuses are supported for assets, and assets can be transitioned from one status to any other status depending on the requirements:

image.png

🟢 MONITORED: Indicates that the asset comes under the responsibility of your organization. Assets in this state are periodically scanned to update their inventory details and their connections are also scanned. This is the default status for all assets discovered by ASM.

🔴 FALSE POSITIVE: Indicates that the asset found by ASM does not belong to your organization. Assets in this state and their successive connections are removed from the scanning process, helping reduce the number of false positives over time and refine asset detection algorithms specific to your organization.

🟡 OUT OF SCOPE: The asset is currently outside the defined scope of monitoring (set manually or through scope rules). Scanning is suspended, and connections are not scanned. Requires review to determine whether it should be brought under monitoring.

⚪ **DEPRECATED:**The asset has been reviewed and is confirmed to be no longer relevant to your organization. Assets in this state and their successive connections are removed from the scanning process.

Default Asset Status Behavior

  • Default Behavior: All manually added domains/assets through DNS integration are set to MONITORED.
  • Monitored Hosts: Assets that belong to a MONITORED host (e.g., same domain or subdomain) are marked as MONITORED and scanned accordingly.
  • Out of Scope Assets: Assets not tied to a MONITORED host are automatically marked as OUT OF SCOPE. You can review them in ASM using filters and decide whether to include them.
  • Custom Statuses: Assets that shouldn’t be scanned can be set to FALSE POSITIVE or DEPRECATED statuses.

Understanding Host Assets and Scope

Here’s how this works in practice:

  • Create Host Assets: Add api.piedpiper.dev and staging.piedpiper.dev as MONITORED hosts. These hosts, and all of their subdomains, are considered in scope.
  • Scope Definition:
    • In Scope: Any subdomain of api.piedpiper.dev or staging.piedpiper.dev (e.g., domain.staging.piedpiper.dev) is now considered in scope and will be monitored.
    • Out of Scope: piedpiper.dev itself, or any domain that doesn't belong to the defined host assets, will be out of scope. For instance, domain.piedpiper.dev will not be monitored, as piedpiper.dev is broader than the defined scope of api.piedpiper.dev and staging.piedpiper.dev.
  • Frontend Assets: When you create a frontend asset like https://piedpiper.dev/, it will output the asset Host piedpiper.dev. Since piedpiper.dev is not a subdomain of api.piedpiper.dev or staging.piedpiper.dev, it will be automatically marked OUT OF SCOPE by default.

What This Means for You

  • Better Control: Now, you can manage your asset scope with greater visibility, review assets via filters, and edit their state to decide whether they should belong to your organization’s scope. You have more control over which assets belong to the organization via the platform.
  • Predictable Monitoring: No more surprise assets being monitored. You can filter by MONITORED assets (the default) and see exactly what’s in scope.
  • Simplified Reviews: OUT OF SCOPE assets are clearly separated, making it easy to decide whether to bring them under monitoring or leave them excluded.

This feature is just the beginning. As always, your feedback is essential in refining and improving the user experience. If you have suggestions or if you encounter any issues or unclear behaviors, please reach out to us!

#125 · AI-Powered Exploit Validation and Remediation Guidelines

We’re excited to introduce a significant enhancement to help you validate discovered vulnerabilities and remediate them.

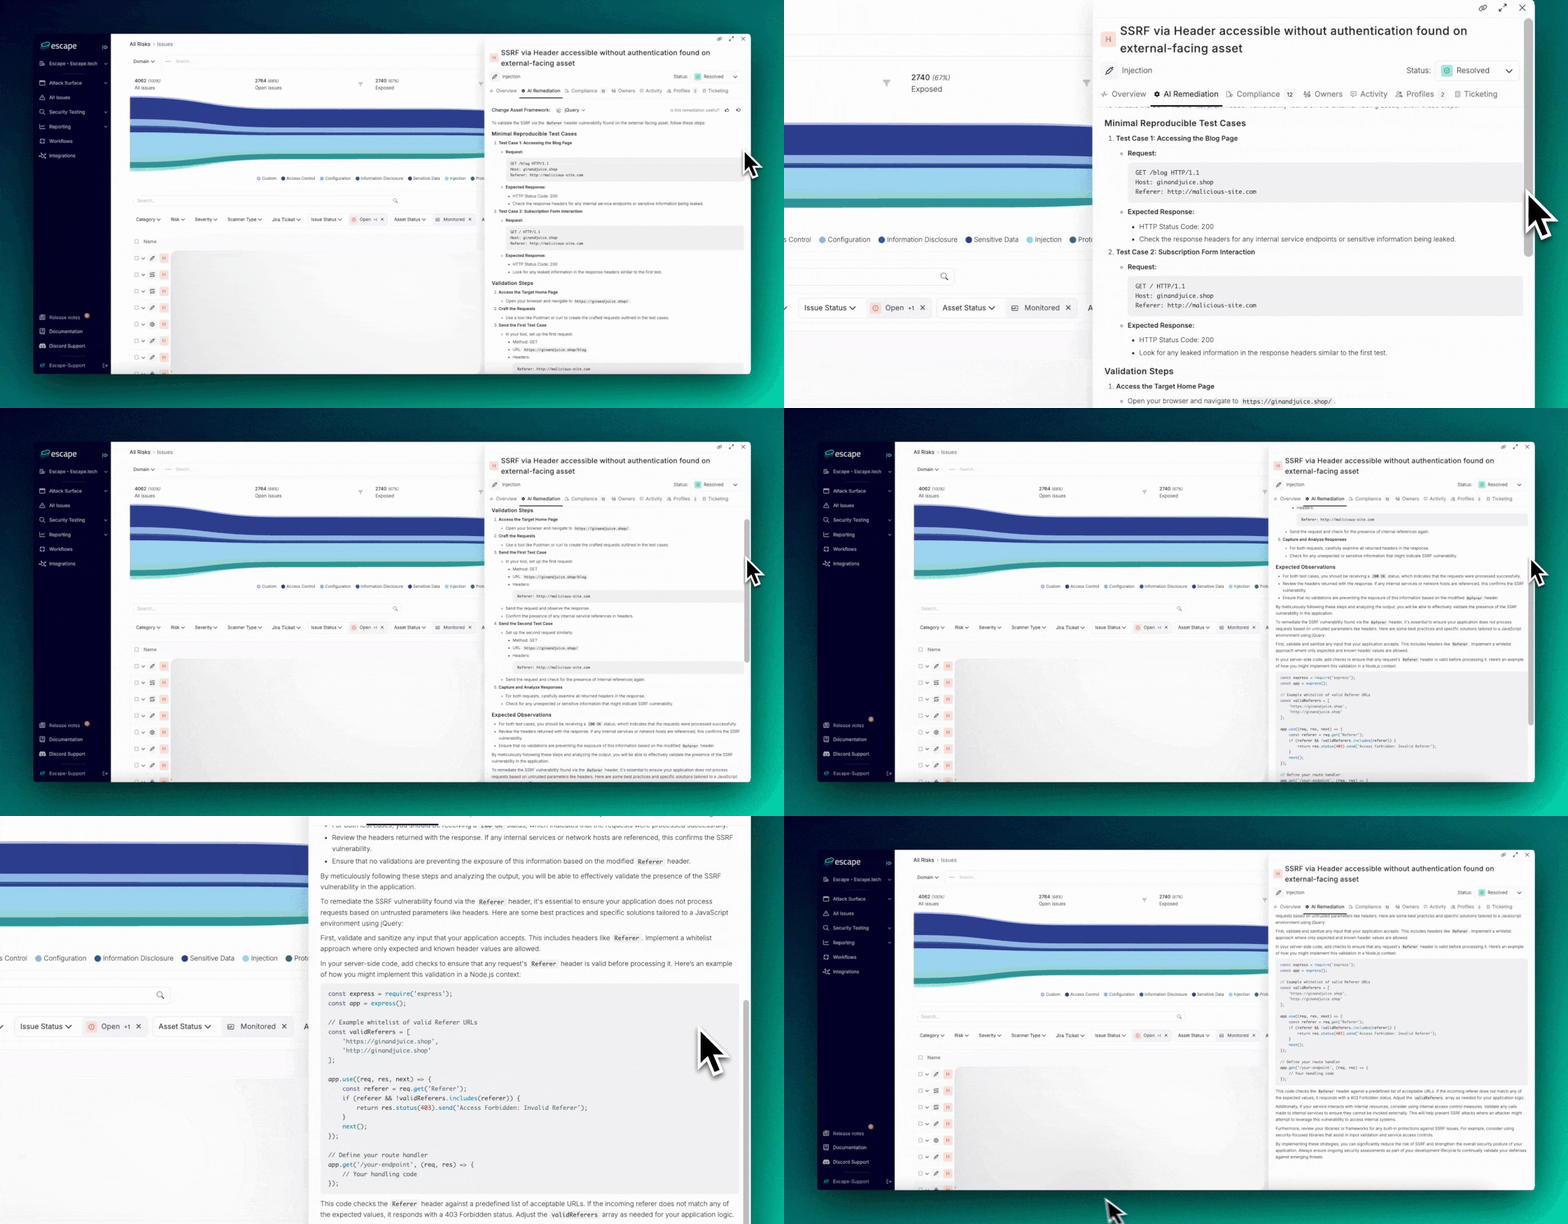
Area.gif

With our AI-powered proof of exploit and remediation guidelines, we’ve evolved from static code snippets tailored to specific frameworks to dynamic, context-aware solutions generated by a specially trained Large Language Model (LLM).

This update puts intelligent remediation and validation front and center, giving teams precise, actionable guidance with proof that the vulnerability can be exploited.

What’s Included:

  • Minimal Reproducible Test Cases: Clear, concise test cases to validate the vulnerability and remediation.
  • Validation Steps: Step-by-step guidance to ensure remediation is correctly implemented.
  • Expected Observations: Key things to expect after remediation to confirm effectiveness.
  • Actionable Remediation Instructions: Contextual, tailored fixes that go beyond generic advice.

Key Benefit:

By leveraging AI, we generate remediation actions tailored to your environment and the specific vulnerability, backed by proof of exploit. This significantly reduces guesswork and ensures that the provided fixes are both effective and applicable. You can apply these solutions with confidence, knowing that the vulnerability has been thoroughly validated and addressed.

For instance, when addressing an SSRF vulnerability triggered by the Referer header in a JavaScript (jQuery) environment, the new guidelines show how this vulnerability can be exploited and will:

  1. Help you whitelist valid Referer headers
  2. Guide you in server-side validation to reject invalid requests
  3. Ensure internal access control to limit exposure to unauthorized service calls

Why This Matters:

These updates streamline remediation and validation, ensuring accuracy, efficiency, and confidence in your security fixes. Teams can spend less time guessing and more time building, while knowing vulnerabilities are effectively mitigated.

Try it out for yourself!

#124 · Global Configuration for Scan Profiles

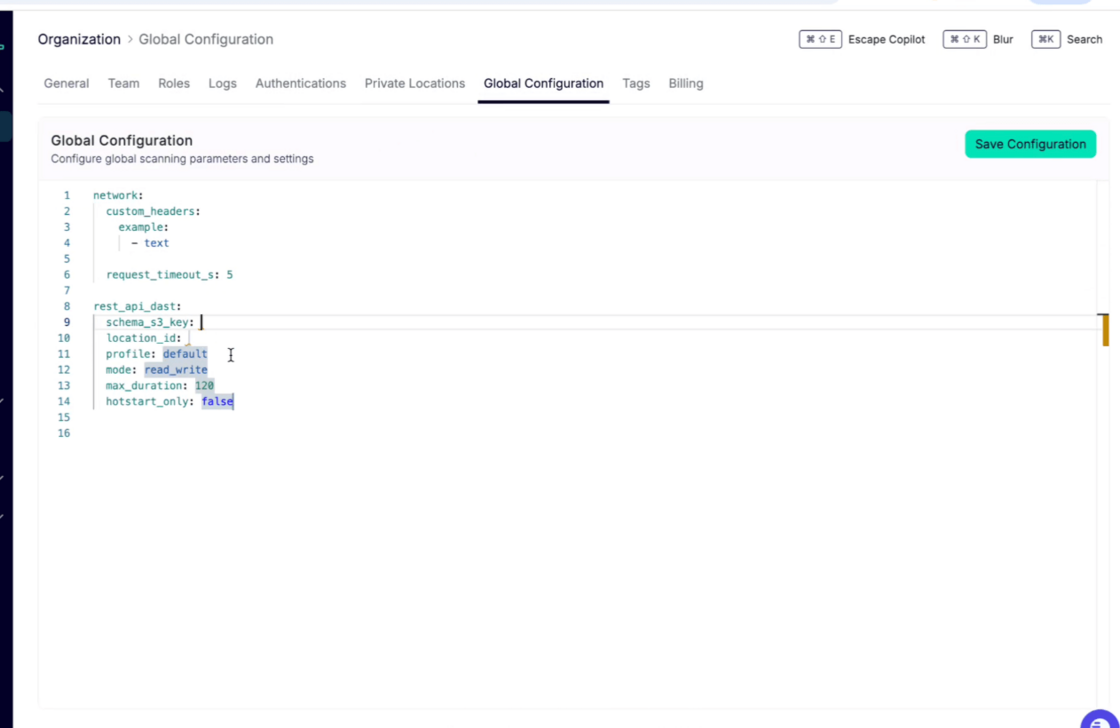
Escape now allows you to define global configurations that apply to all your scan profiles, streamlining the setup process across your organization. These configurations can be set at the organizational level, providing consistency and ease of management for repeated scan types.

Key Features of Global Configurations:

  1. Apply Defaults Across Scan Profiles

    For example, you can define what custom data types (named scalars) should be internal to your company and should never be exposed by any APIs by default and raise an issue if the scalar is found in a git repository in every scan.

  2. Network Configuration: Custom Headers & Timeouts

    On the network side, you can now define custom headers and timeouts globally. This provides better control over request configurations across your scans.

  3. Rate Limiting for APIs

    Rate limiting for APIs is now configurable at the global level. The way it is defined, however, has changed. Now you need to use the following variables to define the required parameters:

    max_duration in s

  4. Override Settings in Individual Scan Profiles

    For enhanced flexibility, you can override global configurations within specific scan profiles. This means:

    • If you need to set a different request timeout for a particular scan, you can now do so.
    • If you need to block specific routes during a scan, you can now easily blacklist pages (e.g., we’re blocking crawling of the "logout" page by default which you can override, or you can customize avoiding other specific routes).

How to Set Up Global Configurations:

To configure these settings, navigate to your Organization Page > General Settings and open the Global Configuration tab. From there, you can define, adjust, and manage your global scan settings.

global-config-example2.png

For more information on how to set Global Configurations up, check out our documentation:

#123 · ASM Documentation Update

We’ve made updates to the ASM documentation to address commonly asked questions and provide more clarity on key aspects of the ASM functionality. The following topics are now covered:

  1. How to restart ASM and ASM scans
  2. When and why asset X is scanned
  3. How to view ASM scans

You can find the updated documentation here.